Roles and authorization
In Nooxl there are the following standard roles, with descending rights:
| Role | Rights |
|---|---|
| Account Owner | Is the person who created an account, or for whom an account was created. The account owner has all rights within this account: he can create new apps and change (design) existing ones, including deleting an App he can create and manage users in his account The Account Owner can never be deprived of admin rights, nor can his account be disabled. A hostile takeover of an account by an admin is therefore not possible. |
| Admin | Has the same permissions as the account owner. An Admin Role can be withdrawn at any time by other Admins or the Account Owner. Admin users can also be disabled. |
| User | Is a user who is neither account owner nor admin. He is therefore a user and his rights are controlled by the standard or workflow permissions . |
On premise user management (no auth0 and no Active Directory integration)
This article is only relevant to you, if you have a Nooxl on premise installation and do not use any of the supported authorization provider (auth0 and Microsoft Active Directory)
Create a new login
Click on you username (1) and then on Manage Logins (2).

Next you see a list of all accounts. To create another one, click on Add Login.

In the next mask please provide the following information:
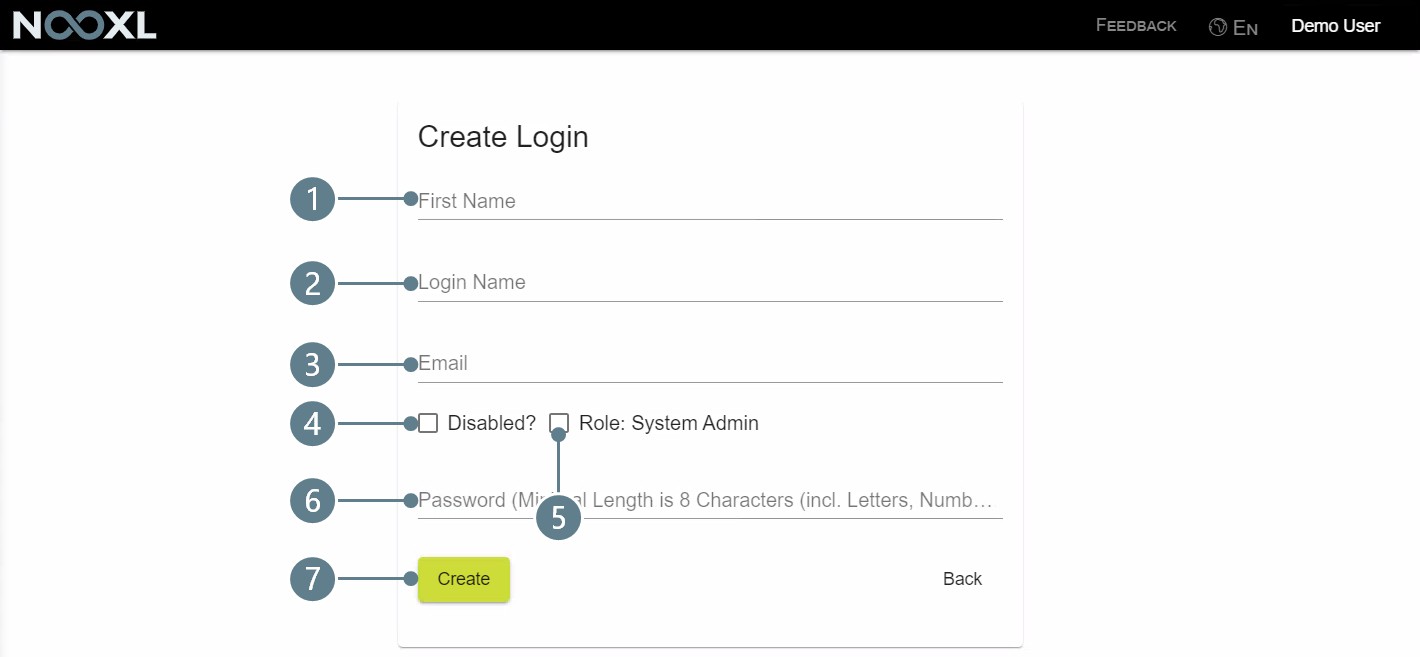
| 1 | First Name | Display name of the user in the system. |
|---|---|---|
| 2 | Login Name | Username used to log into Nooxl. This is most of the time the mail address as well. |
| 3 | Mail address of the user. | |
| 4 | Disabled | With this option you can disable the account. |
| 5 | Role: System Admin | Should the new account have System Admin rights |
| 6 | Password | Initial Password for the login. Users should change those passwords after the first login, but this is not enforced. |
|---|
and then click on Create (7).
In the next step you have to create the user in the standard user administration of Nooxl. How to do this is explained here: Create/invite user
The two pieces of information (Manage Logins and Collaboration) are linked via the e-mail address, which must therefore be identical.
Edit a login
Click on you username (1) and then on Manage Logins (2).
Next you see a list of all accounts. To edit a login click on Edit next to the login.

Delete a login
Click on you username (1) and then on Manage Logins (2).
Next you see a list of all accounts. To delete a login click on Delete next to the login.

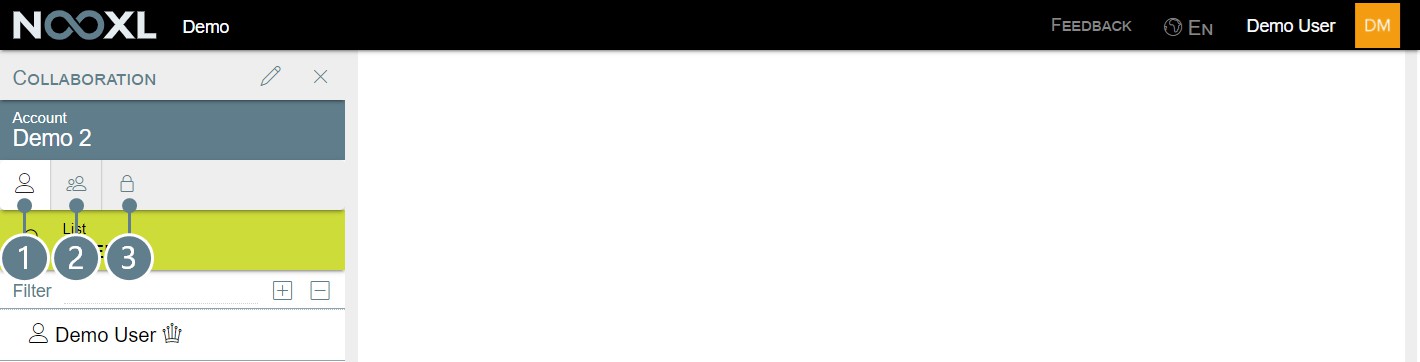
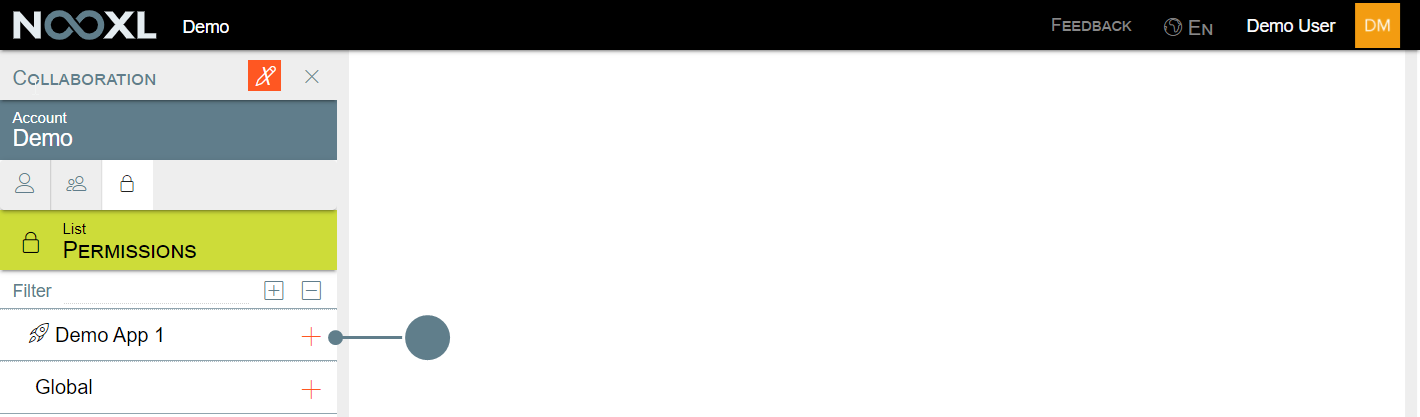
Collaboration (Standard permissions)
All standard permissions in Nooxl are granted in the collaboration area. To access the collaboration area click on the button ![]() in the left navigation pane.
in the left navigation pane.

On three tabs you have the possibility to define users (1), groups (2) and the respective permissions for users and/or groups (3).
User
Go to the collaboration area and switch to the design mode.
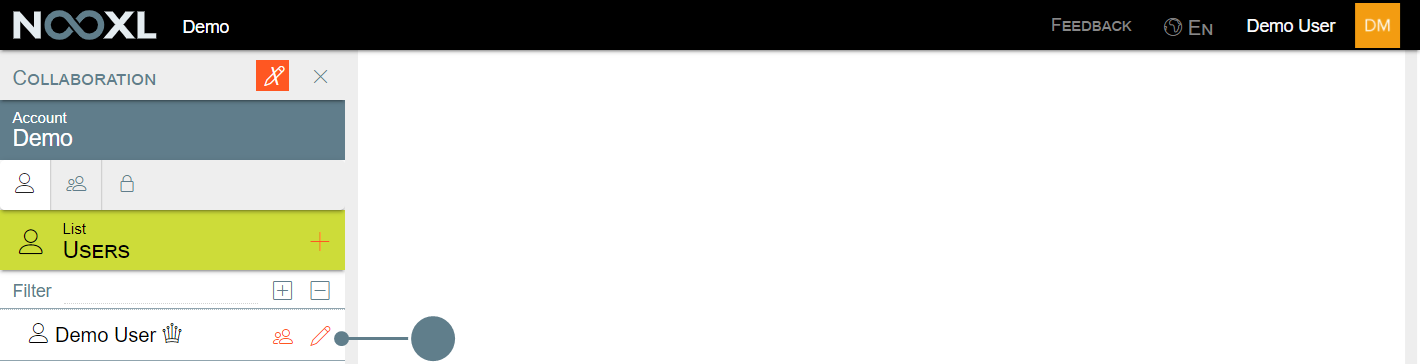
Add an user
To create a new user, click on the red plus icon,

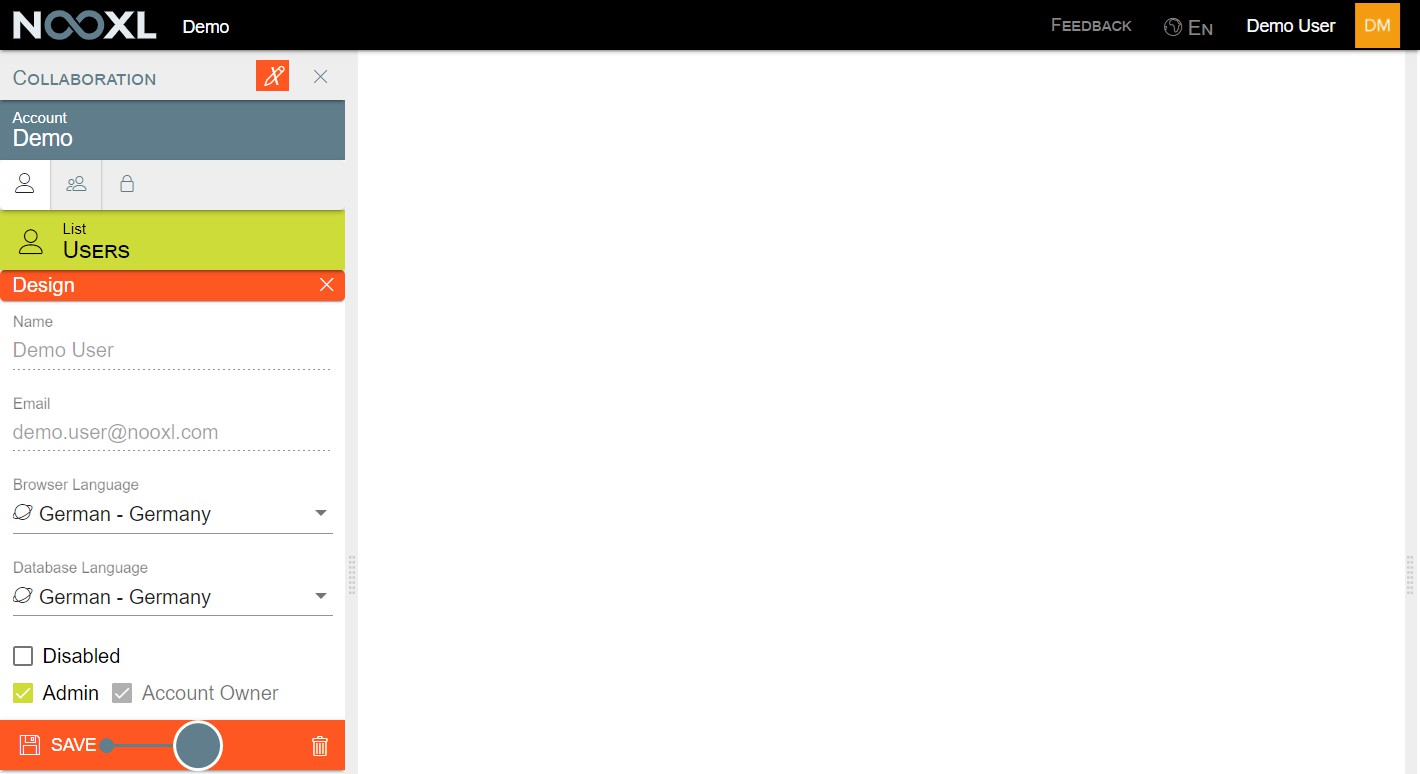
In the opening input mask you have to enter some information. All fields are described below .
Finish your input and save it by clicking on the "SAVE" field.
Edit an user
To edit the properties of an existing user click on the ![]() next to his name.
next to his name.
Change the properties and save you changes by clicking on save.
Delete an user
To delete an existing user click on the ![]() next to his name.
next to his name.
To delete the user click on the trash bin.
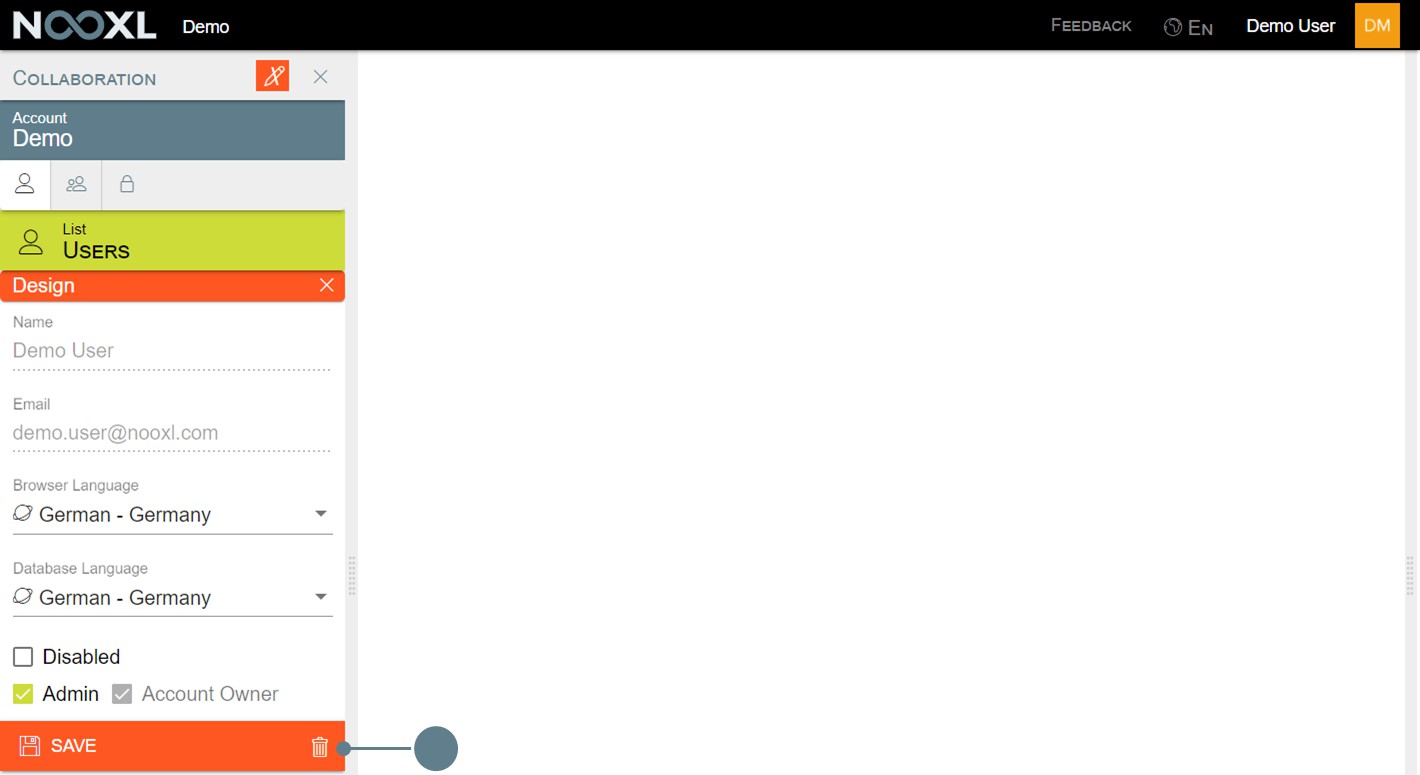
Properties of users
Name
Assign a name for the user. This name will be used in the system as the display name of the user.
The e-mail address of the user. This e-mail address is used to authenticate the user and the user will be informed by this e-mail address if he wants to reset the password.
Browser Language
The Browser Language is currently only available in German and English. This setting controls in which language the Nooxl surface is displayed.
The content of the templates is not directly affected by this setting!
Database Language
Database Language controls the number formats in the templates (thousand point vs. thousand decimal point, date format, time zone, etc.).
In addition, it will be possible later on for designers to read the user's current Database Language in an Excel template to control translations in the Excel file depending on this translation.
Disabled
If a user is disabled, he or she can no longer access the account.
This can be used, for example, if the user is to be unlocked later (e.g. only after all rights have been configured).
At this point you can also revoke all access rights to an already created user on this account by selecting the checkbox "Disabled" without deleting the user directly.
Admin
If the user is an administrator, check the "Admin" checkbox. More detailed information about the rights structure can be found in the chapter Permissions in Nooxl .
Account Owner
The check mark "Account Owner" indicates whether the user is also the owner of the account. This user automatically has administrator rights that cannot be withdrawn.
The Account Owner property is automatically assigned to the user who created the account and is not transferable.
Groups
Groups are used to assign the same rights to several users in Nooxl, so you do not have to define them for each user individually. You can create a group in Nooxl and define the rights for this group, similar to a role in other applications. Then all you have to do is assign the users to this group.
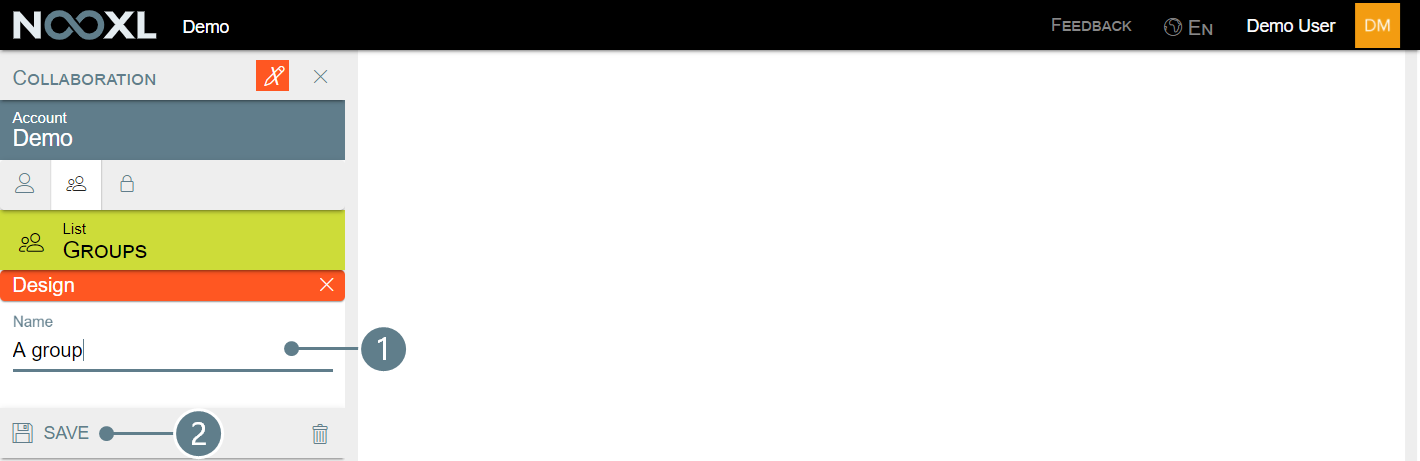
Go to the collaboration area, click on groups (1) and activate the design mode (2).

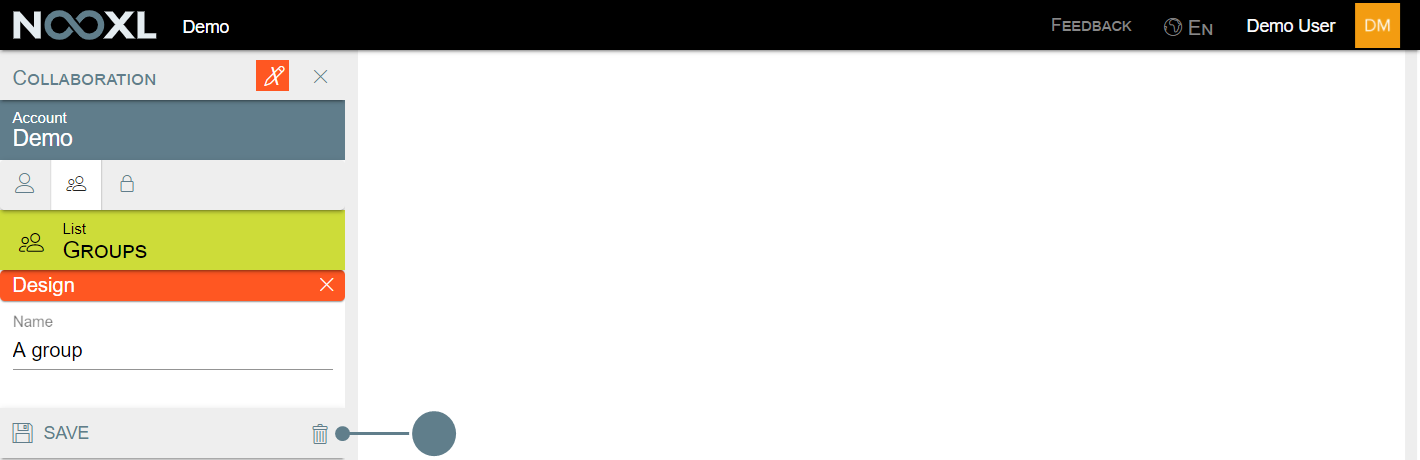
Create a new group
Click on the red plus to create a new group.

In the dialog that now opens, you can assign a group name (1) and save the entry with SAVE (2).
Edit a group
To edit the name of a group click on the ![]() next to the groups name.
next to the groups name.
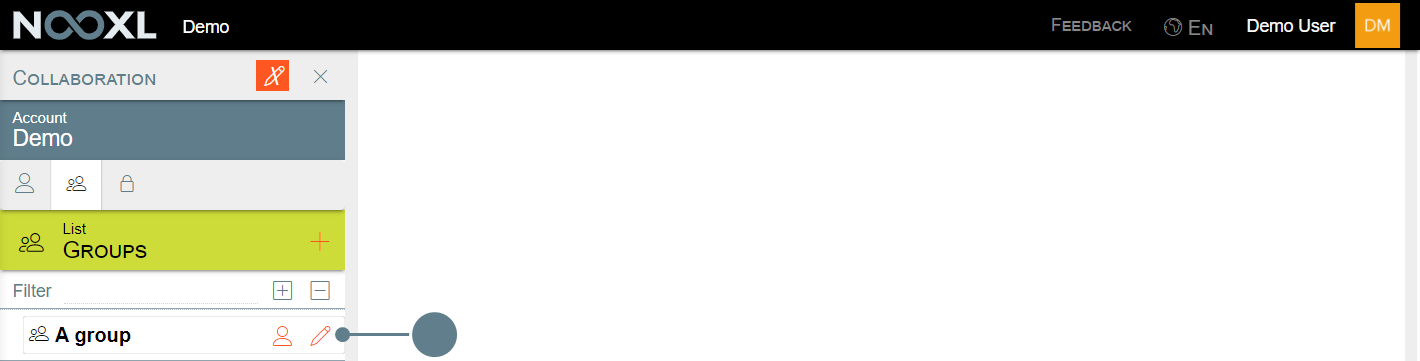
Then you can change the name and save your change.
Delete a group
To delete a group click on the ![]() next to the groups name.
next to the groups name.
Then you can click on the trash bin to delete the group.
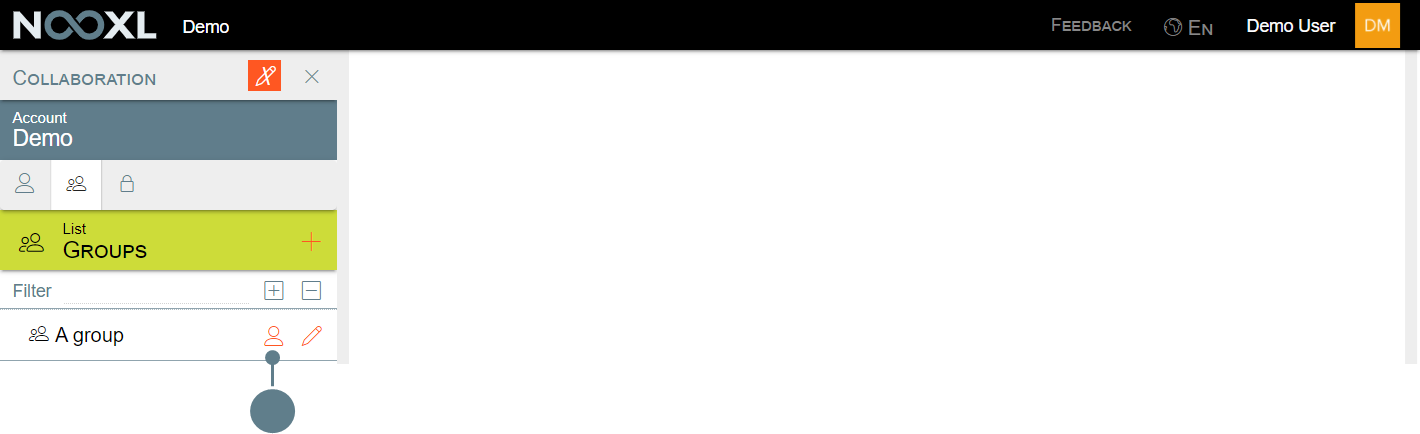
Manage groups and users
Go to the collaboration area, click on groups (1) and activate the design mode (2).
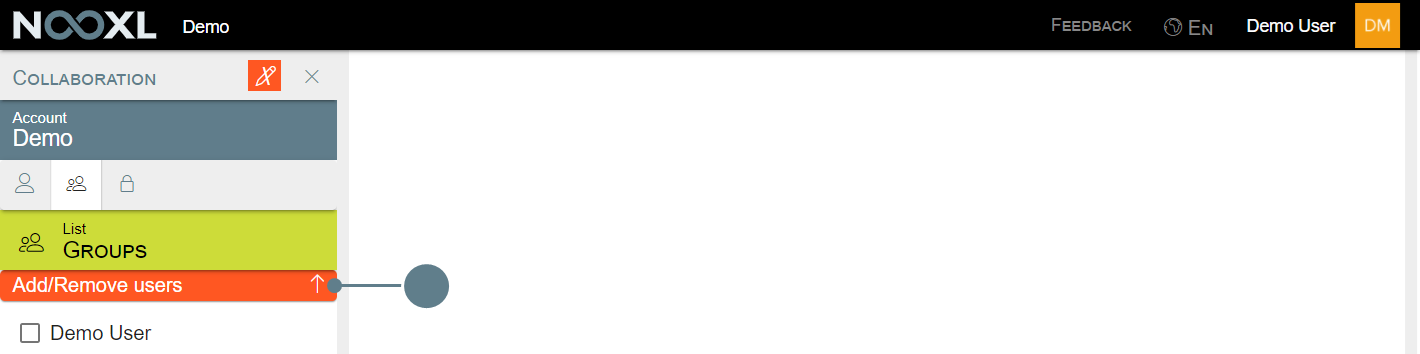
Click on the icon ![]() next to the group you want to add or remove users from.
next to the group you want to add or remove users from.
Check the box for all users which will be part of the group.
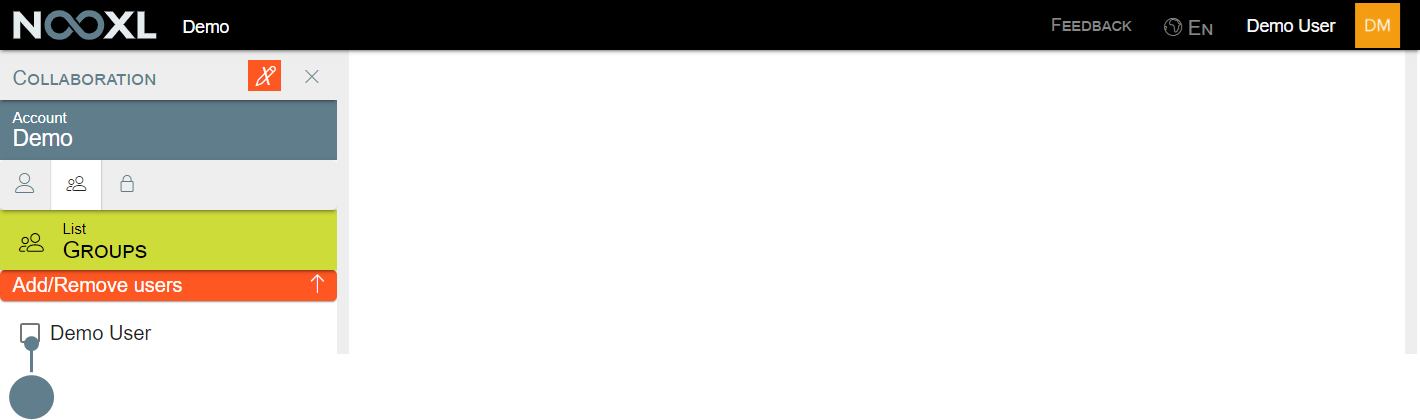
All changes here are immediately effective, there is no separate save button.
Click on the up arrow to leave the group assignment mask.
Assign permissions to groups and users
Go to the collaboration area, click on the tab permissions (1) and turn on the design mode
(2).

In the permissions tab you will see at least two entries: your App and Global. When you assign any permissions on the global level, those will be applied to all apps inside the account. This could for example be handy if you want to create a global designer role in your account.
Create a permission
Click on the red plus to create a new permission.
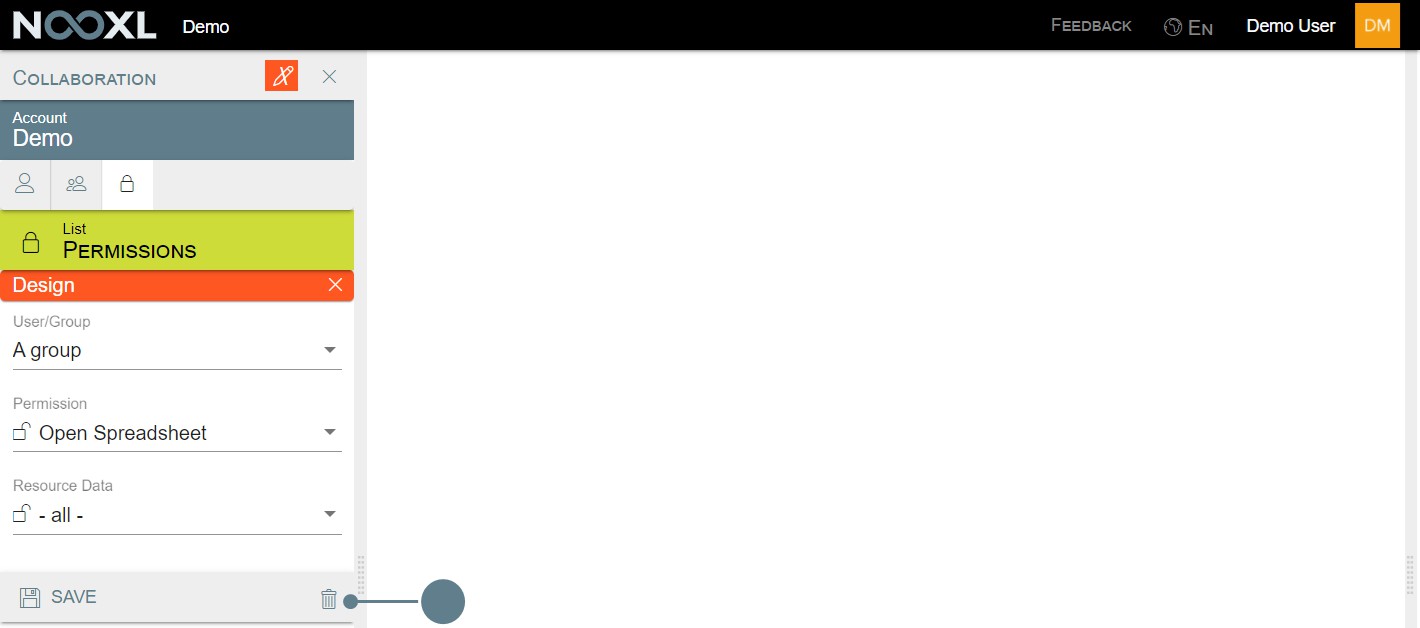
Choose a user or group you want to grant permissions (1) and than choose the permission (2). Depending on the selected permission you have to select the element for which the permission should be valid. After that click save (3).
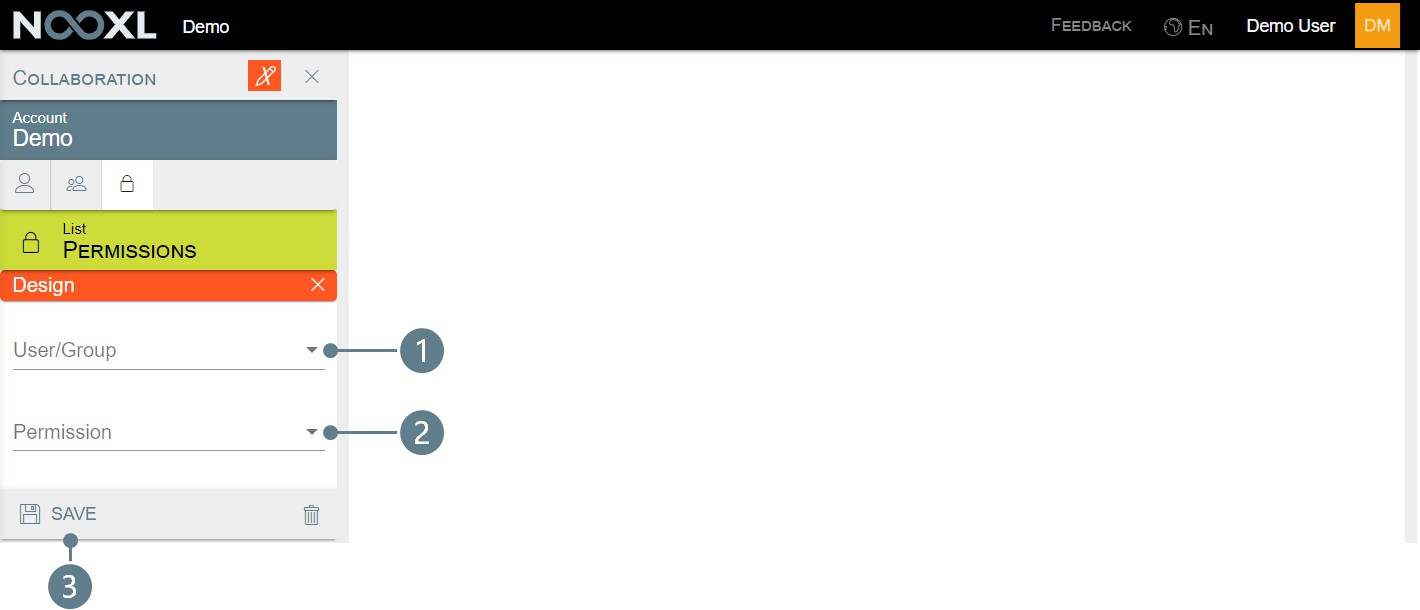
A list of all possible permissions, with a detailed explanation can be found in the chapter Permissions in Nooxl .
Change a permission
To change a permission, click on the ![]() next to the permission.
next to the permission.
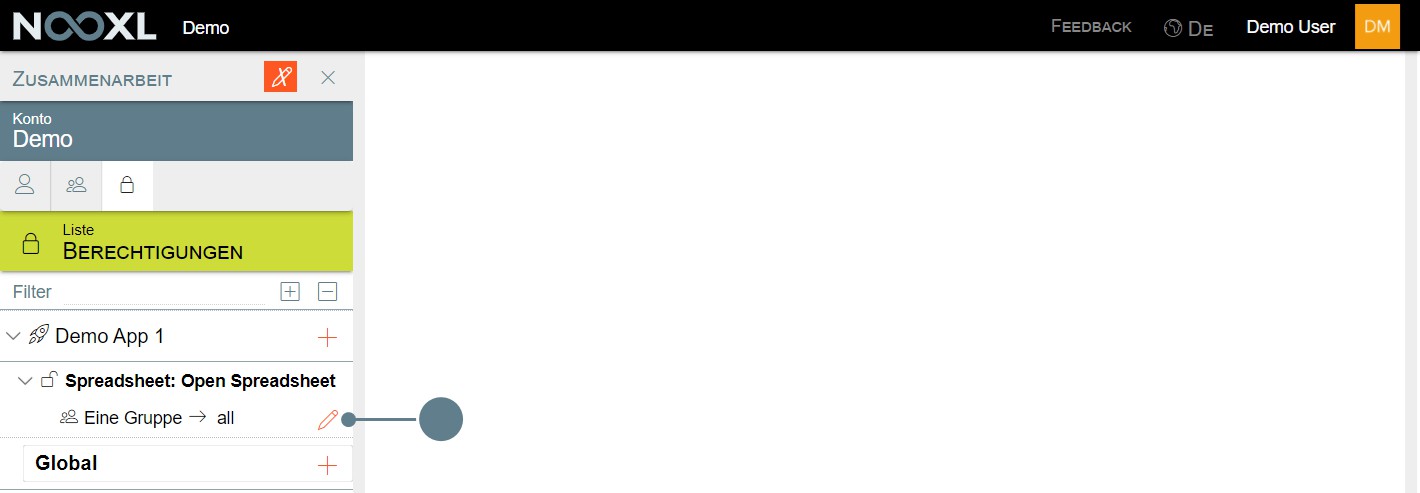
After that you can make your changes and save those.
Delete a permission
To delete a permission, click on the ![]() next to the permission.
next to the permission.
After that click on the trash bin to delete the permission.
Permissions in Nooxl
Below you will find information about the various objects that can be authorized "out of the box" in Nooxl. In addition, it is possible to make the permissions even more granular by applying conditional formatting to input areas for example, in order to also authorize them user-dependently.
Spreadsheet
| Permission | Description |
|---|---|
| Open Spreadsheet | Permission to see a template in the menu on the left and to open the template. |
| Save Spreadsheet | Permission to save an open template. Includes the permission Open Spreadsheet |
| Export Spreadsheet Formula | Permission to export an open template with the Excel formula logic. |
| Invite new external Users to Spreadsheet | Authorized to invite new users via the invitation wizard and set permissions for them.  |
| Permission | Description |
|---|---|
| Invite existing Users to Spreadsheet | Allows to authorize existing users for the template via the invitation wizard. |
The permissions on the object level Spreadsheet are not copied when a template is cloned . All permissions must be set again for the newly created template.
Spreadsheet Tree
| Permission | Description |
|---|---|
| View Folder/Item | Similar to the Open Spreadsheet permission, except that folders can be controlled here and the Open Spreadsheet permission is automatically applied to all templates within the folder. |
Catalog
| Permission | Description |
|---|---|
| Show Catalog Menu | Permission to view the Catalogs and Elements menu:  |
| View Catalog | Permission to view specific catalogs within the Catalogs and Elements menu. The permission to view the elements within the catalog must be granted separately (View Element). |
| Create new Element in Catalog | Permission to create new items in a catalog. |
| Permission | Description |
|---|---|
| For the permission to work correctly, the Edit Element permission must also be set on the catalog. |
Catalog Element
| Permission | Description |
|---|---|
| View Element | Permission to see all elements of a catalog or only certain elements. If the Grant permissions checkbox is checked in a selection, the settings do not apply, but everyone is allowed to see all elements. |
| Edit Element | Permission to change all elements of a catalog or only certain elements. This includes the following other rights: Catalog Element → View Element |
| Change Spreadsheet Data | |
| Delete Element | Permission to delete all elements of a catalog or only certain elements. |
User
| Permission | Description |
|---|---|
| View Users | Permission to view the User section in the Collaboration area.  |
Group
| Permission | Description |
|---|---|
| View Groups | Permission to see the Groups section in the collaboration area.  |
| Change Group User | Authorization to adjust the assignment of user → groups in the collaboration area. |
| New user default group | Authorization to create new users in the collaboration area. |
App
| Permission | Description |
|---|---|
| Design the App | Permission to perform any activity that is edited with the pen within the app. |
| Create new Apps | Permission to create new apps within the current account. This authorization can be assigned at the app level, but should rather be set in the Global area. The respective decision has no effect on the rights. |
| Use the App | Determines whether a user can use the contents of an app. As long as this permission is not given, all permissions for objects within the apps will not work. |
Data States
| Permission | Description |
|---|---|
| Show States Menu | Authorization to view the History of Activities menu: |
| Permission | Description |
|---|---|
 | |
| View States | Authorization to have the activities listed within the History of Activities. |
| Open State Spreadsheet | Authorization to open an old state of a spreadsheet again via History of Activities. In addition, it is necessary that the user has the Open Spreadsheet permission of the requested templates. |
| Change States | Permission to end an open activity or to reopen a closed activity, depending on the current status: 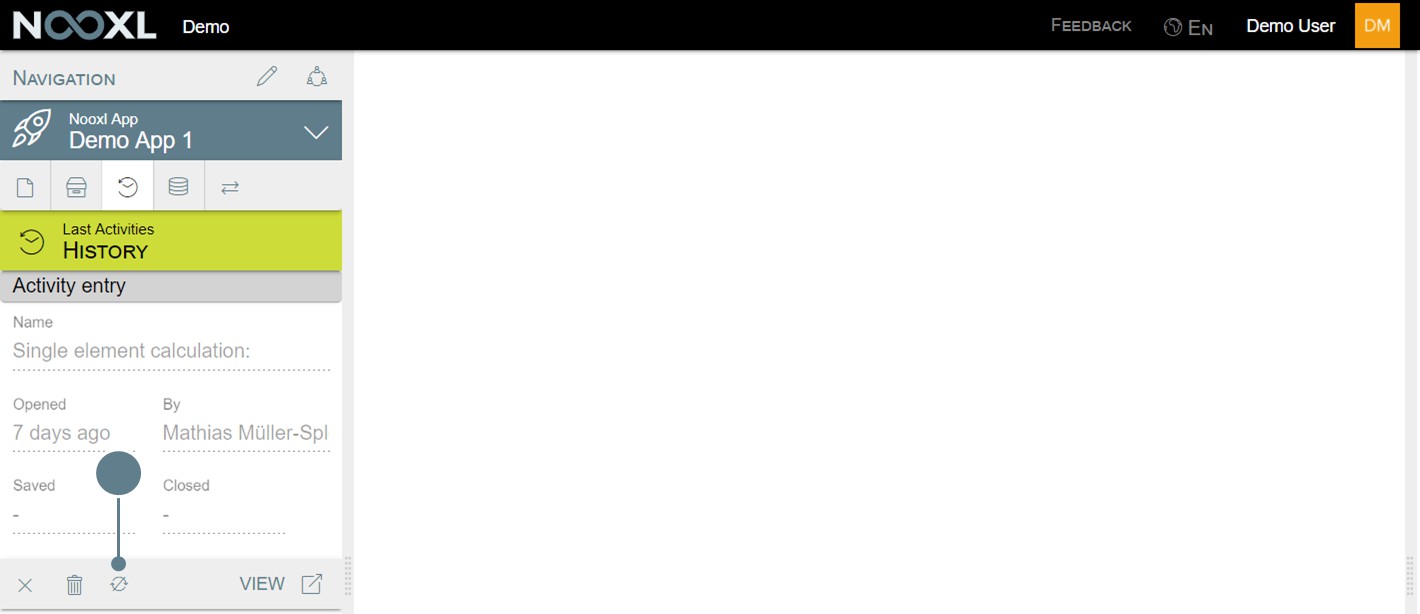 |
| Delete States | Permission to remove an activity from the history: 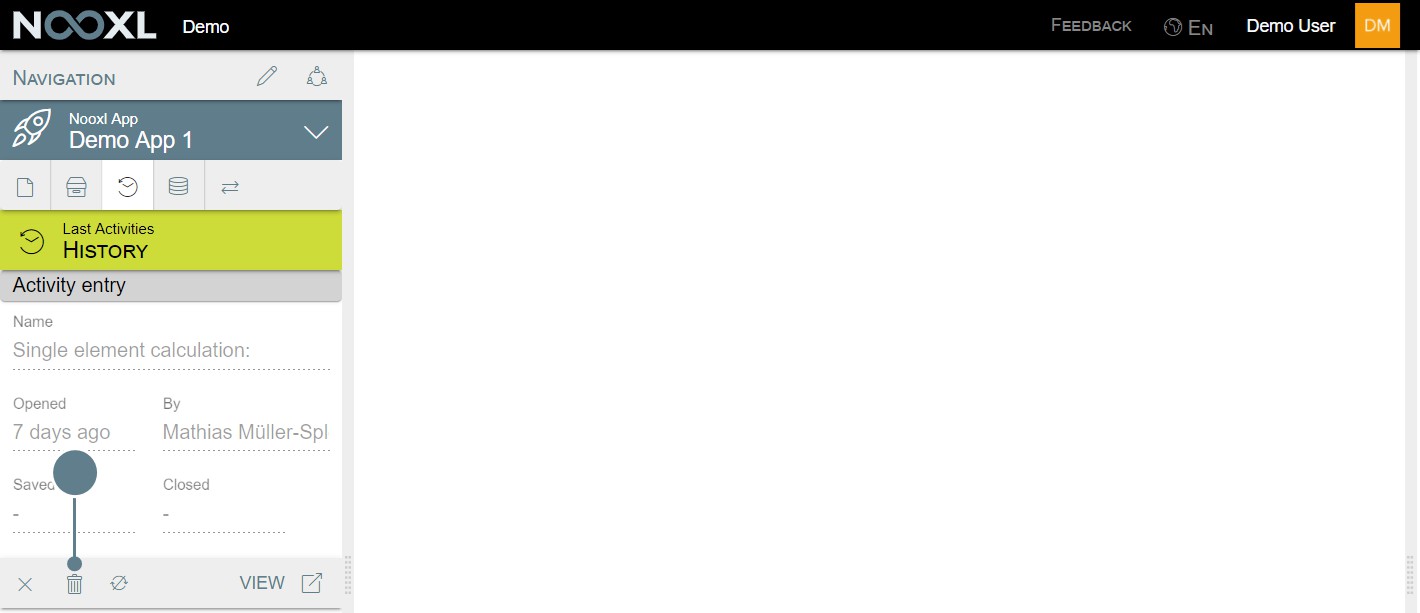 |
Data Entries
| Permission | Description |
|---|---|
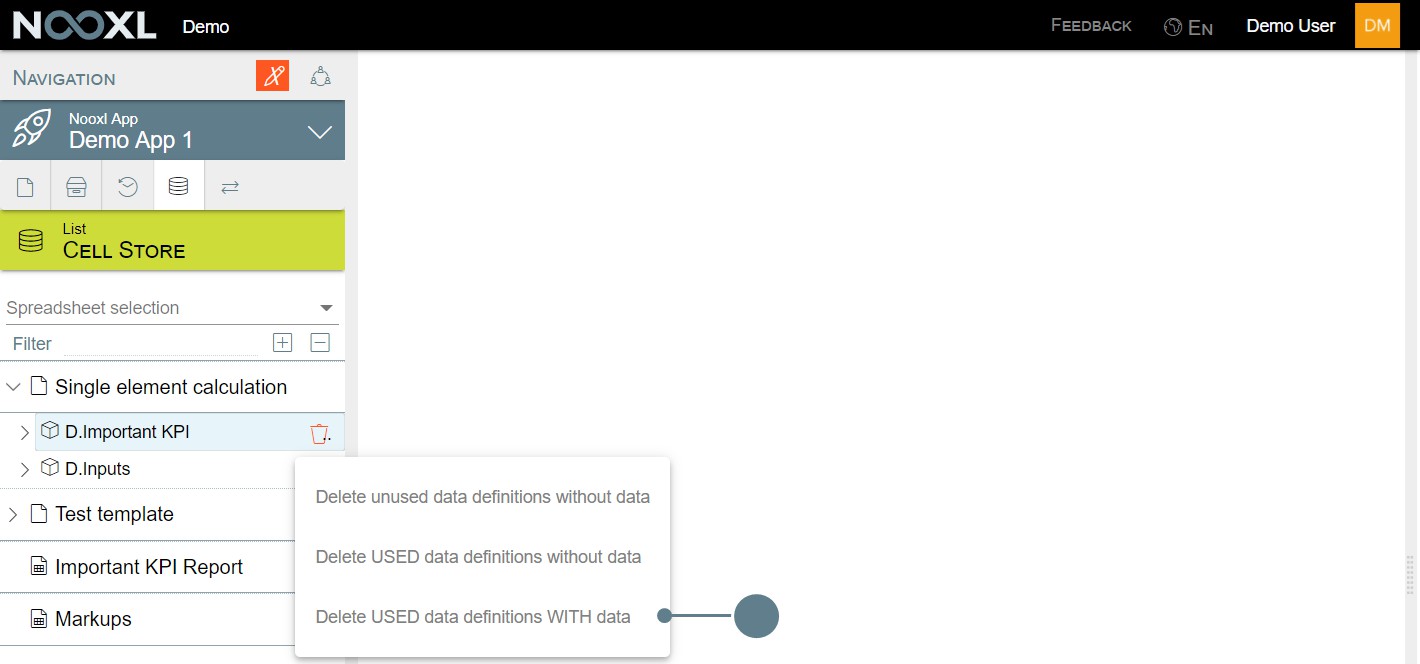
| Show Data Entry Menu | Authorization to view the cell store menu:  |
| View Data Entry | Allows viewing the data of a specific template. |
| Try Delete Data Entry | Permission to use the Delete unused data definition without data option. 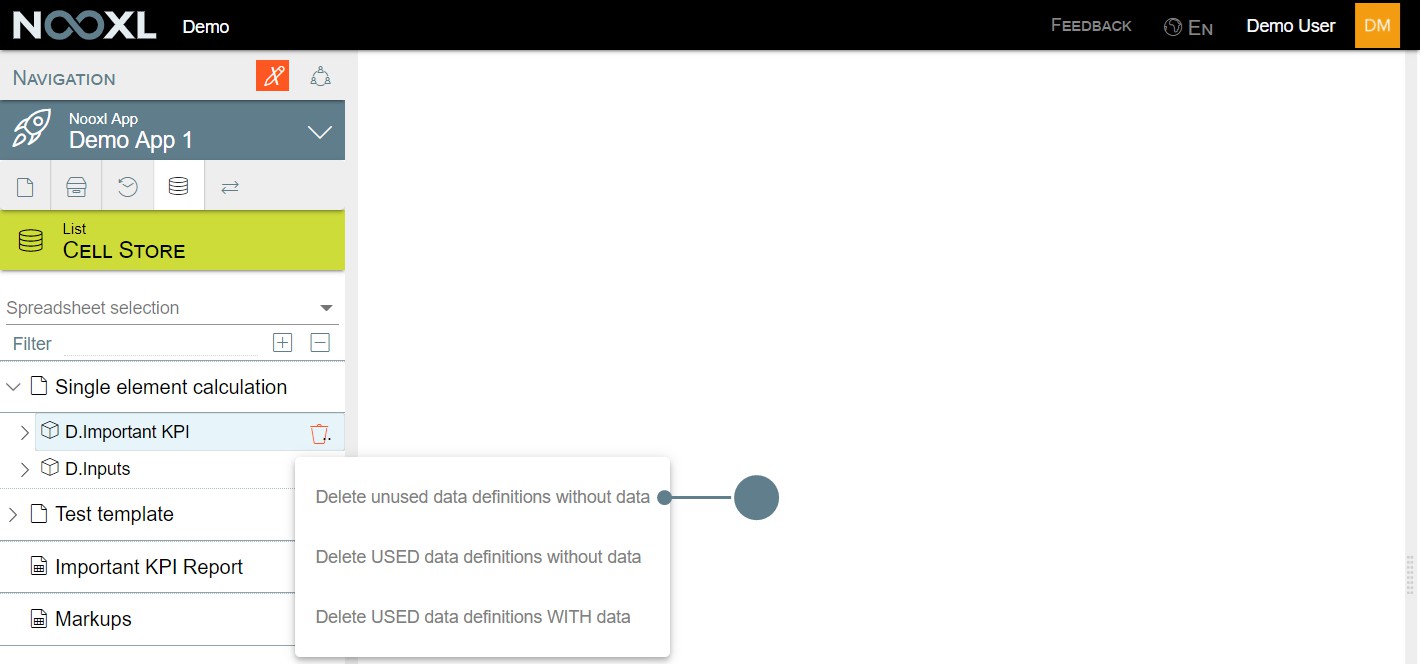 |
| Force Delete Used Entry | Permission to use the Delete USED data definition without data option. 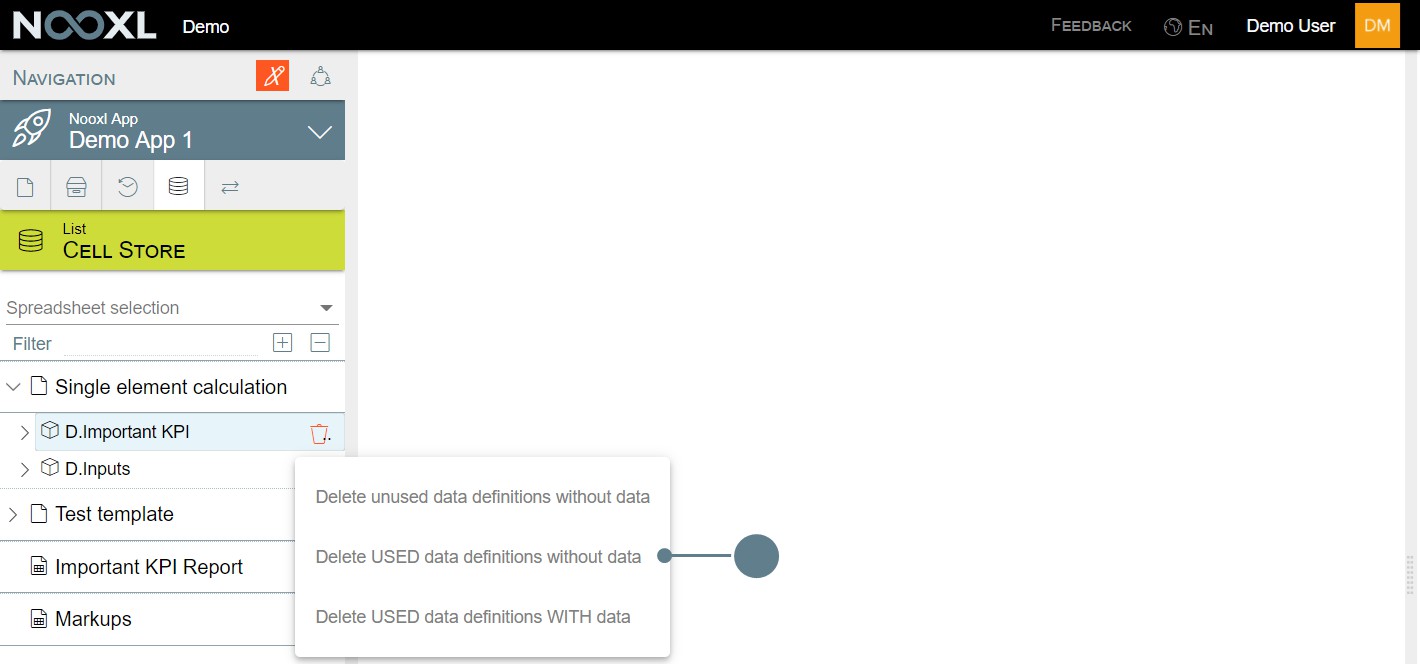 |
| Force Delete Used & Filled Entry | Permission to use the Delete USED data definition WITH data option. |
| Permission | Description |
|---|---|
 |
Realizing workflows in Nooxl
Every permission granted in the Collaboration section of your Account is static as long as nobody changes it. This can be enough, but if you need to implement a workflow which grants different permissions to different user groups based on the current workflow status you need to extend beyond the normal permissions.
Here workflow based user rights come into play. which can be granted to different objects in your App:
| Authorization level | Description |
|---|---|
| Matrix | Changes permissions for a specific template. |
| State | Change permissions for a particular dataset of a template. |
| Condition | Change permissions for elements of a catalog. These permissions are transferred into all templates where the elements are either used for the dataset selection or as selections in dimensions. |
| Selection | TBD. |
The following permissions are distinguished:
| Permission | Description |
|---|---|
| PriorityAccess | Can the element be seen This translates to dataset selections as well as the usage of selections in templates. If a user has no access for the elements it can not be seen. |
| PrioritySave | Can the elements data be changed/ saved |
| PriorityDelete | Can the element be deleted |
| PriorityAssign | Can the element be assigned to a user/ group |
| AssignText | If the element is assigned to someone, what should the assignments text be This is used to pass messages through the workflow, for example to give hints to another department. The messages will show up in the list of existing datasets . |
Currently, workflow markups cannot be created via the web interface. To create a new workflow you need to create a new markup in your template. After that you need to set up the workflow markup in the database table [u1].[MarkupWorkflow] .
Create a new workflow
| Column | Description | Example |
|---|---|---|
| Id | 22 | |
| UniverseId | Id of the account (table [ctr]. [Universe] ). | 1057 |
| MarkupId | Id of the markup you created (table [u1].[Markup] ). | 37859 |
| LogicReleaseId | This Id references an entry in the table table [u1].[LogicRelease] which in the end points to your template. You can find this Id already in the table [u1].[Markup] from the previous column. | 14580 |
| Column | Description | Example | ||
|---|---|---|---|---|
| Name | A name for the workflow markup. This can be the same as the markup itself, but can also be something different. | WorkflowData | ||
| IsDisabled | A Boolean. If it is TRUE the workflow is disabled. | FALSE | ||
| IsFromSummary | A Boolean. If your workflow is granting permissions to states , you can have an additional summary row on top of your table structure. For this set this column to TRUE .  | TRUE | ||
| IsFromSelection | A Boolean. If your workflow is granting permissions to selections , set this column to TRUE . | FALSE | ||
| IsFromMatrix | A Boolean. If your workflow is granting permissions to t emplates , set this column to TRUE . | FALSE | ||
| IsFromState | A Boolean. If your workflow is granting permissions to states , set this column to TRUE . | TRUE | ||
| IsFromCondition | A Boolean. If your workflow is granting permissions to elements of a condition , set this column to TRUE . | FALSE | ||
| FromConditionId | If IsFromCondition = TRUE you must supply the conditions Id (table [u1]. [Condition]) you want to work with. | NULL |
| Column | Description | Example | ||
|---|---|---|---|---|
| FromMatrixId | If IsFromMatrix = TRUE you must supply the template Id (table [u1]. [Matrix]) you want to work with. | NULL | ||
| IsStorageRead | A Boolean. If your elements you want to grant access to are static, you can have them as static content in the template and set this field to FALSE . If you want to read all elements on runtime, because they can change, set this to TRUE . | TRUE | ||
| IsStorageWrite | A Boolean. If your logic is changing the workflows settings you need to set this field to TRUE . If you are only reading the current settings of a workflow you can leave this field as FALSE . | TRUE | ||
| IsAccessGroups | A Boolean. Is access granted on group level | TRUE | ||
| IsAccessUsers | A Boolean. Is access granted on user level | TRUE | ||
| IsContentClear | A Boolean. Should values in the template be overwritten in the markup area | TRUE | ||
| IsContentOverwriteFormulas | A Boolean. If there are Excel formulas in the Markup area, should they be overwritten ( TRUE ) or retained ( FALSE ) | FALSE | ||
| IsStyleAuto | A Boolean. Should Nooxl automatically adjust the cell style for the markup Set this to TRUE is you want this, or FALSE if you want to retain the style set in the template. | TRUE |
| Column | Description | Example |
|---|---|---|
| ExpanseTypeRows | 2 | |
| CopyTypeRows | If ExpanseTypeRows is TRUE , should the original content be copied over to the inserted rows | 1 |
The number of inserted rows corresponds to the number of authorization groups from the Collaboration area, multiplied by the number of elements to be authorized in the selected catalog.
Accordingly, out of consideration for the usability of the system, but also from a performance point of view, you should try to authorize the smallest possible catalogs.
Workflow table properties
After you created a new workflow in a template, you find a similar structure to this.
![]()
Depending on your settings you made for the workflow we will see less columns or some not visible in the screenshot above. All columns you can see are described below.
| Block | Column | Description |
|---|---|---|
| Source | Id | An internal Id for the specific workflows setting.  For all rows without any change in the permission, this is enumerated with signed integers and for all rows with changed with unsigned integers. So please be ware that this is not a static Id. For all rows without any change in the permission, this is enumerated with signed integers and for all rows with changed with unsigned integers. So please be ware that this is not a static Id. |
| Source | Essentially the workflows type: Element (→ Condition), State, Template (→ Matrix) | |
| Element | ElementId | The Id of the catalog element. Only visible for Condition. |
| Block | Column | Description |
|---|---|---|
| Element | The name of the catalog element. Only visible for Condition. | |
| Group/ User | GroupId | The groups or users internal Id. This is static and can be used to identify users even if the display name is changed. |
| GroupUser | The display name of the group or user. | |
| IsUser | Contains an "x" if the entry is a user and not a group. Only visible if the permissions are granted for users or groups and users. | |
| IsMember | Contains an "x" if it is the current user (then IsUser is also "x") or if the current user is part of the group. Only visible if the permissions are granted for users or groups and users. | |
| Permissions | PriorityAccess | Can the element be seen This translates to dataset selections as well as the usage of selections in templates. If a user has no access for the elements it can not be seen. |
| PrioritySave | Can the elements data be changed/ saved | |
| PriorityDelete | Can the element be deleted | |
| PriorityAssign | Can the element be assigned to a user/ group | |
| AssignText | If the element is assigned to someone, what should the assignments text be This is used to pass messages through the workflow, for example to give hints to another department. The messages will show up in the list of existing datasets . |
How are permissions evaluated
As soon as you created a workflow markup and reload the template you will see an auto generated table structure, similar to this.
![]()
No matter which columns you have, on the right hand side you always find the four permissions you can grant or deny. A user or group is granted a permission as soon as the value in the permissions column is equal or greater than 0 ( >=0 ). So in the example above the group Asset Manangement can not save data for the element Ankauf, but can access it.
If you authorize on a user and group level at the same time, please note that the rights are summed up.
So if you have some users in a group and that group has -1 for priorityAccess on an element, no user can see it. But if you then give one of the groups users a +1
for priorityAccess he has a 0 in total, meaning that he can see the element, despite nobody else from his group can.
![]()
Authorization levels
The following section describes the individual authorization levels in Nooxl workflows and how to use them. Please note that not all permissions are usable within every authorization level. Which you can use is described in each section.
Matrix
Matrix workflow permissions can be set up in their own templates, but also if you want in the template itself. Therefore you can decide were to put your workflow. If have need to change permissions to a template based on what happens inside this template, you would like to put the workflow right inside this template. If it depends on actions done somewhere else in your Application, put it there.
priorityAccess
priorityAccess
Without to a template the user is still able to see the template in the navigation and
also to view whatever selections are available, but the View button is never enabled.
prioritySave
prioritySave
Without
the user will not be able to save any changes made to any dataset of the
template, as well as not be able to use the copy and recalculate features for this template.
State
State workflow permissions are set up directly in the template they should affect.
Each time you save the dataset you can specify who can do what to the specific dataset in this template after you saved.
In order to use a state workflow, your template must at least use one selection for the datasets.
priorityAccess
priorityAccess
Without
button is never enabled.
to a state the user is still able to see the dataset in selections, but the View
prioritySave
prioritySave
If you restrict button.
, it will prevent the user from saving any changes, by withholding the save

Condition
Condition workflow permissions are set up in their own templates, because they influence all templates of an App. By doing so, per default condition permissions are somewhat static and need manual interaction by a user, or need to be included as a step in a job .
Rights set up on conditions, influence your app in two places: dataset selections and selections used in advanced mode inside your template.
Even if the permission object is called condition and you use a condition to set the rights,
everything is applied to the underlying catalog!
priorityAccess
priorityAccess
The revocation of the
permission has two effects. First of all the affected users will no
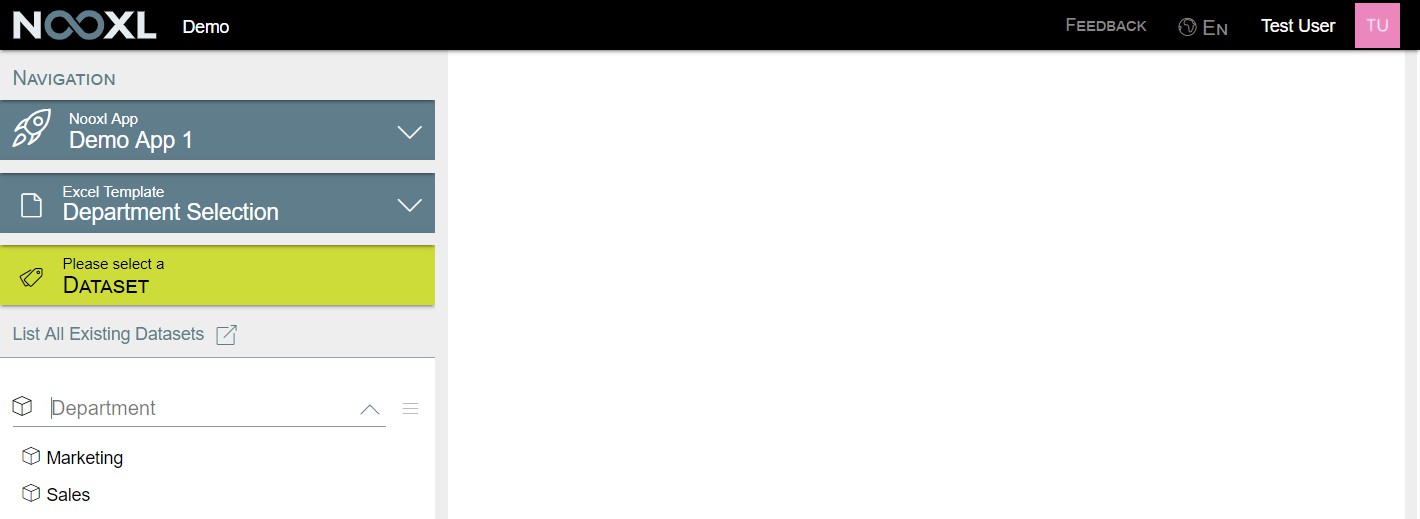
longer see the elements in dataset selection. The screenshot below show the selection items for a "normal" user without restrictions.
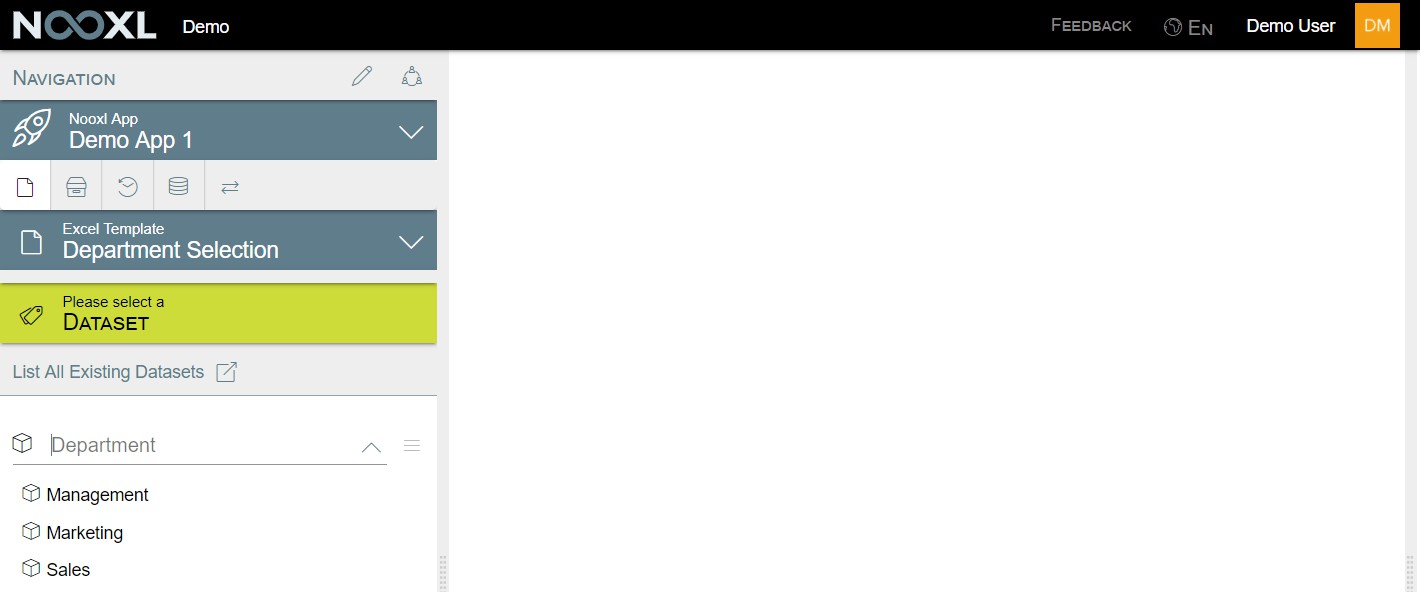
priorityAccess
The next screenshot shows what Test User can see. He is not granted the permission
priorityAccess
for the element Management. Therefore this element is not available to him in the dataset selection.
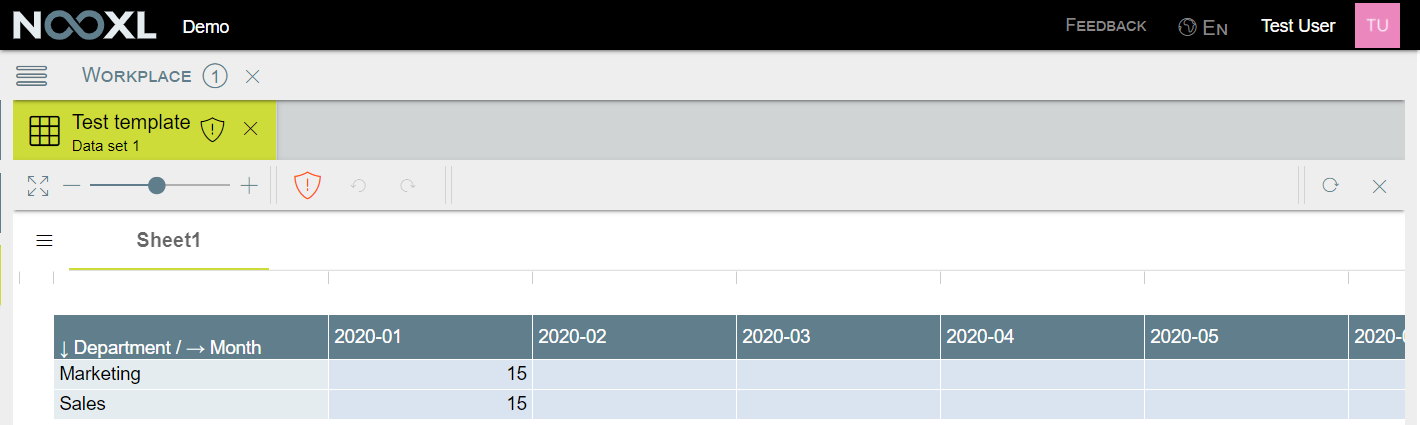
The second place were your users will feel the restrictions is inside your templates. If you use a selection
in your template as a dimension of a cell storage, the will restrict which elements the
user can see. Below the user without restrictions can see all three departments in the rows.
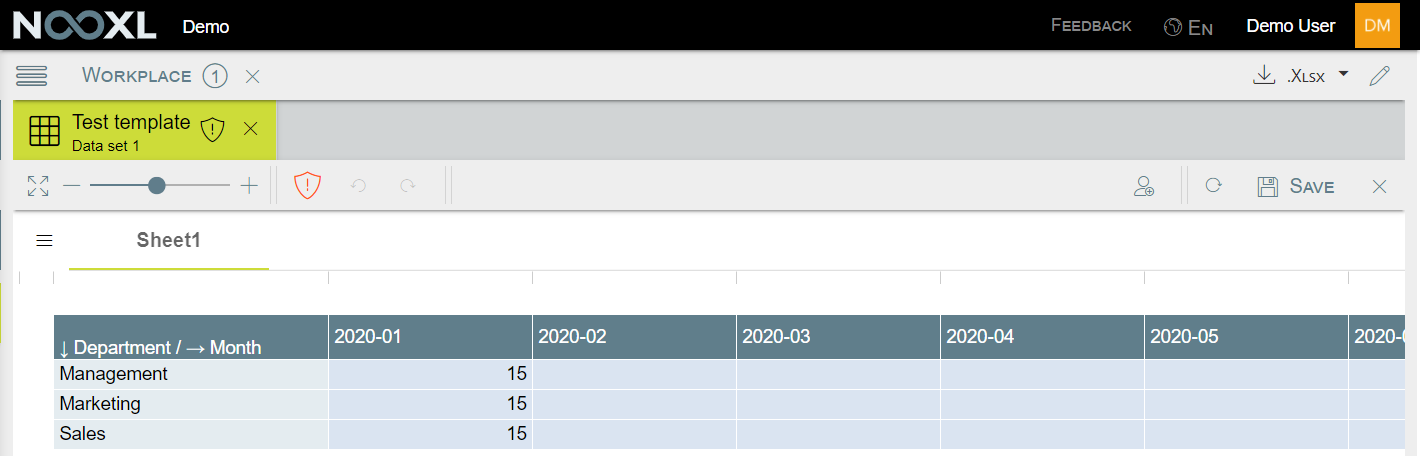
Test User will not see the element Management.
prioritySave
If you restrict
prioritySave
prioritySave
, it will prevent the user from saving any changes, by withholding the save
button. Test User is not granted shows up.
for the Management element, therefore no save button
For Marketing he does have the permission and so the Save button will show up for him in this dataset.

If your dataset uses more than one selection, Nooxl will add up the prioritySave
permissions for all elements involved. If it is >=0 then the user can save the dataset. Is the sum
<0 he can not.
![]()
Selection