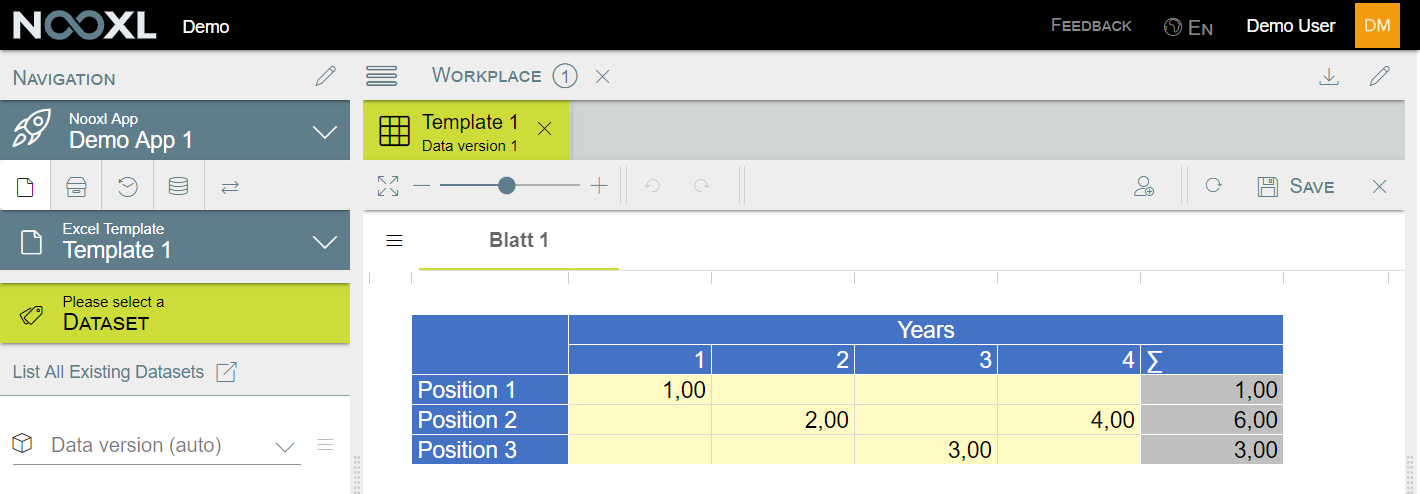
Model Design
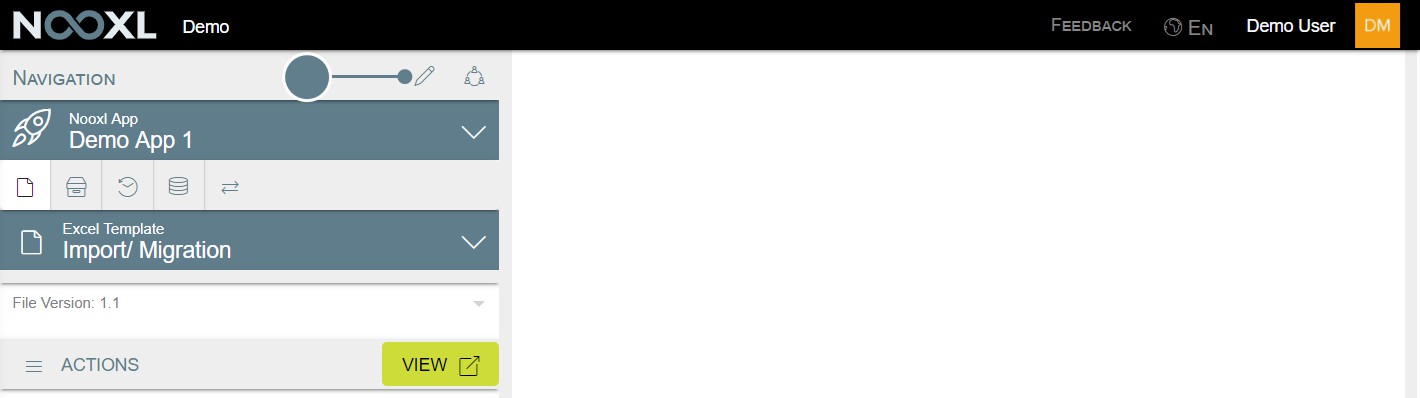
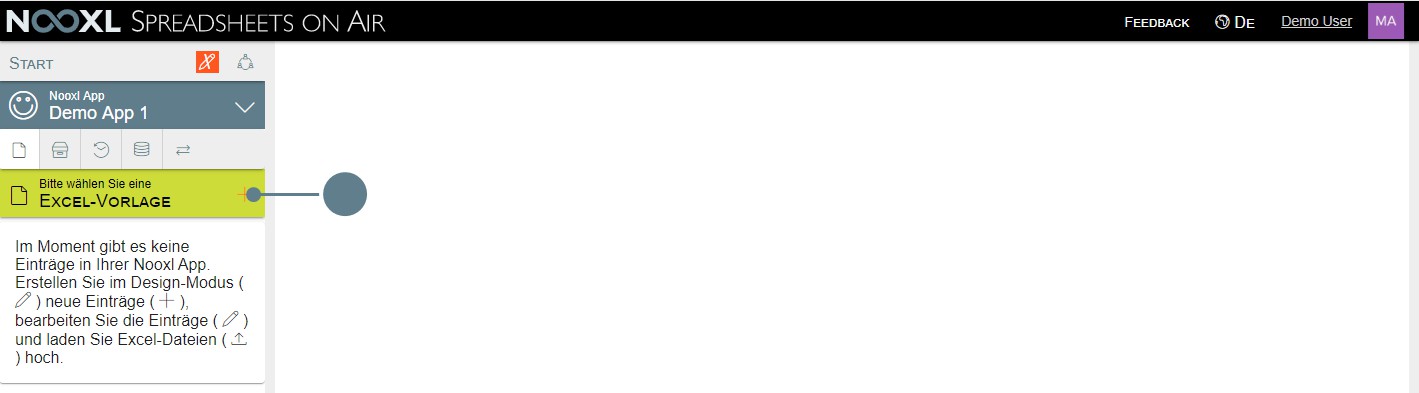
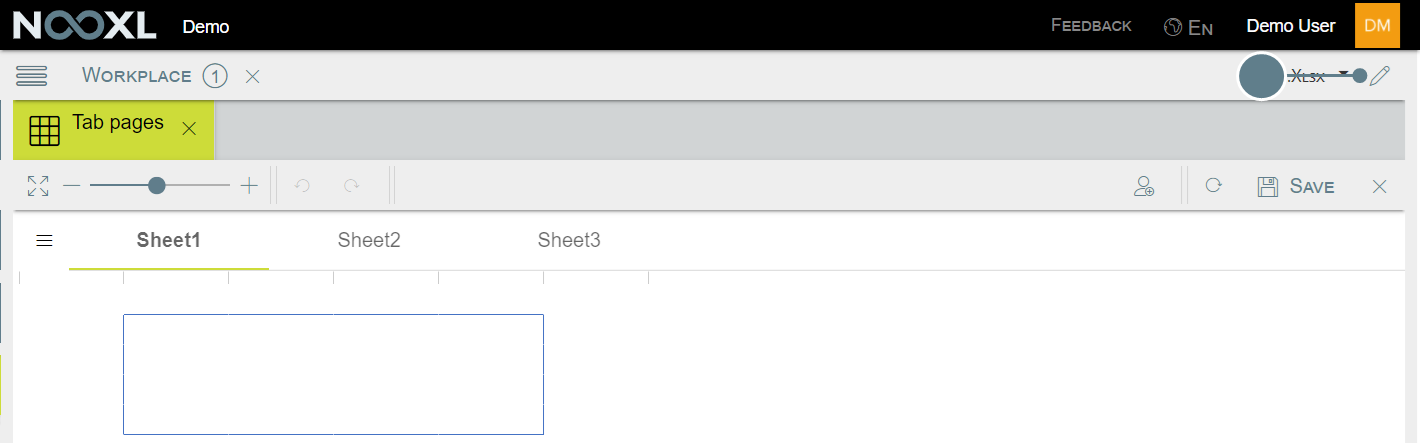
When an app is opened, the Excel Templates view is open by default.
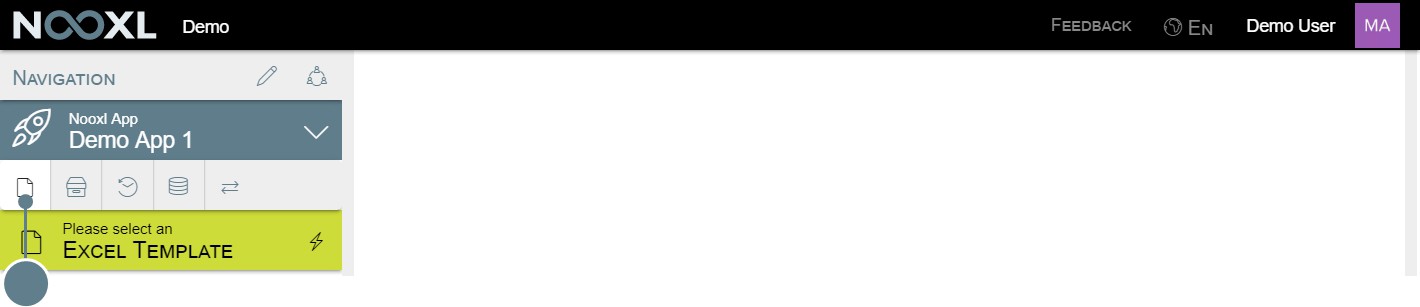
Every Nooxl App consists of one or more templates in which the end users work. The access to a template is done by the users via the left navigation of the app.
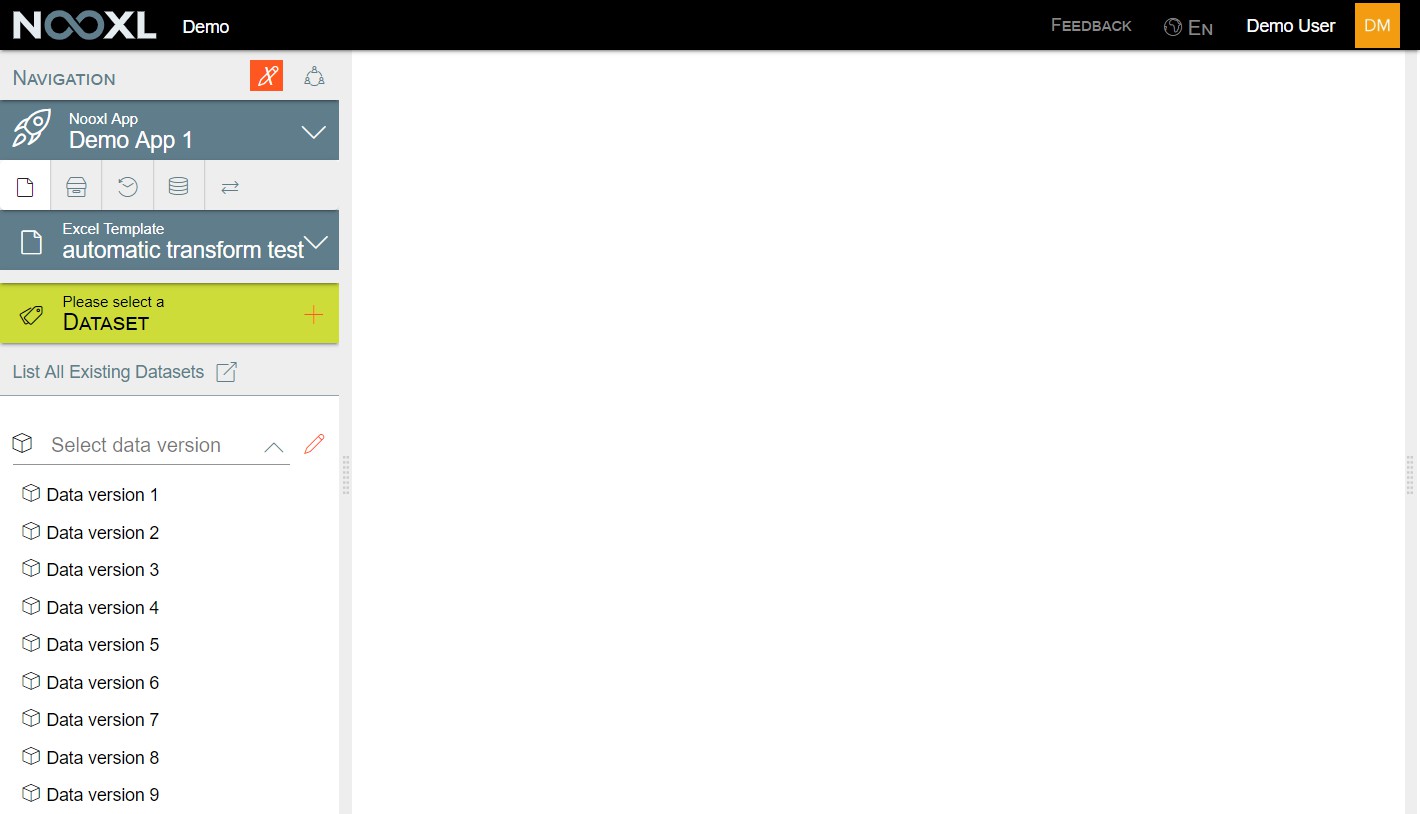
Select a dataset and List of all existing datasets
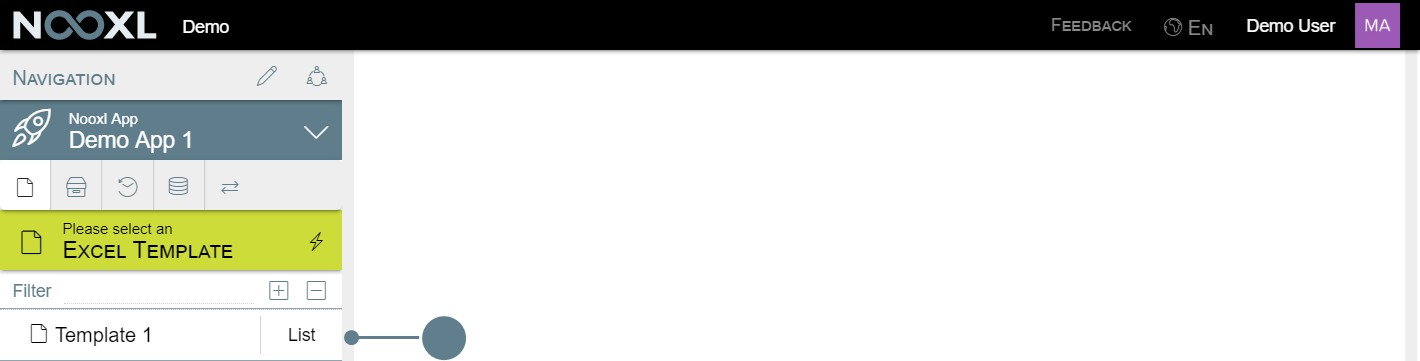
For each template there are two possible actions that the user can directly perform:
Clicking on the templates name will open the dataset selection for the template .
Clicking on List, will List all existing datasets .
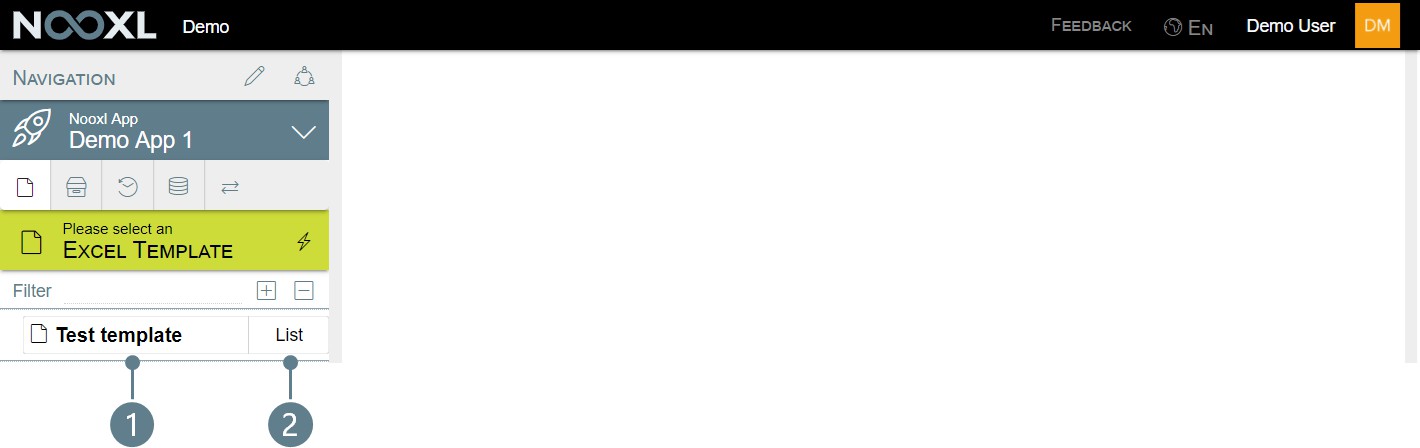
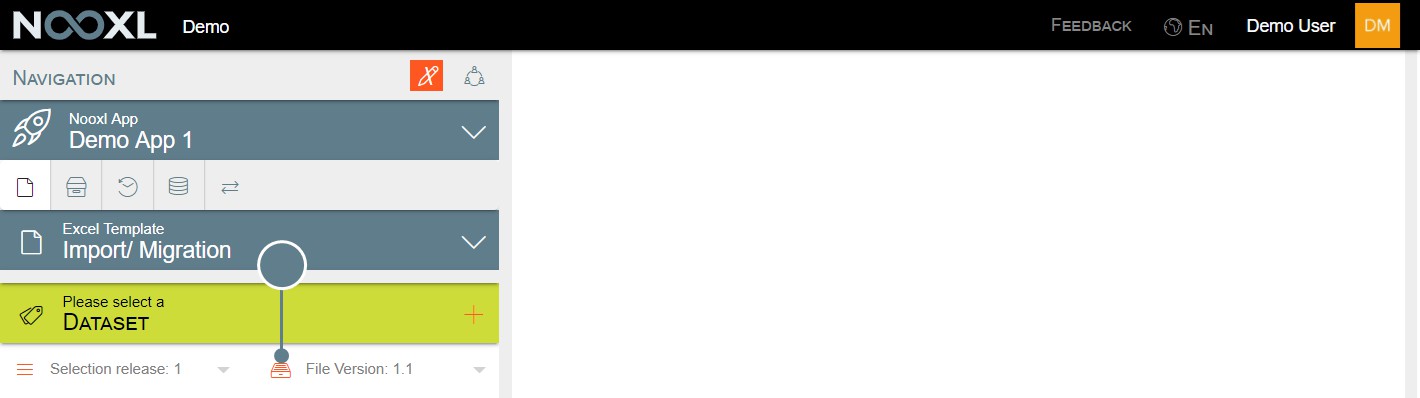
This is the default behavior of Nooxl. The functionalities can also be configured in exactly the opposite way per account. In this case, "More" is displayed on the right instead of "List".
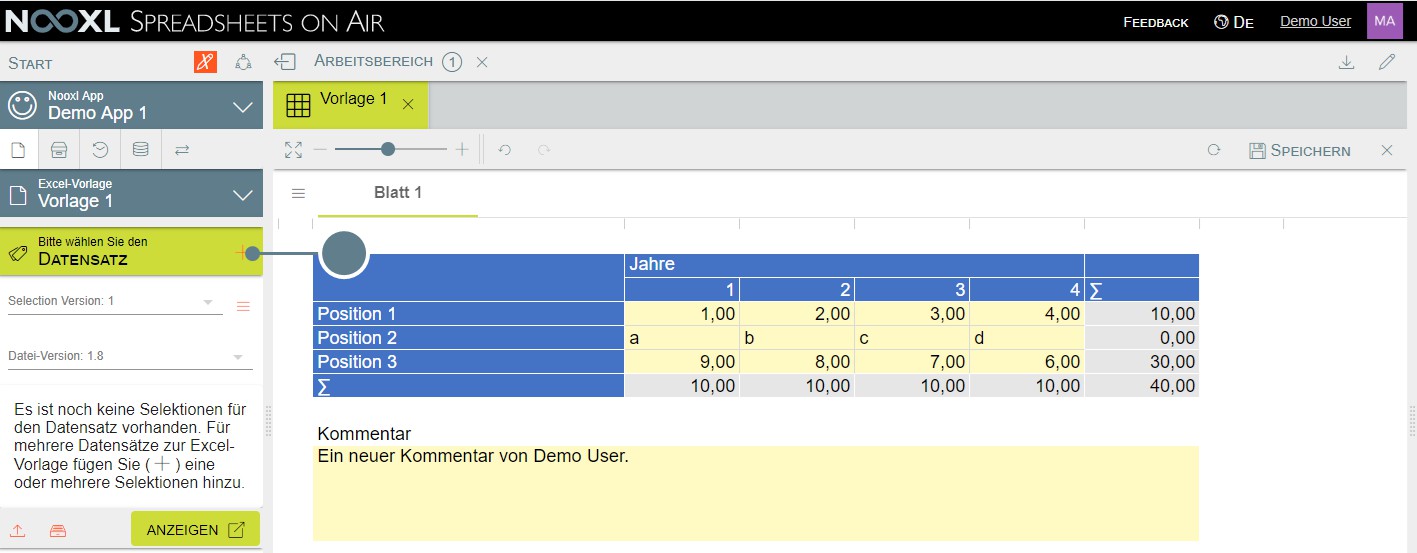
Dataset selection
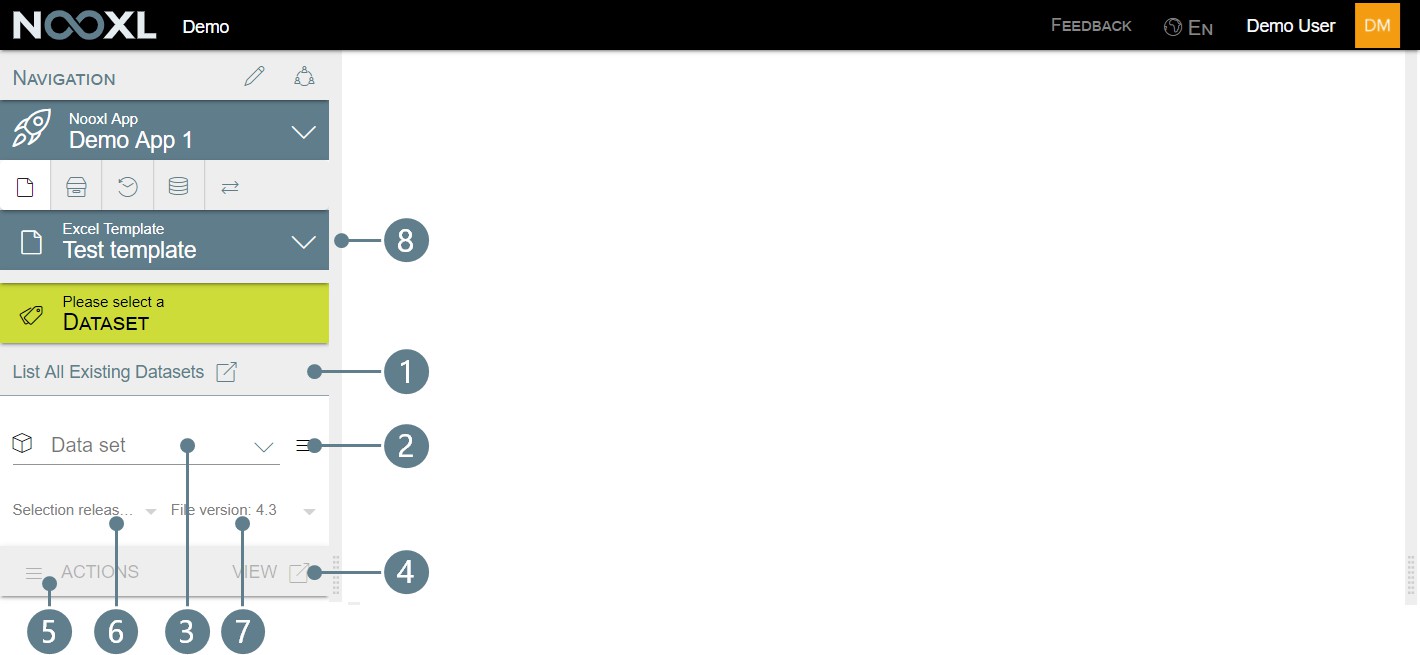
The following functionalities can be used in the dataset selection:
- Jump to the list of existing datasets .
- Depending on the configuration of the selections of the dataset, a click on !](../media/f52fc256d7445205ff6a9d33bcaf25d6.png) opens a menu where further [elements can be created, edited or deleted .
- Depending on the configuration of the template, there are different selections that describe a dataset. There can also be templates without any selection, in which case there is exactly one dataset.
- If an element is selected for each of the available selections of the template, the View button turns green and can be clicked to load the selected dataset.
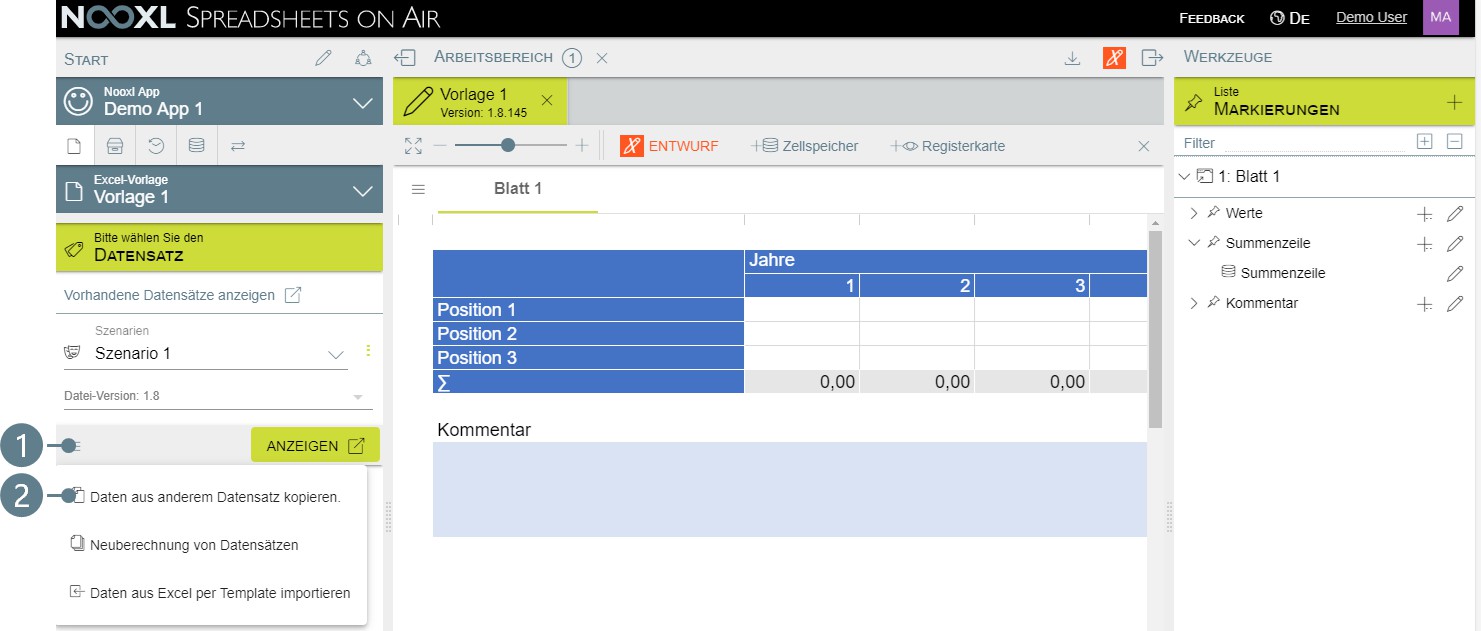
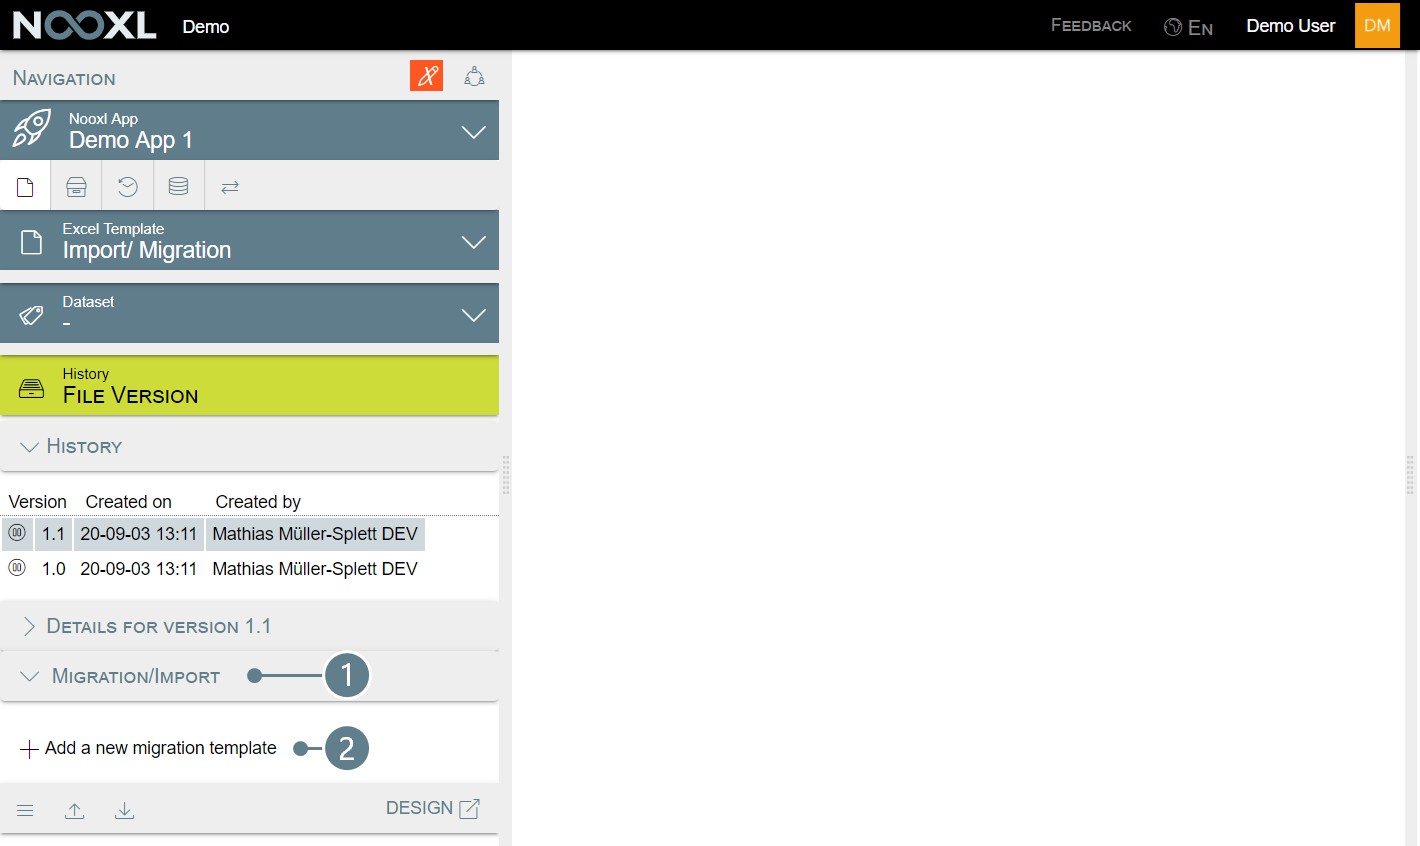
- A click on this button opens a menu through which the following additional functions can be accessed:
- Copy data from another dataset
- Recalculation of datasets
- Import data via a template
- Mass export of datasets
- This dropdown lets you switch between selection releases. Older selection releases let you access older major versions of the template (7).
- This menu lets you choose an older version of the template .
- When you click on the templates name, you will go back to the navigation with all the templates.
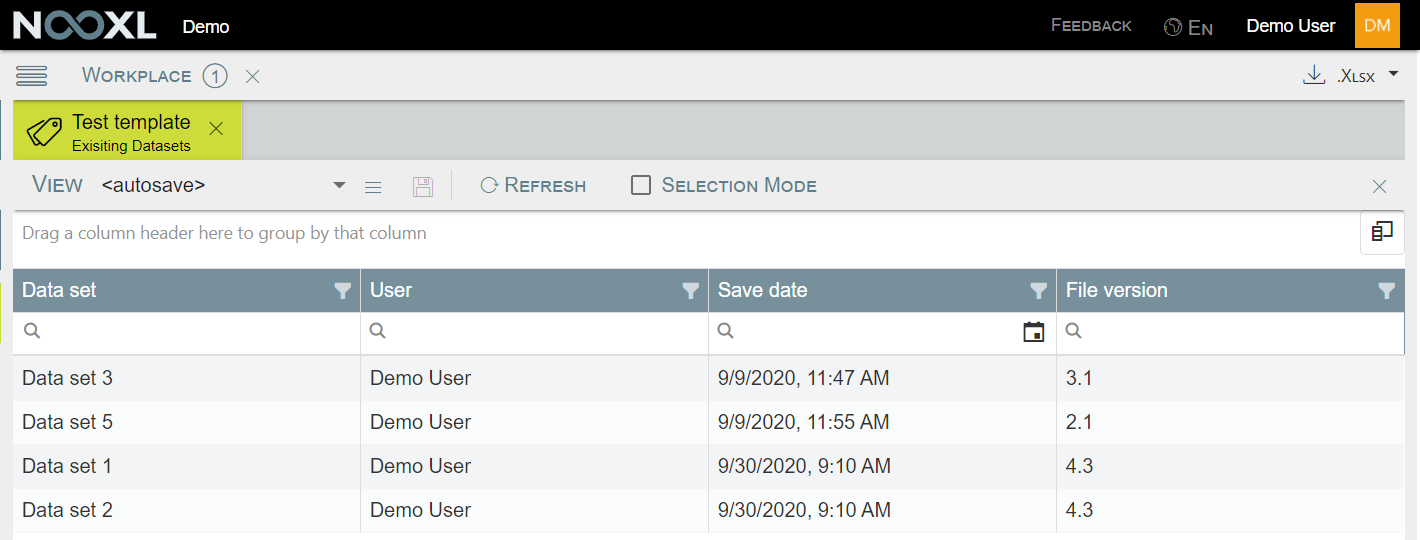
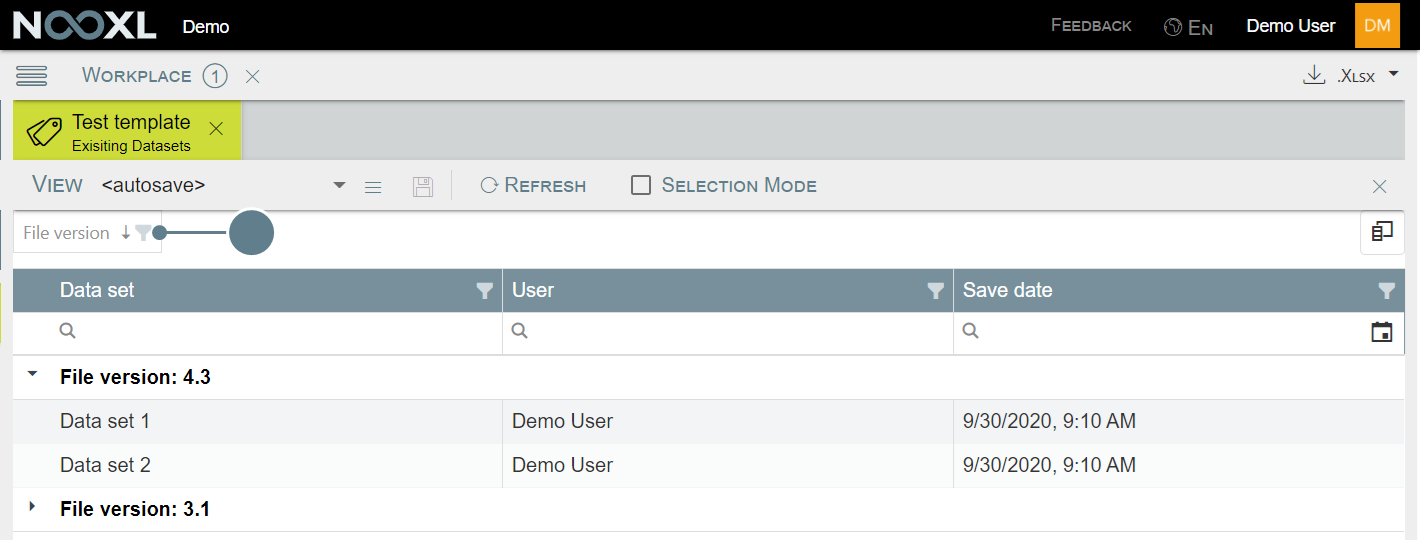
List all existing datasets
The list of existing datasets shows one row per dataset and contains different information about each dataset in the columns.
A click on an entry in the list opens the dataset in a new tab of the workspace.
Configuration of the columns
The displayed columns are freely configurable by the users. To do so, click on the column symbol (1) and then tick the columns to be displayed (2). As soon as the selection is complete, the selection window can be closed again by clicking on the "x" (3).
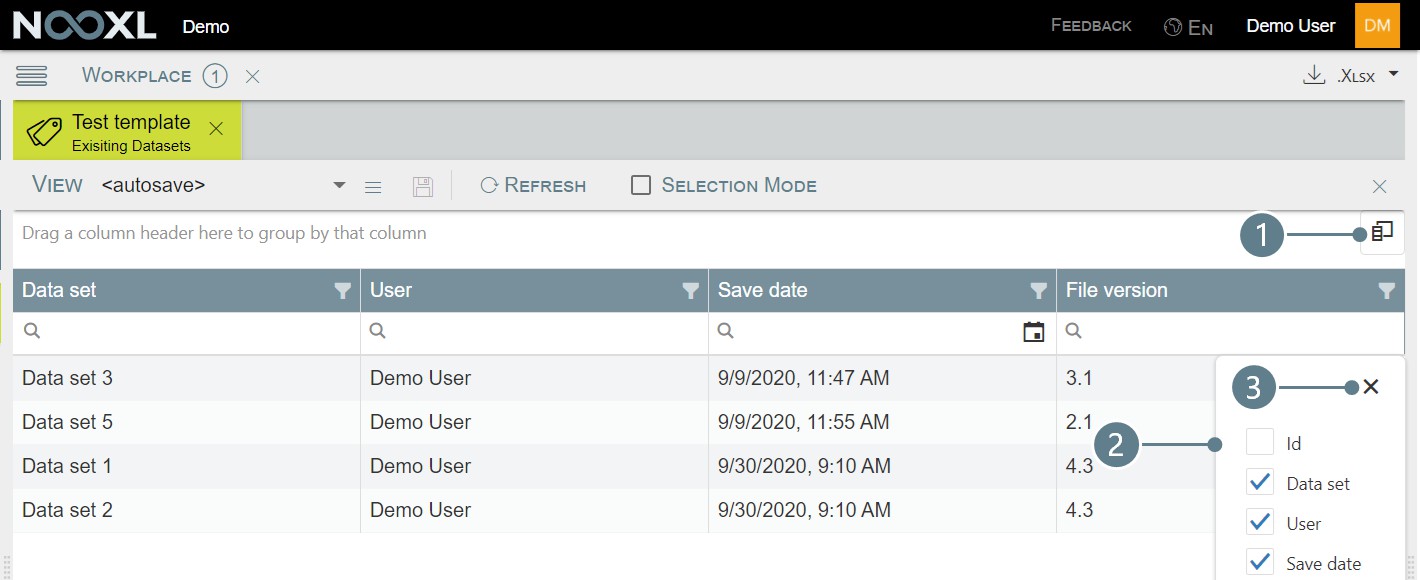
The available columns are on the one hand standard columns, which are always present, and on the other hand every selection of the dataset selection is available as a column.
| Column | Description |
|---|---|
| Id | The Nooxl internal Id to identify the dataset. |
| User | Display name of the user who last used the dataset. It is irrelevant whether the user has also changed the dataset and/or saved this change. A simple display is sufficient to store the new user name in the list. |
| Save date | Date on which the user saved the dataset. The date format corresponds to ISO 86012 (YYYY-MM-DD). And time at which the user saved the dataset. The format corresponds to the extended time format of ISO 86013 without seconds ([hh]: [mm]). |
| File version | The version number of the template that was used to save the dataset. |
| Access | The following columns always consider the current user. There is a ticket checkbox for each of the different permissions you can set up in the workflows of Nooxl. The message contains whatever was is stored for the current user in the AssignText column of the workflow . |
| Save | |
|---|---|
| Delete | |
| ToDo | |
| Message |
1: Standard columns of the list of existing datasets
Search for a dataset
You can filter the datasets by searching for values in the columns.
Note that you can change the search type depending on the column, by clicking on the . For example you can search for all datasets saved between to date/ times by changing the type to between and giving a start and end date.
![]()
Saving and interacting with saved column configuration
The last column view set up is automatically saved for each user and used in the future. In addition, each user can also configure and save any number of other column configuration, so that different views can be pre-configured for different use cases. These views can be made public so that other users of the app can use the same column view.
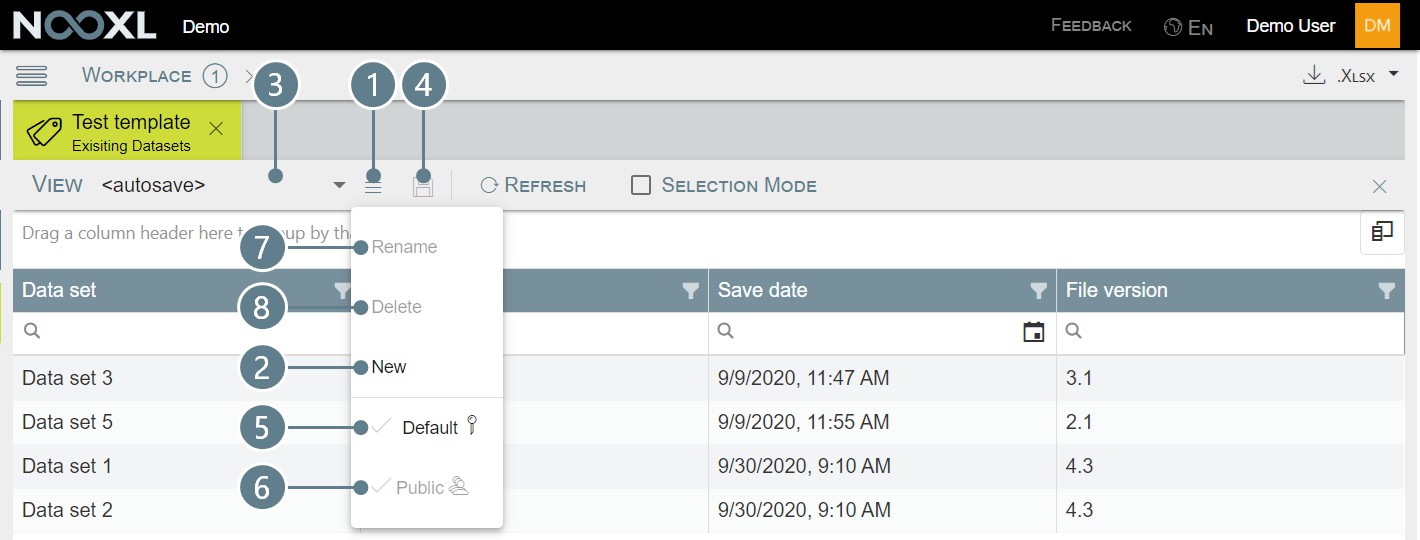
The steps for saving configurations are:
- Opens the menu to interact with column configurations (create new, delete, modify, publish, etc.)
- A click on New creates a new view, which can be named.
- Opens a selection menu with all available views.
- A click on the disk saves the current view. This button is not available in the <autosave> view.
- Marks the current view as the user's default view, which is selected as default when the list of datasets is opened.
- Makes the current view available for other users of the app.
- Renames the current view.
- Deletes the current view.
Grouping the datasets
Besides the pure list view, columns can also be used to create groupings. To do this, simply drag and drop the desired column header into the designated area.
There must be at least one column in the table. The order of the hierarchy can be changed at any time by drag and drop.
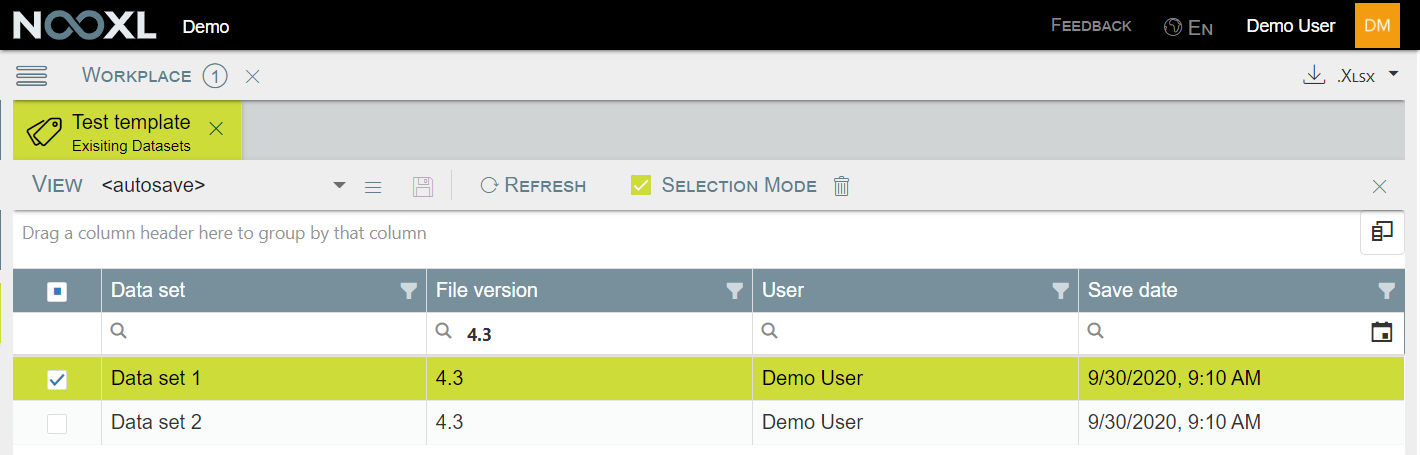
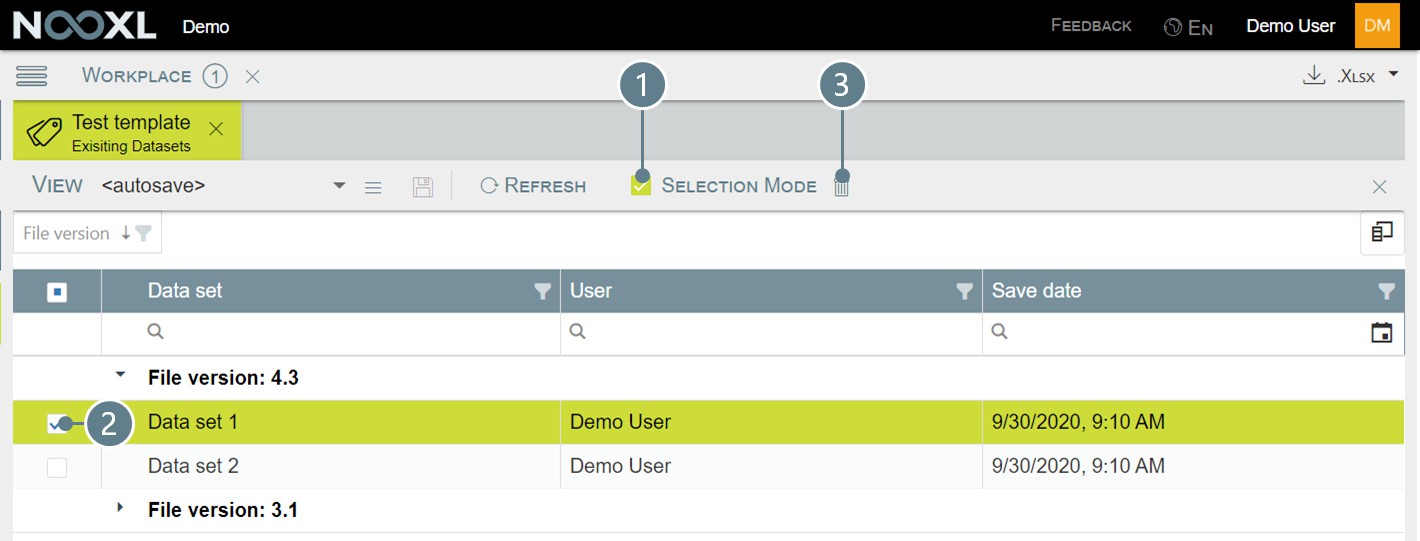
Deleting a dataset
To permanently delete a dataset of a template, the selection mode must be activated (1). Then the datasets to be deleted can be selected in the list (2) and deleted by clicking on the trash can (3).
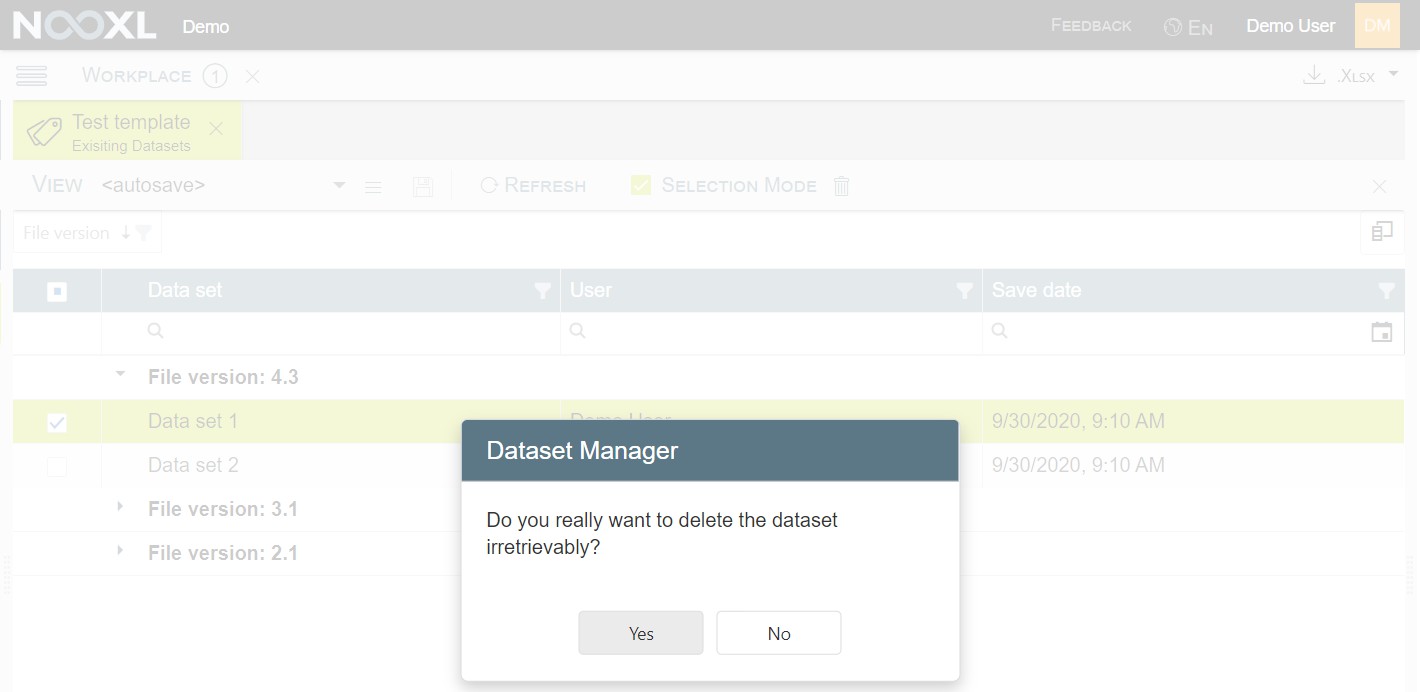
Before deleting, Nooxl asks again if the selected datasets should really be deleted. A click on Yes then deletes the dataset(s).
Copy data from another dataset
Copying datasets is useful if, for example, you want to start a new planning session but want to build on the planning of the last session and do not want to restart it completely.
To copy datasets, click on the three blue-grey horizontal lines (1) in the dataset selection of the template and then select the entry "Copy data from another dataset" (2) in the menu that opens.
In the opening mask you have the following setting options:
This is the target dataset to which the data is copied.
This is the source dataset whose data is copied to the target dataset (1).
If your dataset selection has several selections, it may be useful to select the "All" option.
If this option is not active, existing data in the target dataset (1) will not be overwritten. This means that only data from cell stores that are not filled in the target dataset will be enriched by the data from the source.
If this option is active, only "filled" cell memories from the source dataset are copied to the target. If this option is not activated, data in the target would be overwritten with "nothing".
If everything is set, click on Copy to start the copying process.
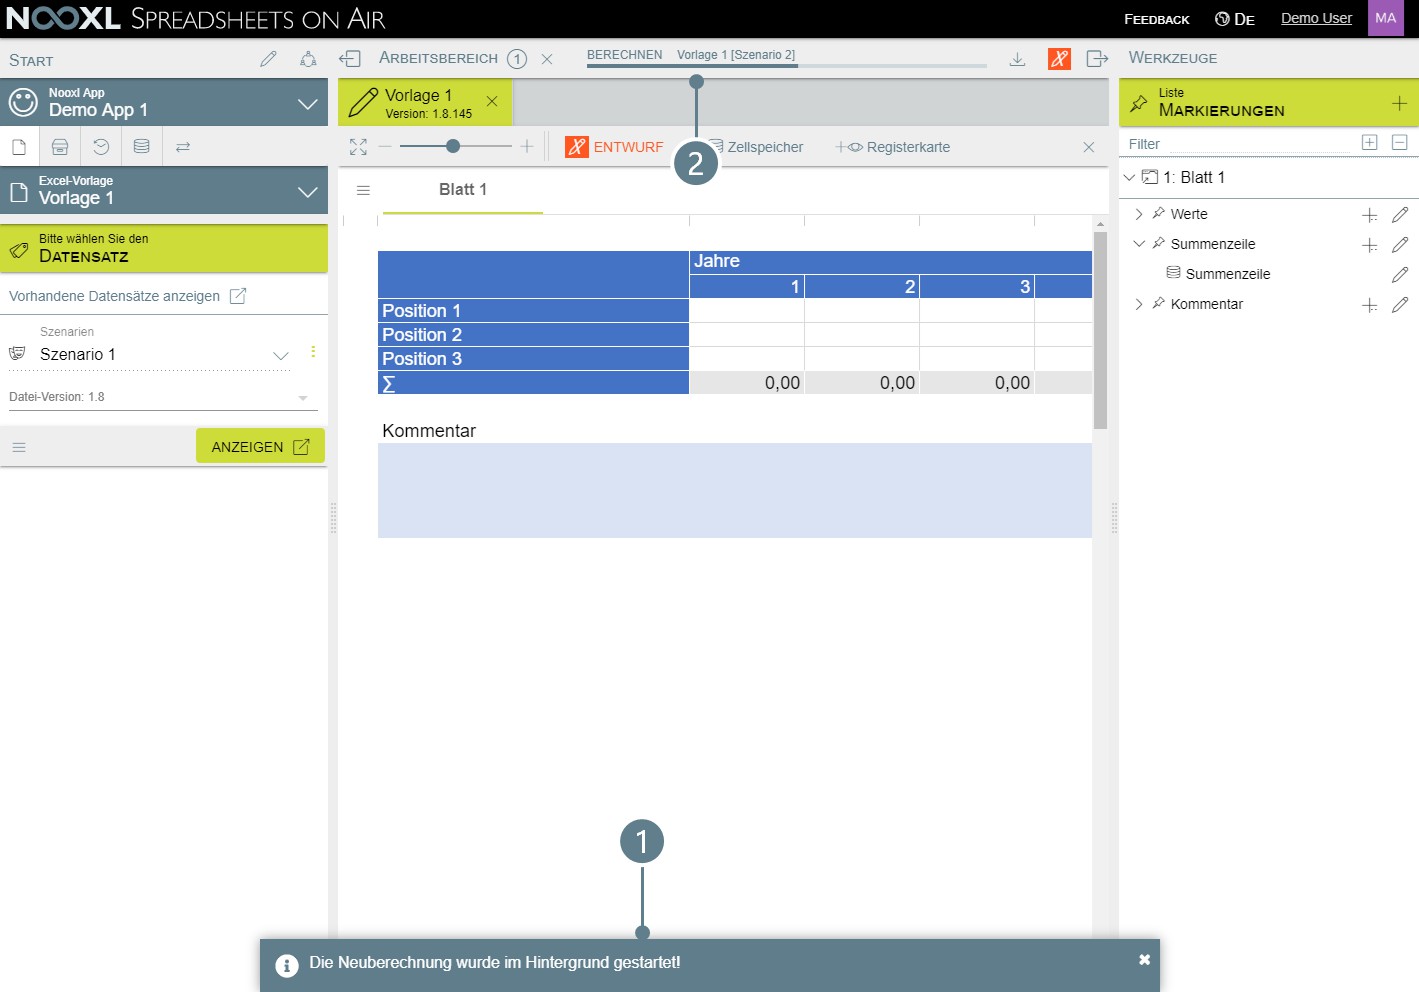
At the bottom of the screen you will be informed that the copy process has started in the background (1) and at the top you can see the progress (2).
The copy process takes place on the servers of Nooxl, which means you can switch off your computer and Nooxl continues the process without you.
Recalculation of datasets
A recalculation of datasets is always necessary if
- uploaded a new template with modified Excel logic in Nooxl, or
- have connected new cell memories whose values are to be used in other templates.
To recalculate datasets, click on the three blue-grey horizontal lines (1) in the dataset selection of the template and then select "Recalculate datasets" (2) from the menu that opens.
Depending on the use case, mark in the available selections that all containing elements (1) are to be calculated and then click on the Recalculate button (2).
At the bottom of the screen you will be informed that the recalculation was started in the background (1) and in the upper area you can see the progress (2).
The recalculation takes place on the servers of Nooxl, this means you can switch off your computer and Nooxl continues the calculation without you.
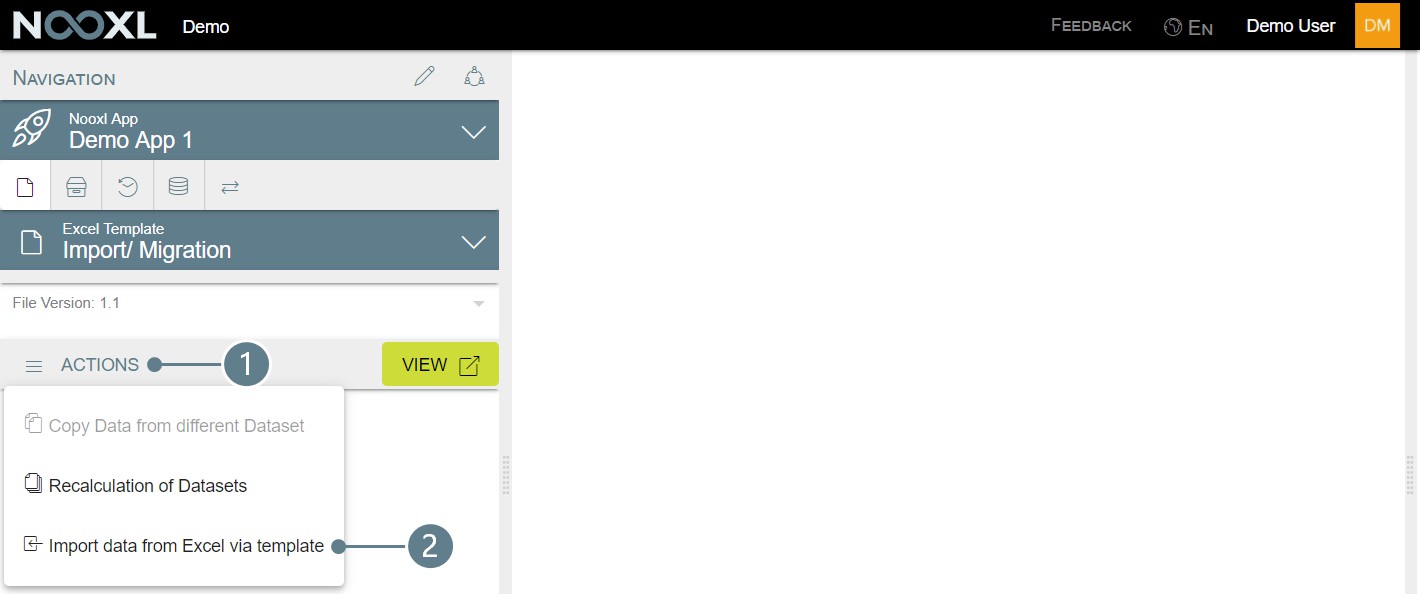
Import data via template
If you regularly receive data from third party systems as Excel, CSV or TXT files, you can create an import and migration template to extract, transform and load the data into Nooxl (ETL process). In this way, recurring similar data imports can easily be imported into Nooxl by your users.
The following articles are available on this topic:
How to import data via template
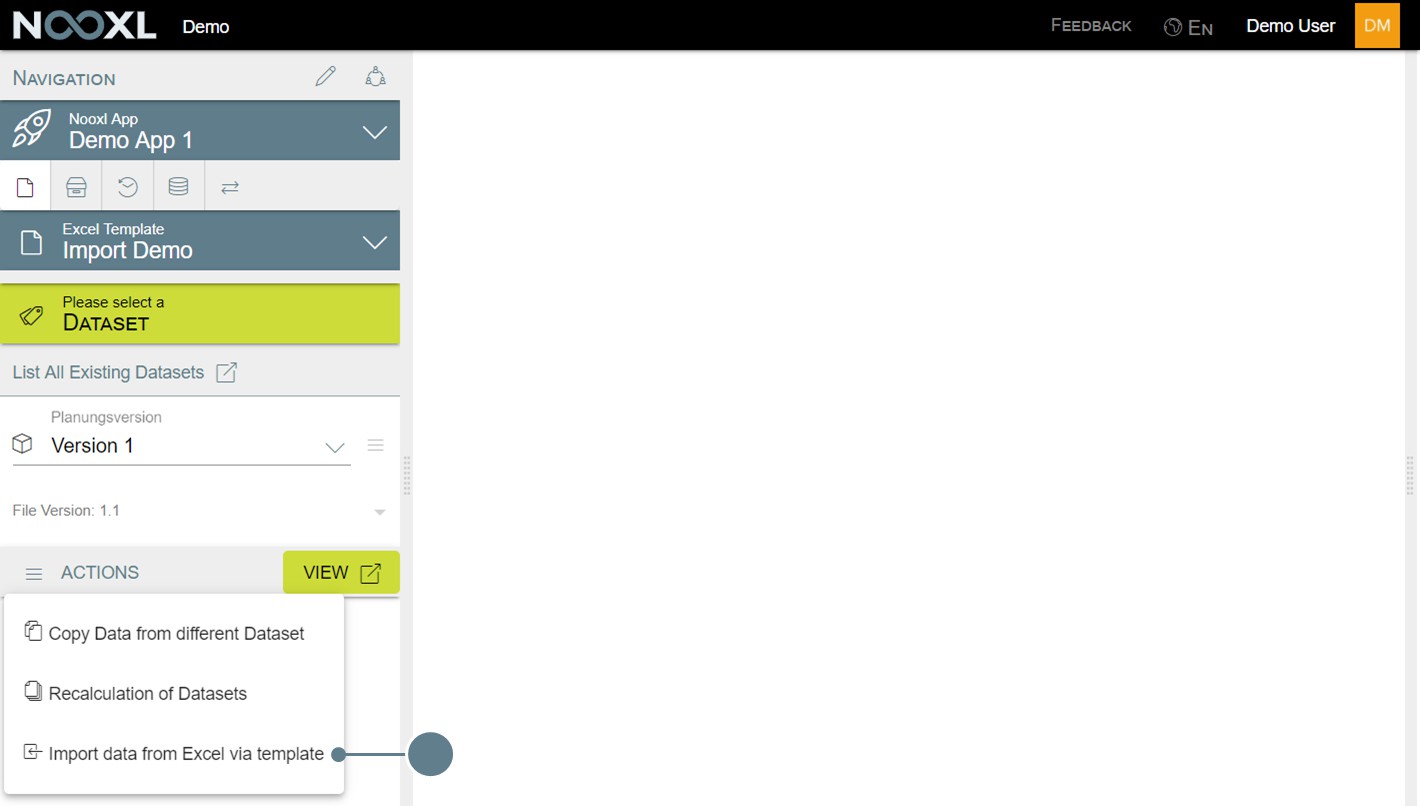
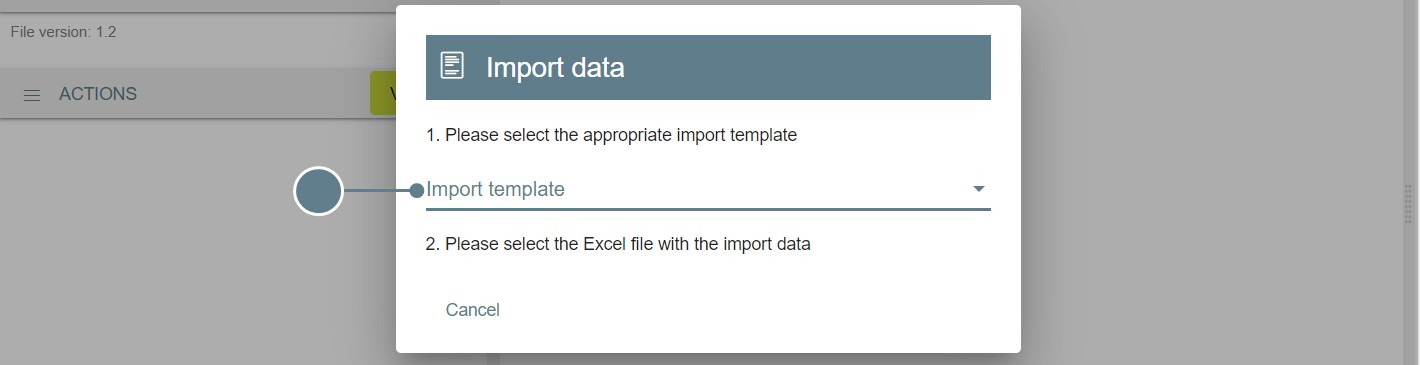
When a template is set up with a data import and migration template you'll see a third option in your dataset actions menu:
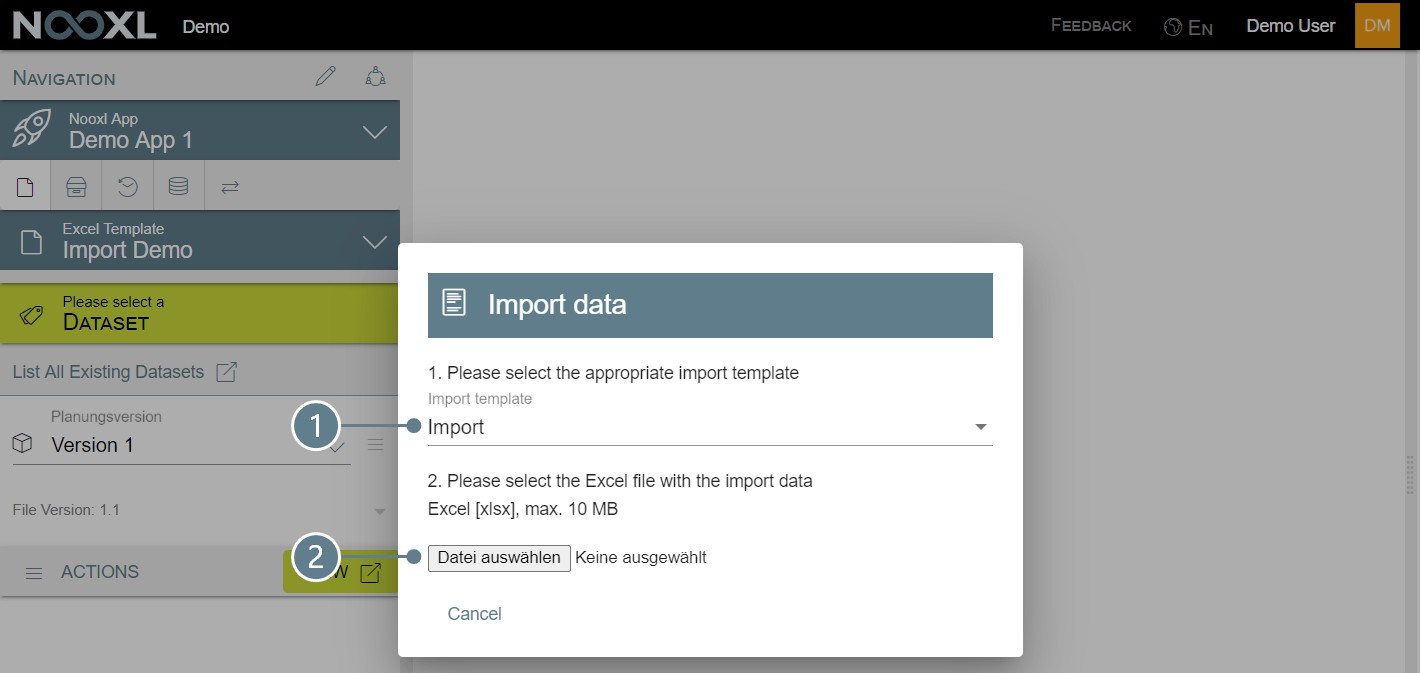
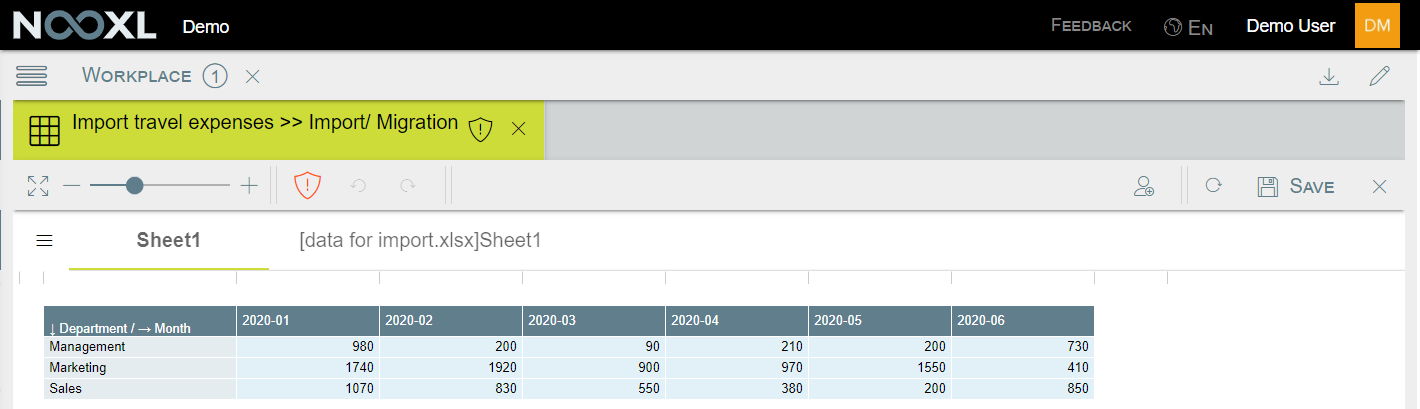
The dialog Import data lets you choose an import template (1) and select the file (2) containing all the data. Once you have selected a file, a button to upload the data appears.
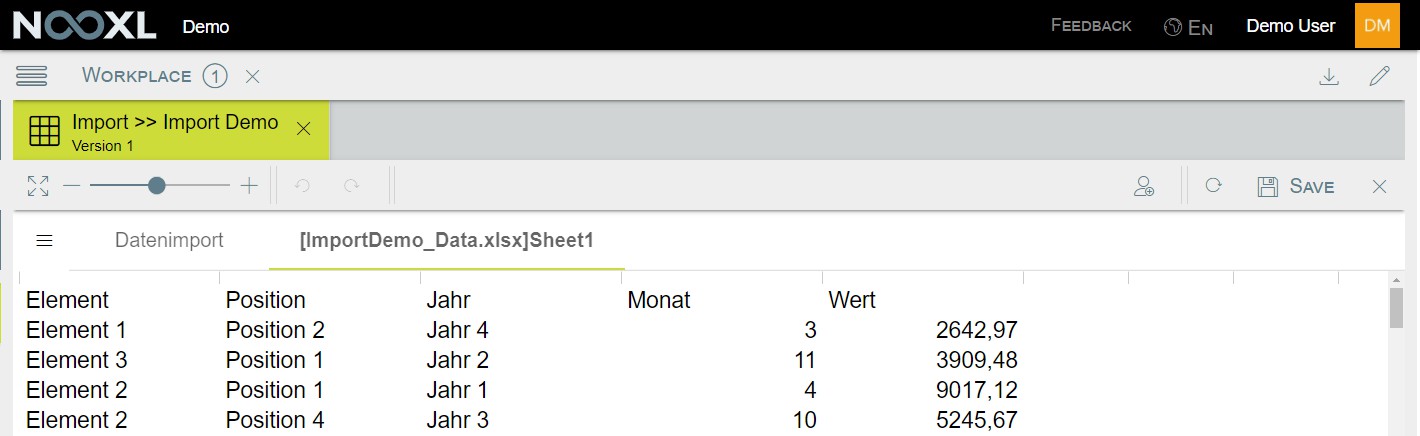
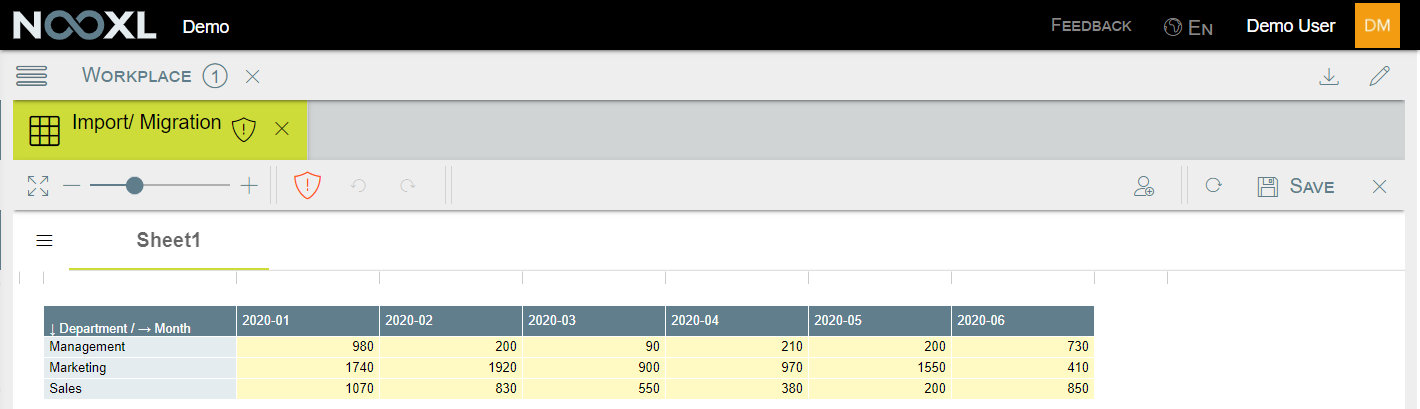
After the upload is complete, the template will open with an additional sheet. When you click on this sheet, you can see the actual data contained in your upload file.
To finish the import process, click on Save.

Create Migration Template Dialog
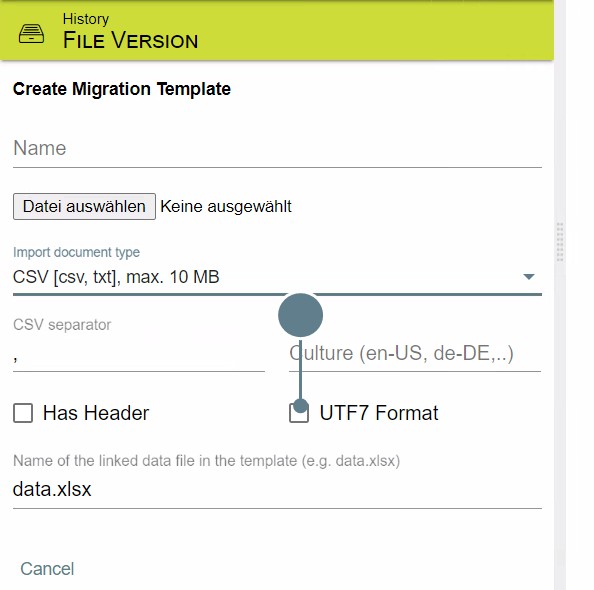
For CSV and TXT files
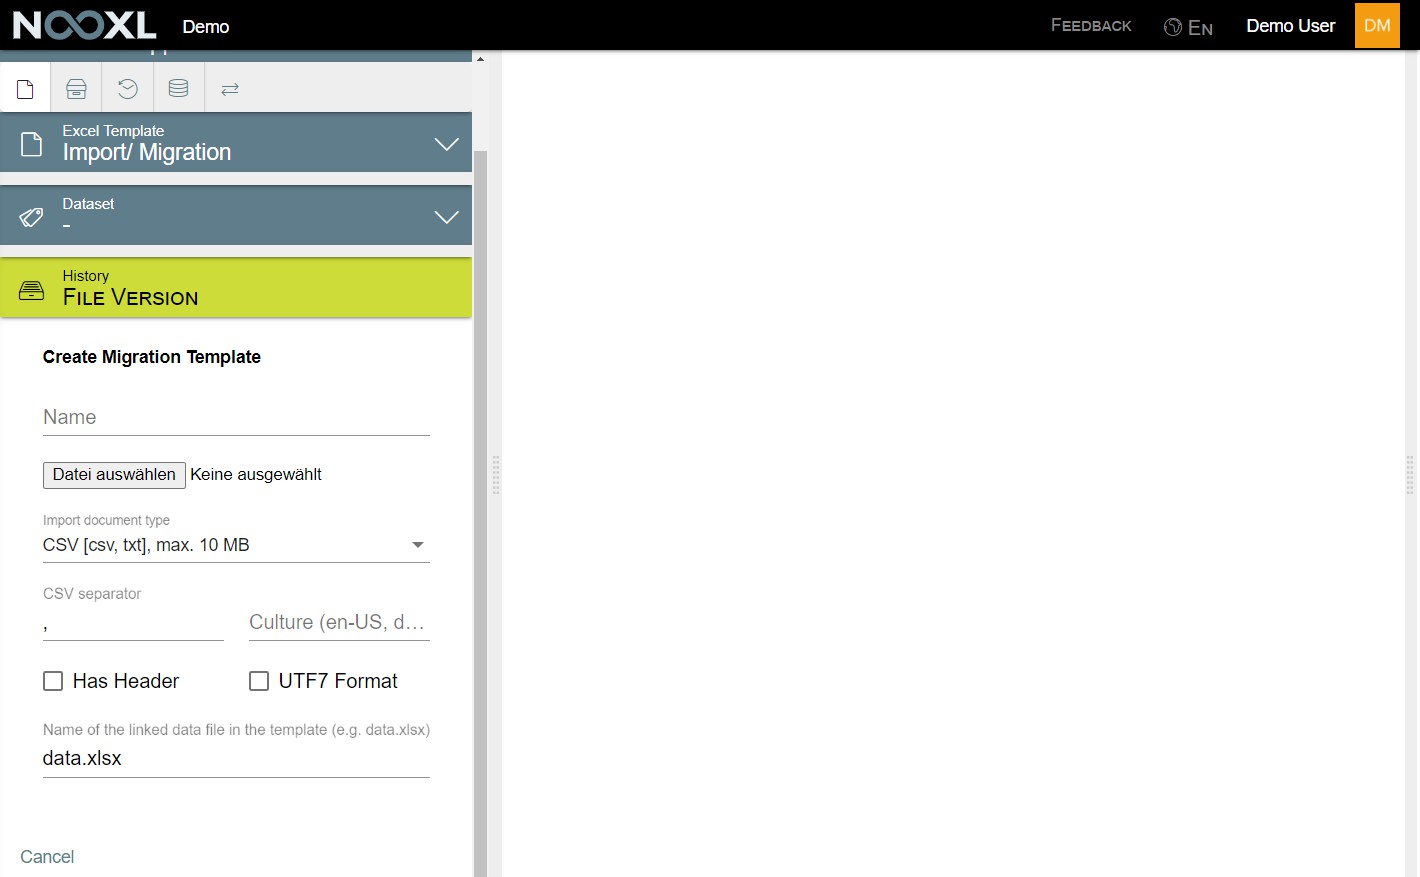
Name
The name of your Import template. This will be shown to the users in the Nooxl dialog "Import data":
File
A file selection dialog, were you need to point Nooxl to the actual excel import and migration file.
Import document type
CSV [csv, txt], max. 10 MB
is set here.
CSV separator
By default Nooxl recommends the comma as separator, since CSV is short for Comma Separated Values. However, some systems use a pipe symbol ( | ) or something exotic as the column separator, so here you can specify it.
Culture (en-US, de-DE,..)
The ISO 639-1 language code of the data you are dealing with. Essentially, this is where you tell Nooxl what to expect as decimal separator for numbers and what the date format looks like.
Has Header
If your data comes with a header row, check this option.
UTF7 Format
When this option is not set, the file is treated as an ANSI encoded file, which is okay for most data extracts. However, when you deal with special characters, your file is probably encoded with UTF-7 or UTF-8 and you want to tick this option in order to ensure that the special characters get imported correctly.
Name of the linked data file in the template (e.g. data.xlsx)
The name of the Excel data example file you used to create your import and migration template with. This string will be replaced with whatever the actual name of the import file is, which the user is trying to upload.
When you create an import and migration template based on a csv or txt file, you will do this as well with an Excel file as your example file. Please make sure, that the sheet, in which your data is located, is called CSV (all caps).
How to create an Import and Migration template
The following article will guide you through the process of how to create an import template for your Nooxl App. It will demonstrate the underlying concepts, which you can then apply to your specific use case.
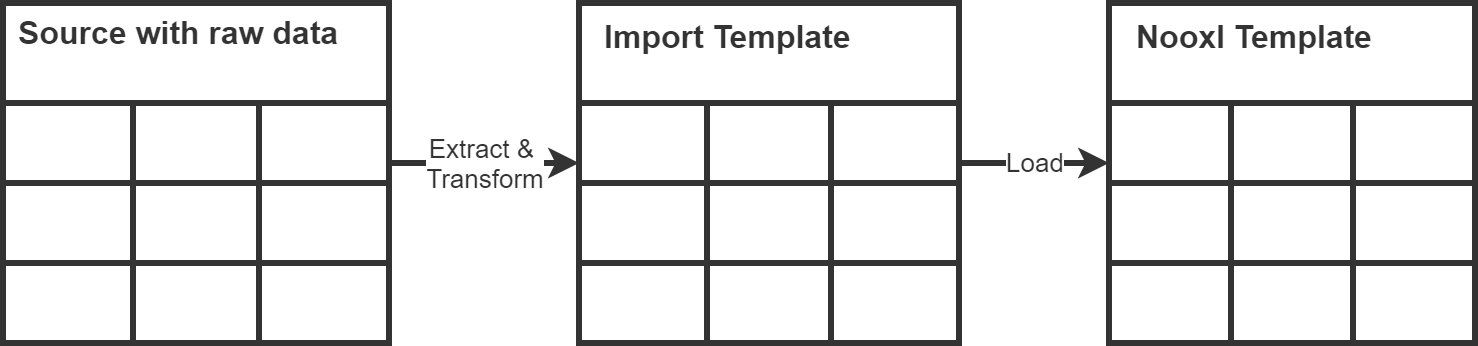
The following schema illustrates the import and migration process.
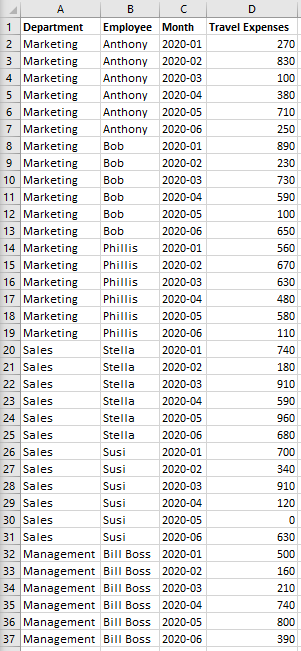
Step 1: View your source file with the raw data
First of all, we need to take a look at the data source provided to us, so we know what we are dealing with. Nooxl supports *.txt, *.csv and *.xlsx files as data sources.
In our example we will deal with travel expense data provided as an Excel spreadsheet by the travel agency of our company.
Please download the example file data for import.xlsx if you want to follow the guide.
In the file you will find the travel expenses per employee on a monthly basis. Additionally, the department of the employee is mentioned.
Step 2: Decide which data you need
Most of the time, you'll deal with files which are not tailored specifically for you. Typically, the files will contain information you do not need and which you want to discard on the way into Nooxl. This will dictate the layouts of your Nooxl template and your Import template.
Our travel expense example has detailed data per employee, but we only want to know the total travel expenses per department per month. So this is something we will need to transform in our Import template.
Step 3: Create your Nooxl template and store your data
In this step we create the Nooxl Template used to load the data, which is the template on the right side in the process scheme at the top. It will also be the base for the import and migration template in the middle.
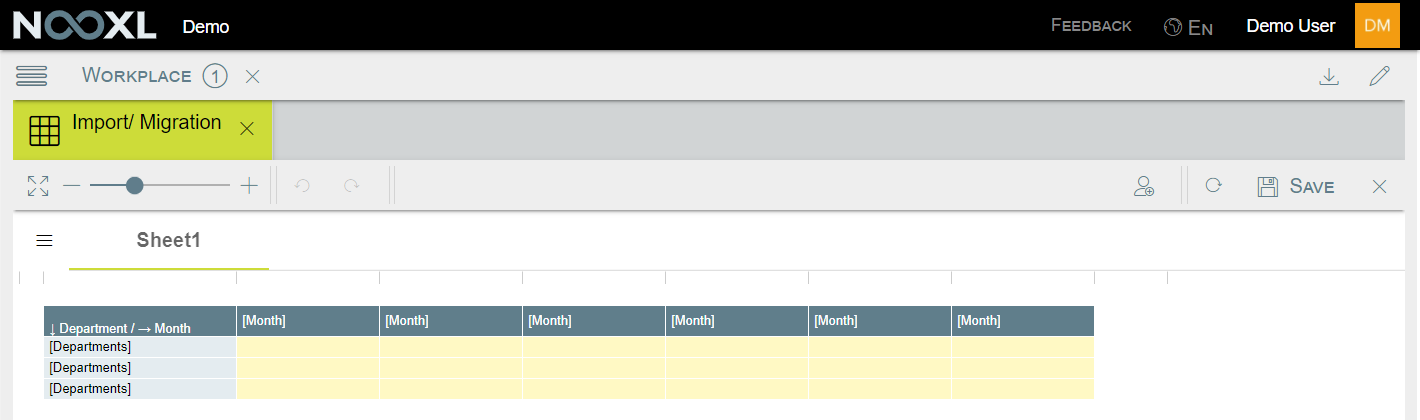
As mentioned in the last step, we want to store the travel expenses per department per month in Nooxl. As the layout we could choose a tabular layout, but we will go for a X-/ Y-axis approach.
| Department | Month | Sum of travel expenses |
|---|---|---|
| Management | 2020-01 | 1234 |
| Management | 2020-02 | 5678 |
| ... | ... | ... |
2: tabular layout example
| ↓ Department / → Month | 2020-01 | 2020-02 | ... |
|---|---|---|---|
| Management | |||
| Marketing | |||
| Sales |
3: X-/ Y-Axis approach
Create the two catalogs for the two dimensions
For the Nooxl template you will need two catalogs (Department and Month), with the following elements :
- Month
•
•
2020-01
2020-02
- 2020-03
- 2020-04
- 2020-05
- 2020-06
- Department
- Management
- Marketing
- Sales
Create the Nooxl template in Excel
The Nooxl template will look really simple, as it consists of just four cells.

You can download it here.
!](../media/c8bd82537f348e86c7163c43e80351c2.png)Select the cell and click on 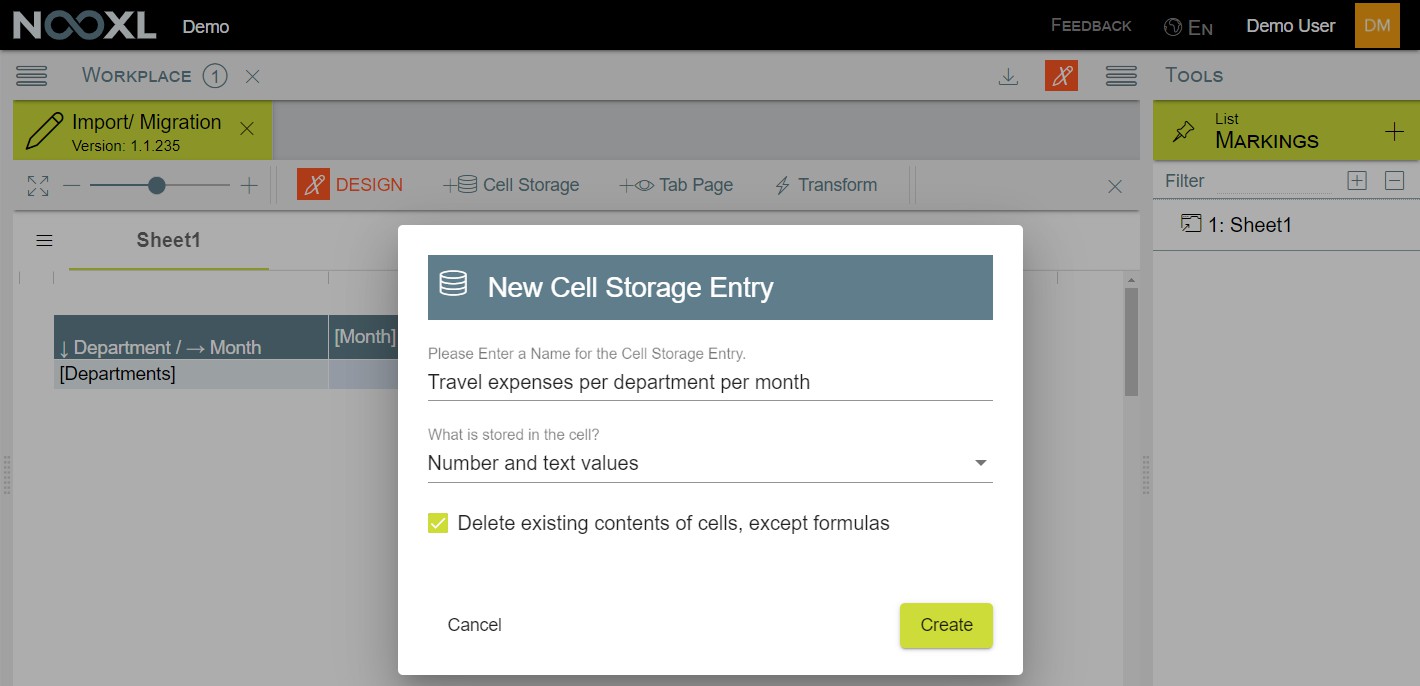
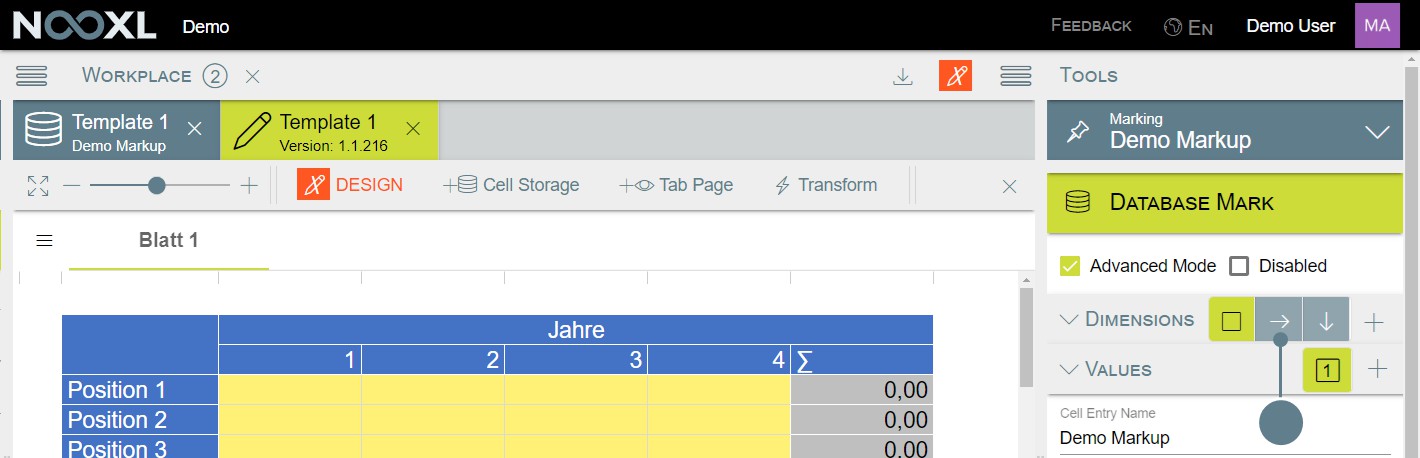
Open the database mark in the right hand tools section and activate the advanced mode.
In the advanced mode set up the two catalogs as the vector right and vector down.
Set the Expanse option to Insert complete lines (1) and to Copy cells with size from dataset 1 (2).
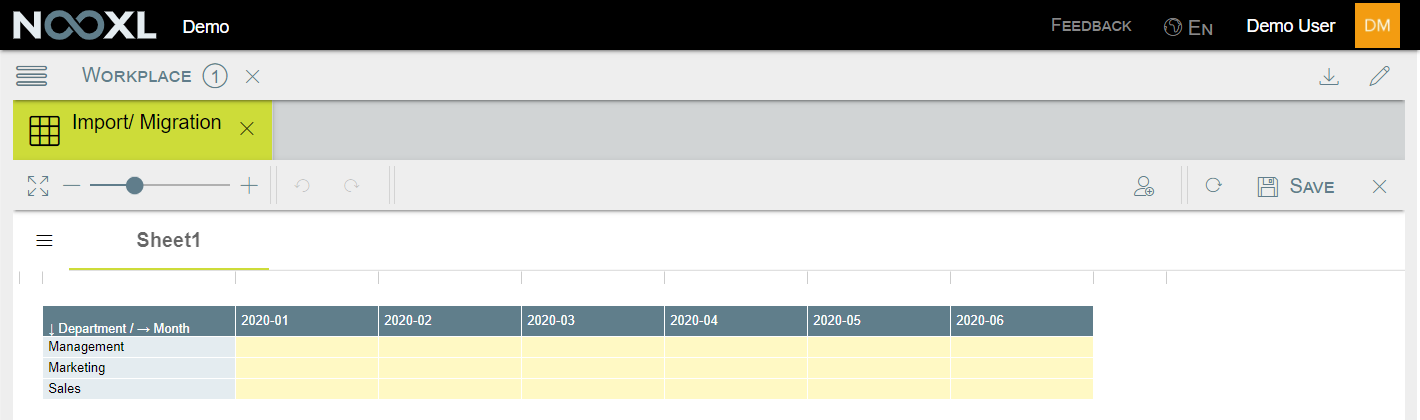
When you now take a look at the template in Nooxl you'll notice that the rows and columns have been inserted, but the labels are missing:
Read the catalog element names
To fix this issue you need to add two more values to your cell storage and set them up as follows:
| Department | Month | |
|---|---|---|
| Cell Entry Name | Departments | Months |
| Content Type | dataset | dataset |
| Content Source | CONDITION | CONDITION |
| Dimension | Down | Right |
| Property | ELEMENT_NAME | ELEMENT_NAME |
| Storage | READ | READ |
|---|---|---|
| Offset Columns | 1 | 0 |
| Offset Rows | 0 | 1 |
| Cell Style Auto | deactivate | deactivate |
We get the desired result.
Step 4: Alter your template to read data from the source file (create the import template)
In design mode you need to download your template. This will serve as the base for the import and migration template. Open up the template as well as the file with your import data and place them next to each other:
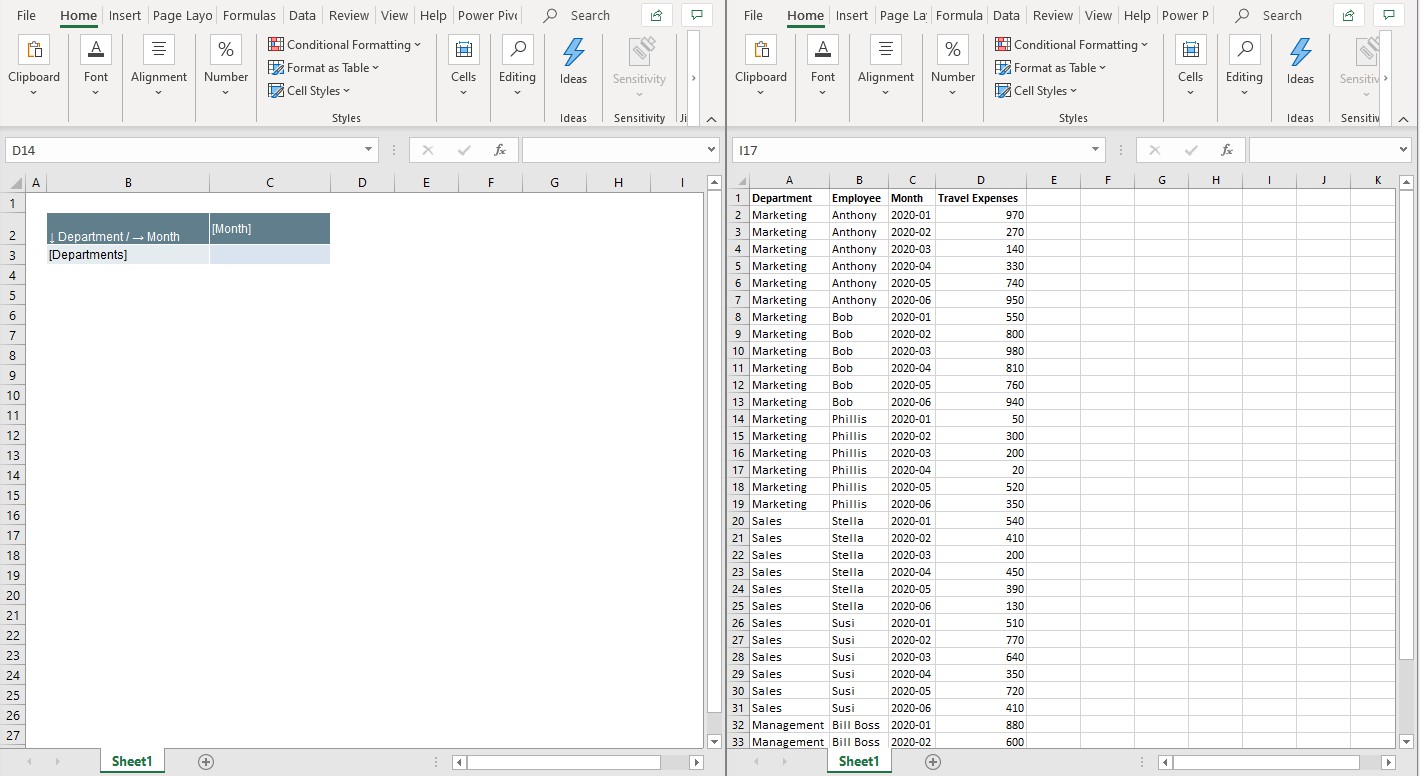
![]() Go ahead and create an Excel logic in the cells making up your cell storage (in the example ), which is
Go ahead and create an Excel logic in the cells making up your cell storage (in the example ), which is
able to extract the data from your source file. For the example file the formula could look like this:
=SUMIFS(
'[data for import.xlsx]Sheet1'!$D:$D; '[data for import.xlsx]Sheet1'!$A:$A;$B3; '[data for import.xlsx]Sheet1'!$C:$C;C$2
)
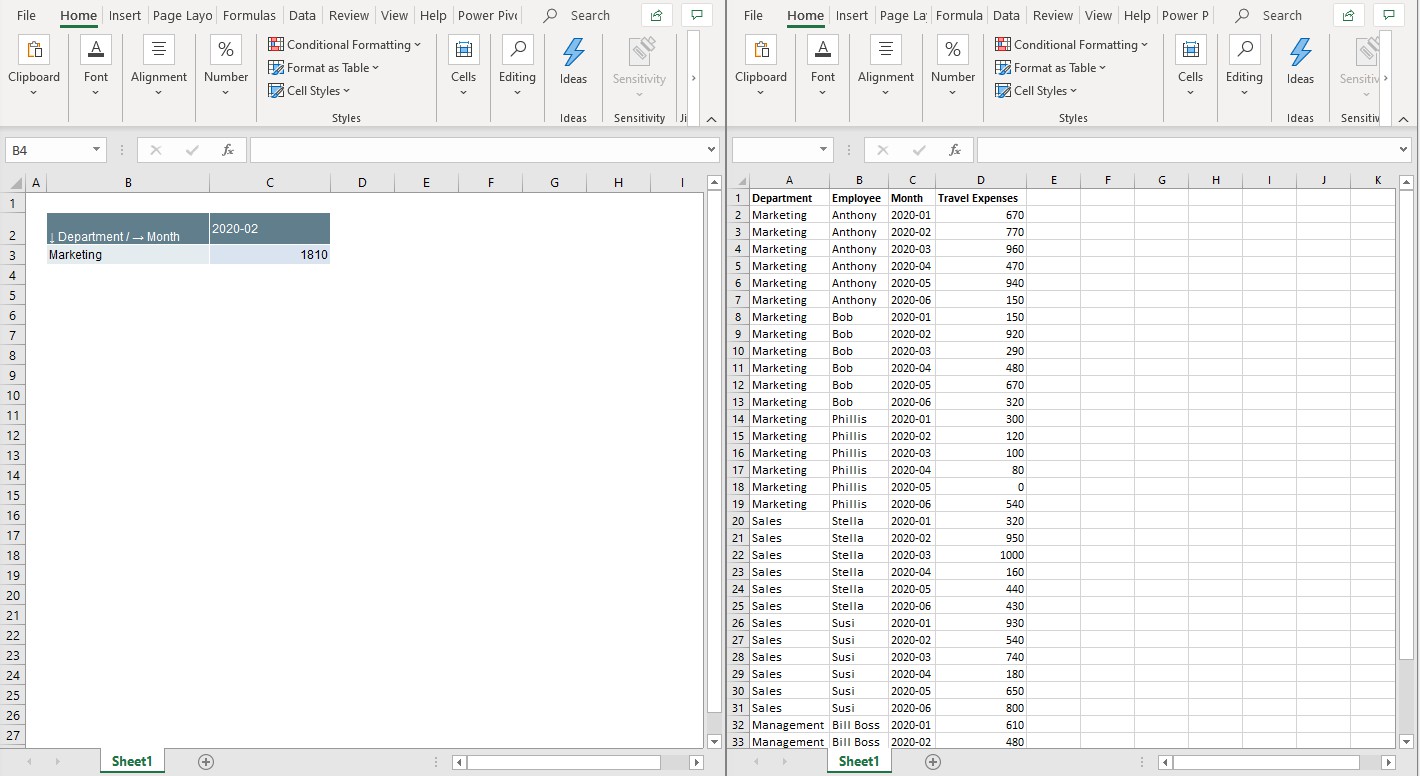
To test your formula you are of course allowed to insert test values in C2 and B3 :
![]()
As soon as you are finished:
Save your file.
data for import.xlsx
Make a note of the file name of your raw data (the string between the brackets in your formula). In the
example this is
Close the import template.
Close the file with the raw data.
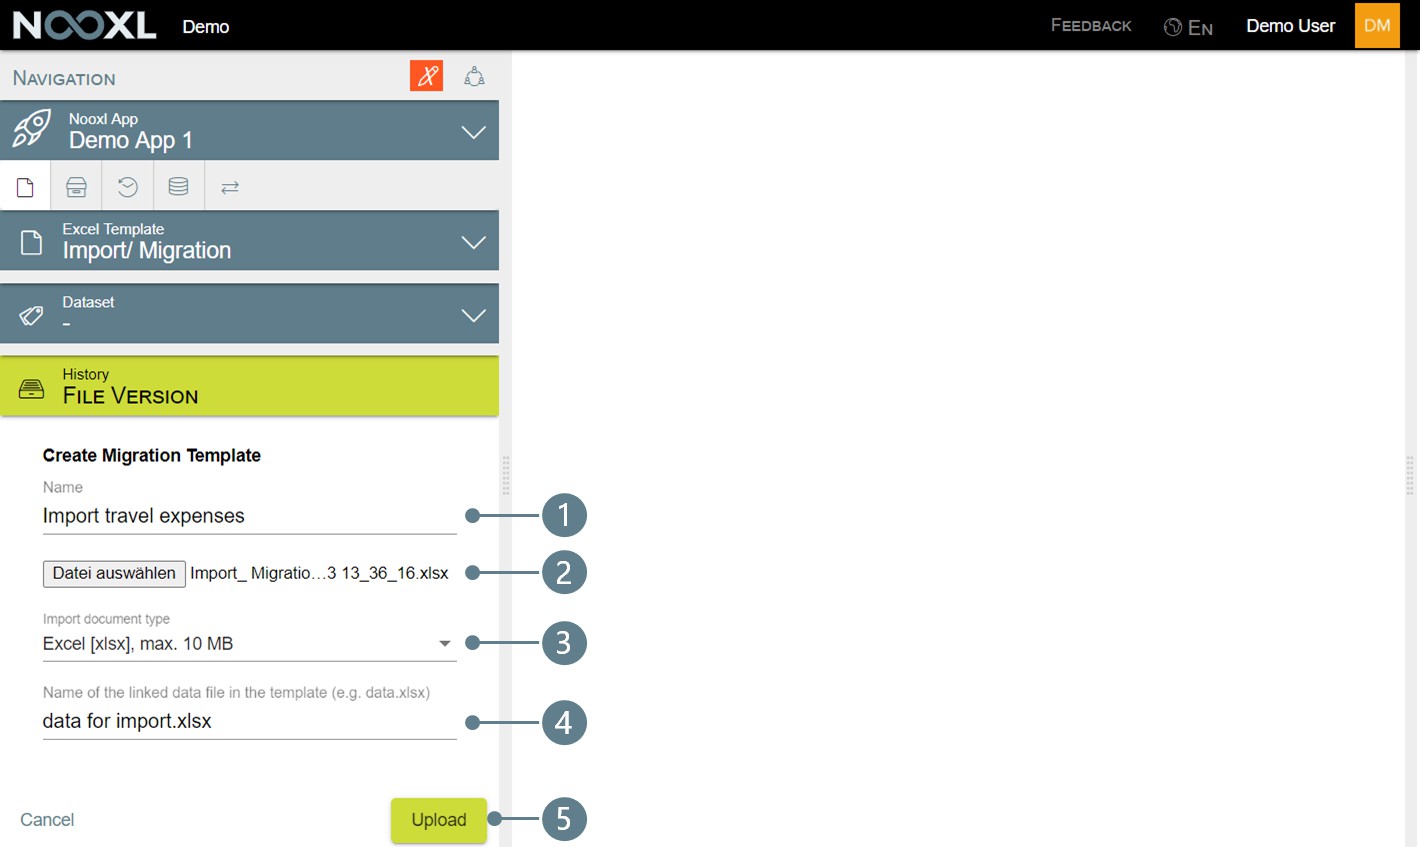
Step 5: Upload your import and migration template
In Nooxl, go to the dataset selection of your template and activate the design mode of your app.
Open the Version Management of your template.
Open the section Migration/Import (1) and click on Add a new migration template (2).
Give your template a name (1) and point Nooxl to the file from the previous step (2). For the import document type you need to specify the type, which is either Excel or CSV (this includes TXT files) (3). The field Name of the linked data file in the template (e.g. data.xlsx) (4) wants to know the name of the import file you used to create the migration template. This is the name between the brackets from the last step you needed to make a note of. When you are all set, click on Upload (5).
Step 6: Test the import
In the context menu Actions (1) of your template you will now find a new entry called Import data from Excel via template (2).
Click on it, choose your import template, point Nooxl to the file with the raw data and click on Upload. You can see the aggregated data of your raw file as well as the raw data itself (last tab). Right now the data is not yet stored, so you need to click save to finish the upload process.
When you click on Reload Calculation you will see that your data was successfully stored in the Nooxl database.
Congratulations, now when the travel agency sends you new data next month, you can easily import the data into your Nooxl app and use it in your templates.
Tips
Dealing with dates
DATEVALUE()
When you deal with dates in your raw data, please make sure that you convert those into real date data
types in your migration template. This can be done with the Excel formulas and .
If you don't do this, it is possible that your migration template will just discard the separators ("." or "/"
for example) and you end up with strings in the form
Dealing with special characters in txt and csv files
, but not actual dates.
When you have trouble with special characters like "&", "ä", and others, please make sure to activate the UTF7 Format option when you create the template:
Sheet name when creating a csv/txt based import and migration
When you create an import and migration template based on a csv or txt file, you will do this as well with an Excel file as your example file. Please make sure that the sheet, where your data is located is called
(all caps).
Execute imports via JobRanges
As mentioned in the article about JobRanges , you can have an import be part of your job.
Setting up an import job step
First of all you need to follow the instructions in the article about JobRanges to set up a job
in your template.
When you are done you need to create a cell storage in your template which will allow the users to upload the file with the data you want to import.
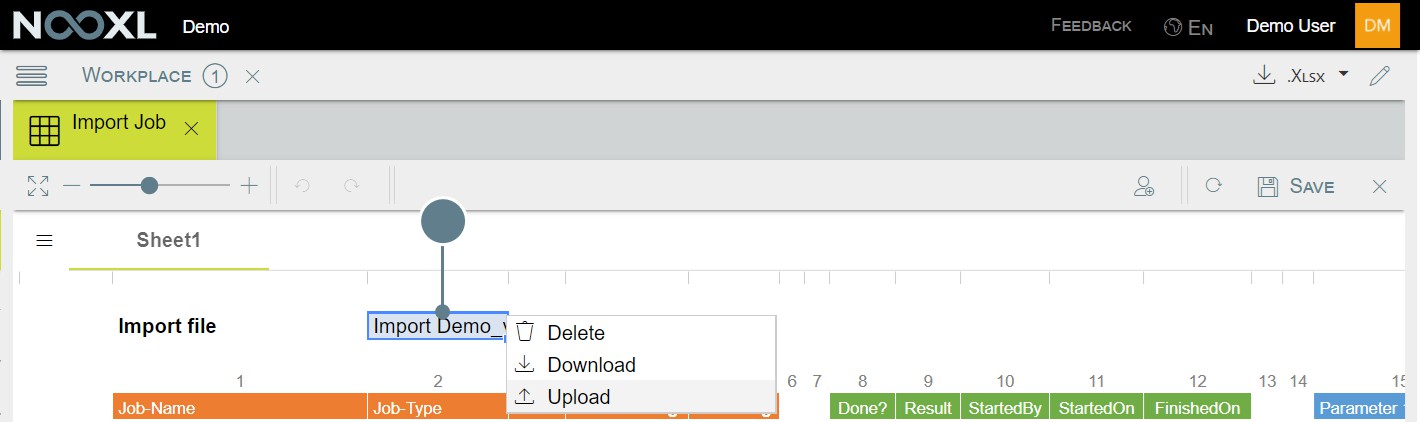
In the design mode of the template go to the markup for your document. Active the Advanced Mode (1),
add a fifth value (2), name it DocId (3) and get the that it will printed right next to the cell storage (5).
property for the uploaded file (4). Make sure
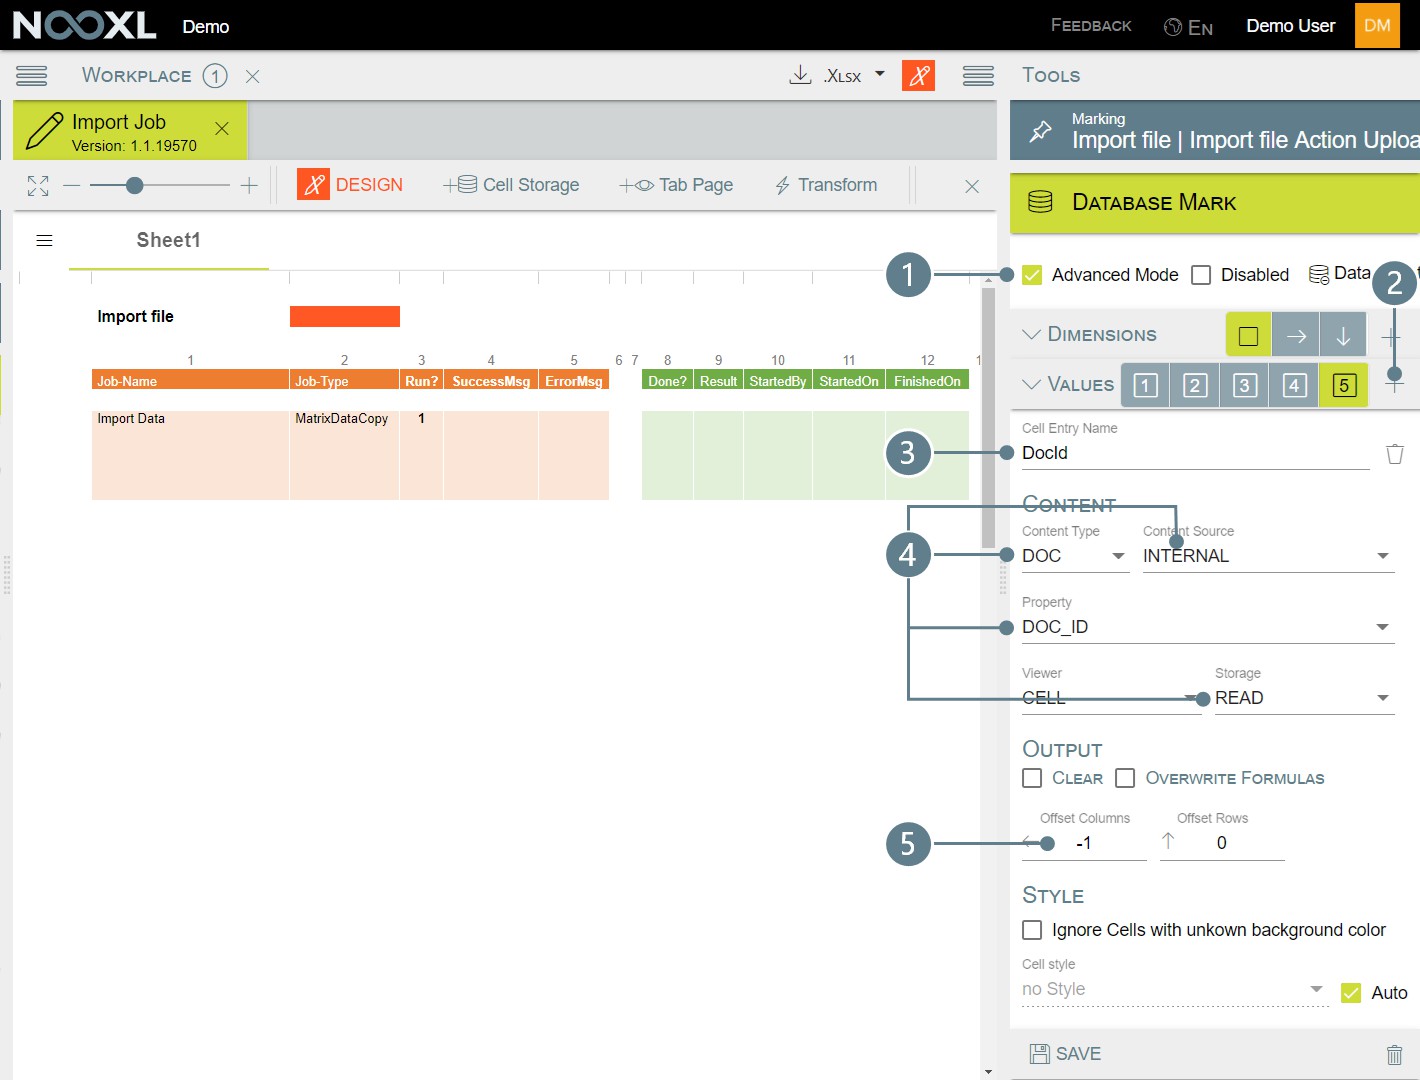
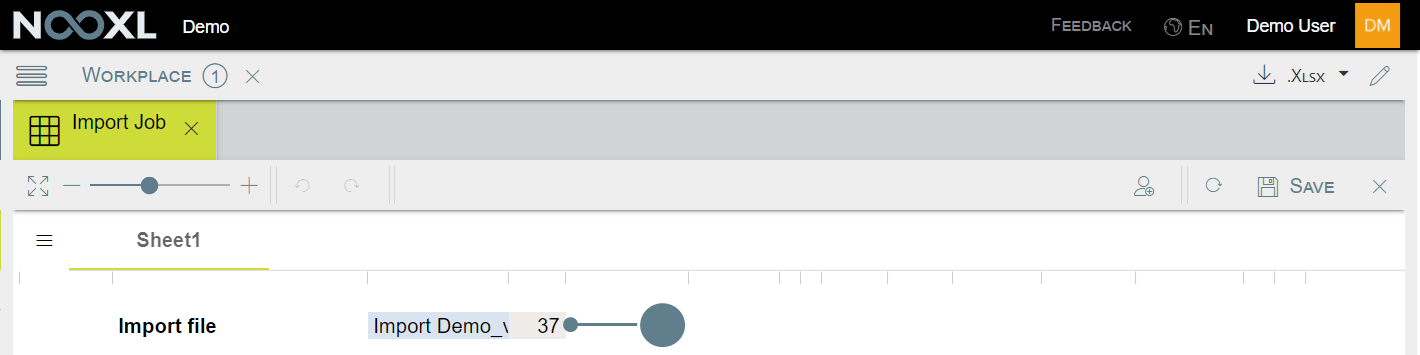
Then reload the template and write down the documents Id.
Now you have all the information you need to fill in everything for your jobs step.
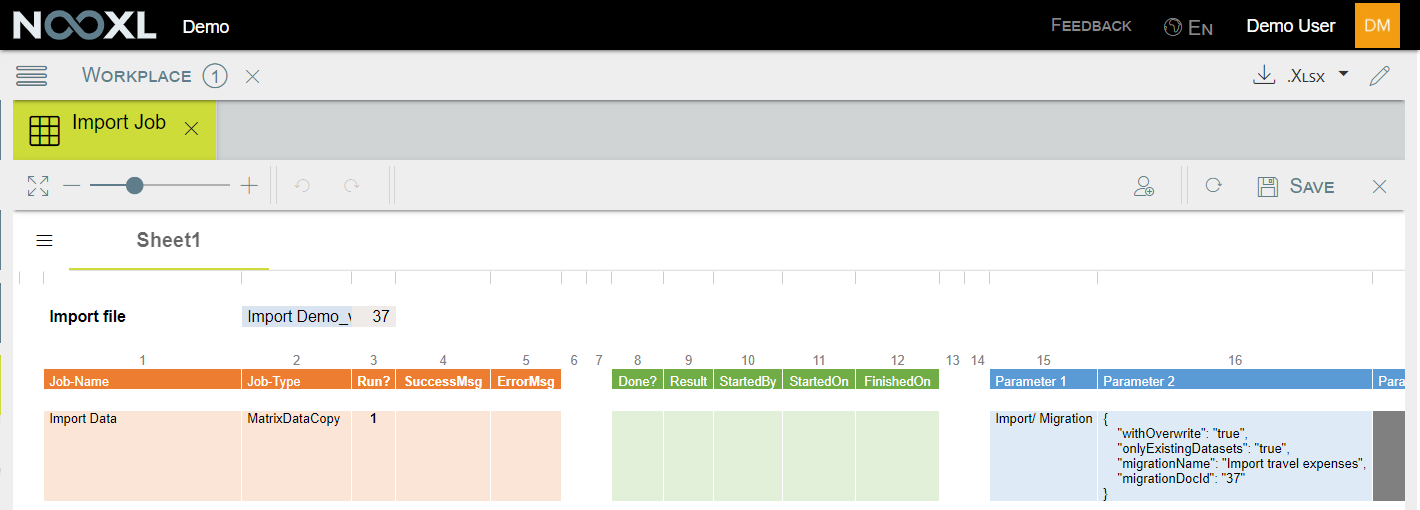
| Column | Description |
|---|---|
| Job-Name | Any name you feel suitable for your import. |
| Job-Type | MatrixDataCopy |
| Run | 1 if it should run. You can make this field editable for the user by changing the background color, to enable him to decide if the step should run or not. Another option would be to insert an excel formula to decide if it runs based on certain parameters. |
| Parameter 1 | Here you need to insert the name of your import template, as it is shown in the navigation. |
| Column | Description |
| |  |
|
| Column | Description |
|---|---|
| The migrationDocId (line 5) is the number from the last step. |
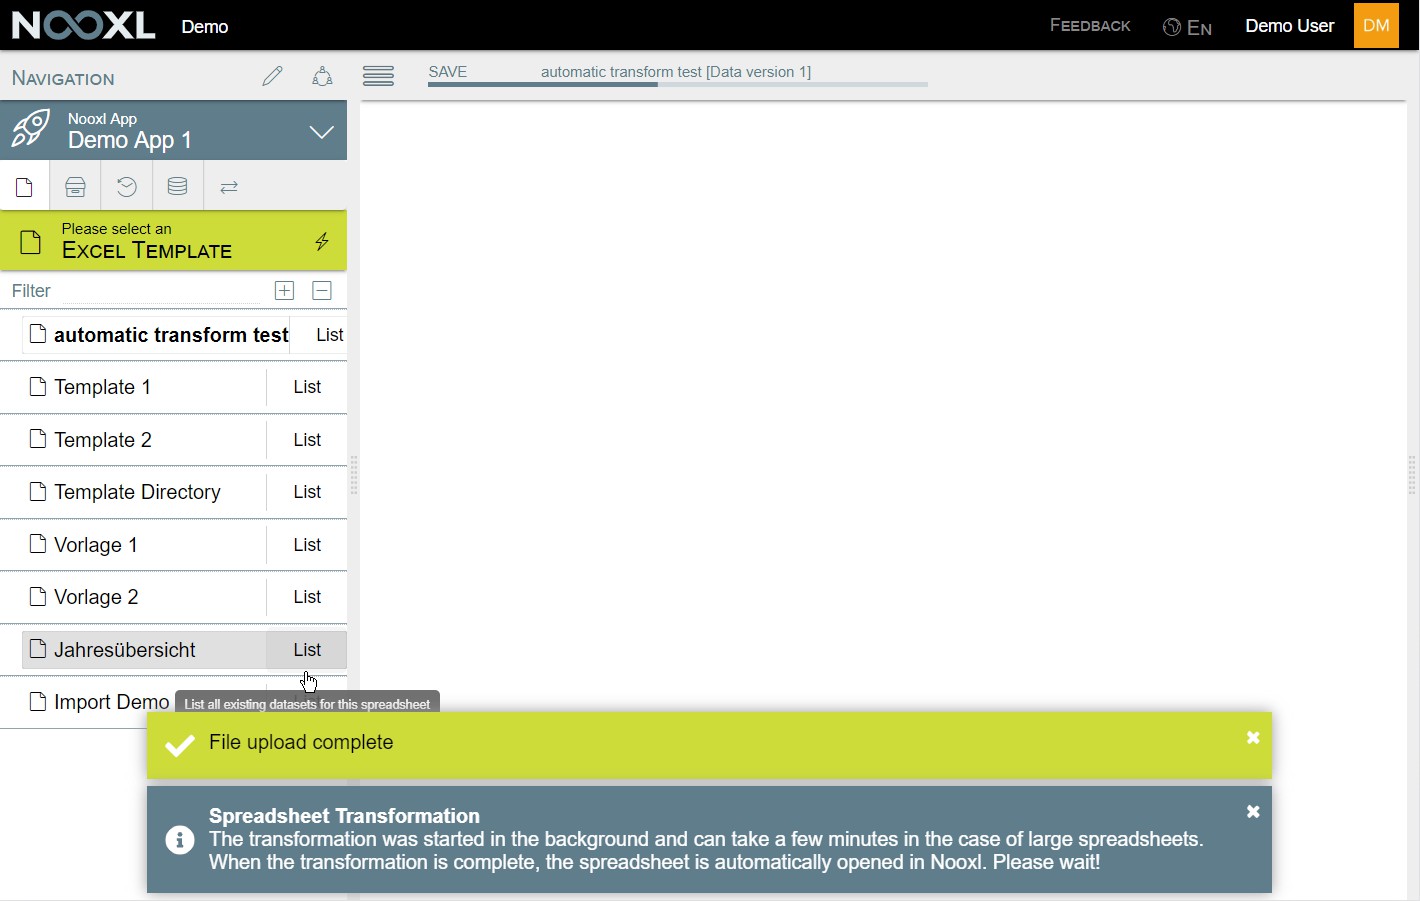
Automatic transformation from Excel file to Nooxl
When you create a new template for your Nooxl application or upload a new version of an existing template, you can let Nooxl create the cell storage entries instead of doing this manually.
Nooxl will try to identify all cells in your template, which likely have to be stored in the database.
How to use the automatic transformation
To start the automatic transformation of a new template, click on the lightning icon in the left navigation panel:
Next, you find yourself in the usual template upload dialog. Here you need to specify where the new template should be located (1), what the visible name of the entry is (2) and whether you want to specify the order (3) instead of ordering the items alphabetically. By clicking the Upload button (4) you'll get a dialog to select a file from your local machine.
Then, you can give a reason for the change (1) to document your progress. It is also possible to create a new major version (2). When you are done giving all the needed information, make sure that Transform automatically (3) is turned on and click on Upload (4).
Depending on the size of your template, the process to automatically transform it can take a while.
The result
In the following example Nooxl successfully identified the input cells (marked red) and created a cell
storage with the name
. Additionally, it created a tab page called
since this is the
name of the sheet in the original template.
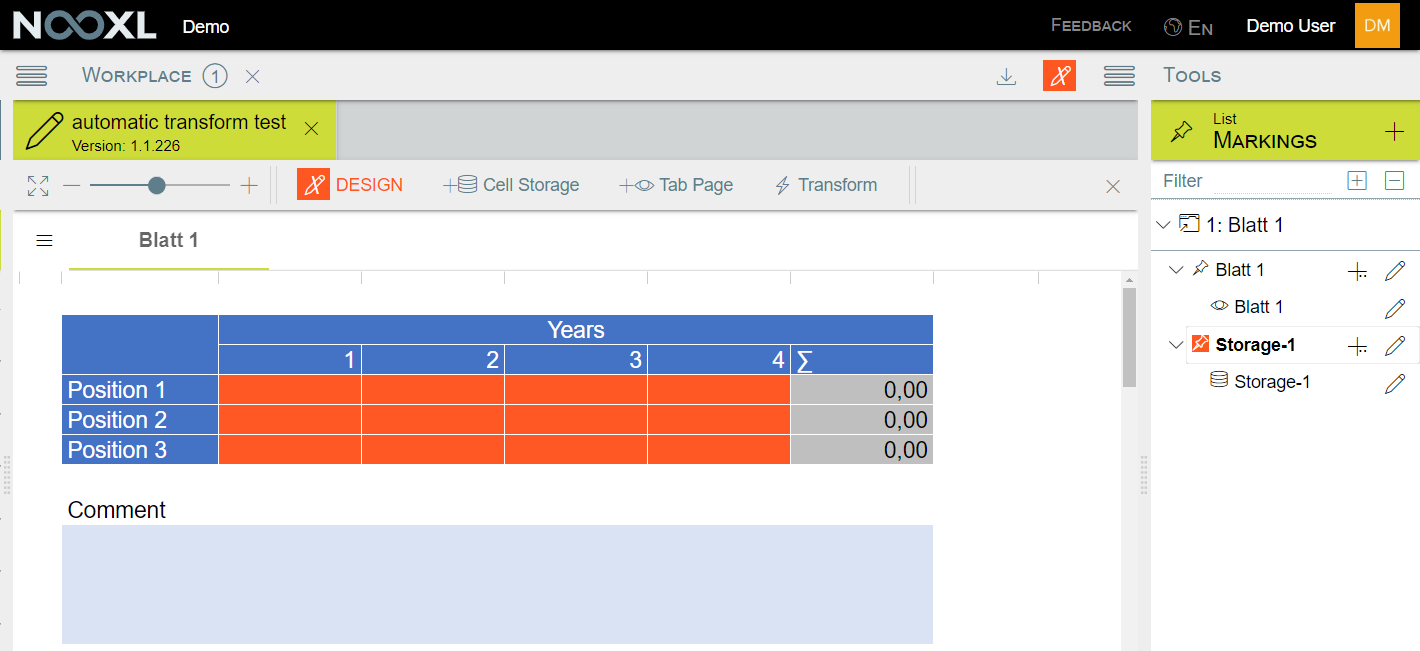
Nooxl also created a selection using the catalog data versions for the new template. This is the default
behavior.
What to do after the automatic transformation is complete
Check if everything has been set up to your liking
Nooxl analyzes all cells and how they are referenced inside the workbook to determine if a cell is likely a manual input, which should be saved to the database. Since the content of the comment cell in our example is not referenced by any other cell in the workbook, Nooxl didn't recognize it as a cell whose content should be saved to the database. If you wish to store the content of this cell, you need to create a cell storage manually.
By default, Nooxl will create all cell storages as DATA_TEXT_NUMBER , which is fine. If possible, it is, however, recommended to change this to DATA_TEXT or DATA_NUMBER if you know for sure that the cells content can be only one of the two.
Add more selections to the dataset
The default selection with data versions is maybe not what you really need for your template. So please go ahead and delete or expand the selections.
Upload a new template
To create a new template in Nooxl, click on the button with the pencil icon in your app to switch to the draft mode of the app.
You can then create a new template in the app by clicking on the red plus.
In the investment mask, please enter a name for the template (1) and then click on Save (2) to create the new entry.
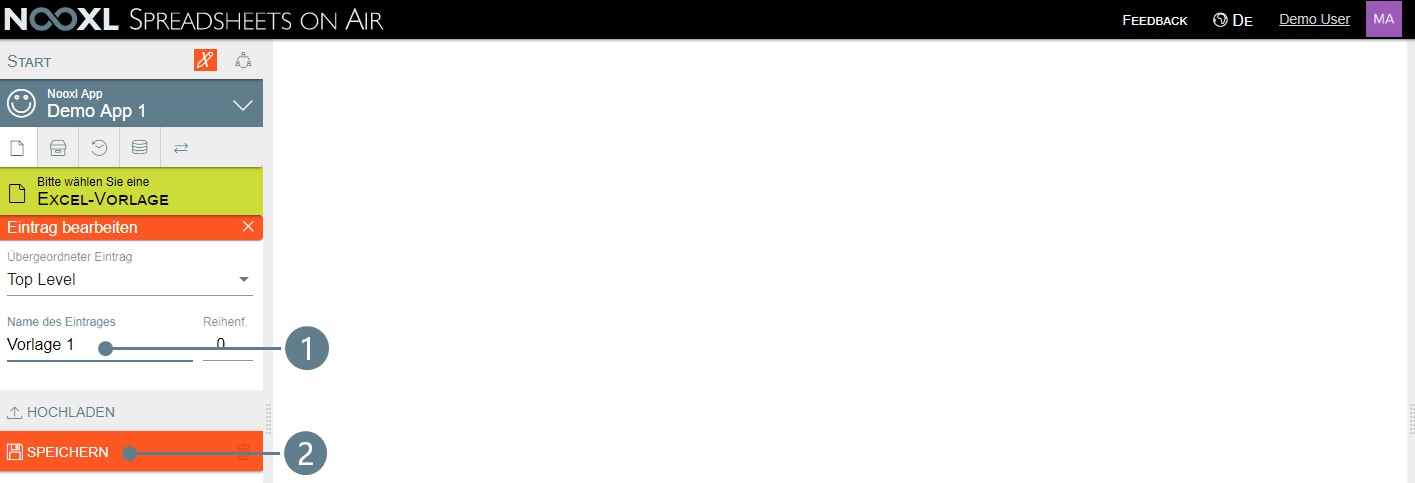
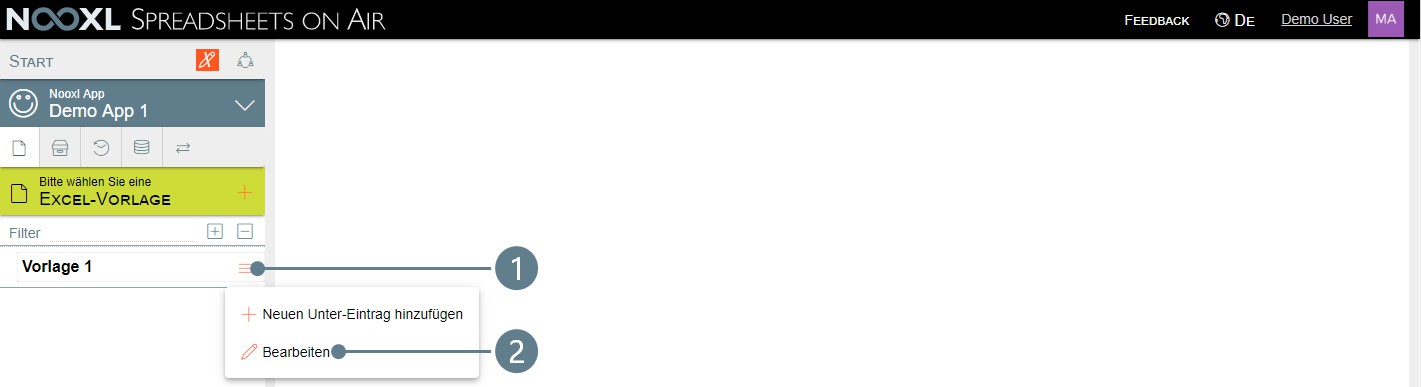
To assign a spreadsheet to the entry, click on the three red horizontal lines to the right of the entry (1) and then select Edit (2) from the menu.
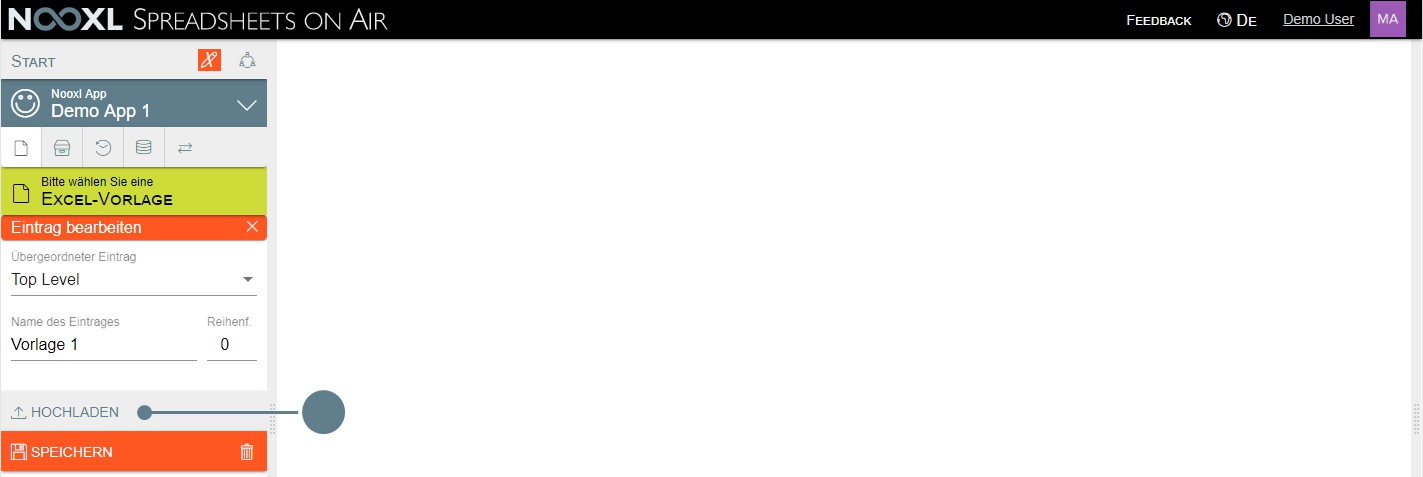
In the mask for editing the entry, click on Upload.
Save the following Excel template to follow the instructions or upload your own Excel template

Vorlage1.xlsx
In the next dialog box, click on Upload file and then select your own template or the template provided here.
You can then enter a reason for the change (1) and upload the template (2).

Exit the draft mode by clicking on the red pen.
Set up the dataset selections for a template
To use our catalog in the template to identify different datasets, we now need to create a selection and assign it to the template. For this we return to the "Excel Template" section of Nooxl.
Next we click on "More" to the right of our template to get to the dataset selection.
To create a new selection and add it as a selection, the design mode of the app must be activated. This is done by clicking on the pencil so that it is displayed in red.
In draft mode a new selection can be added to the dataset by clicking on the red plus.
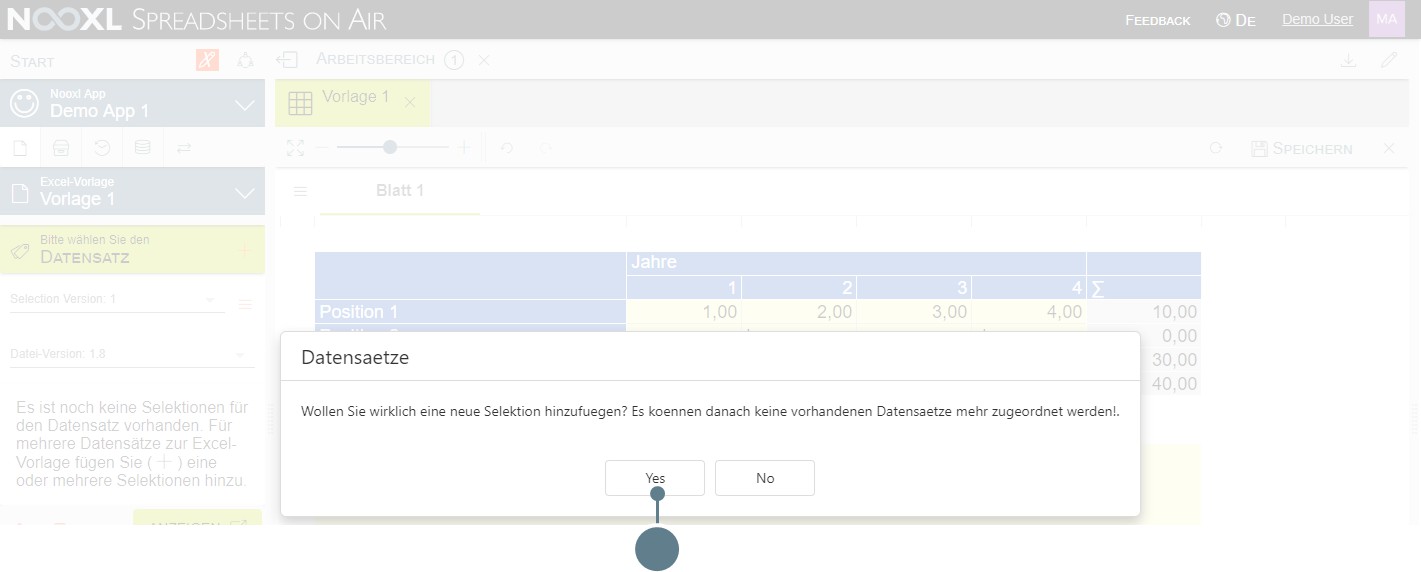
The system then warns you that by adding new selections, the existing datasets can no longer be assigned to the template. Please confirm this warning by clicking on "Yes".
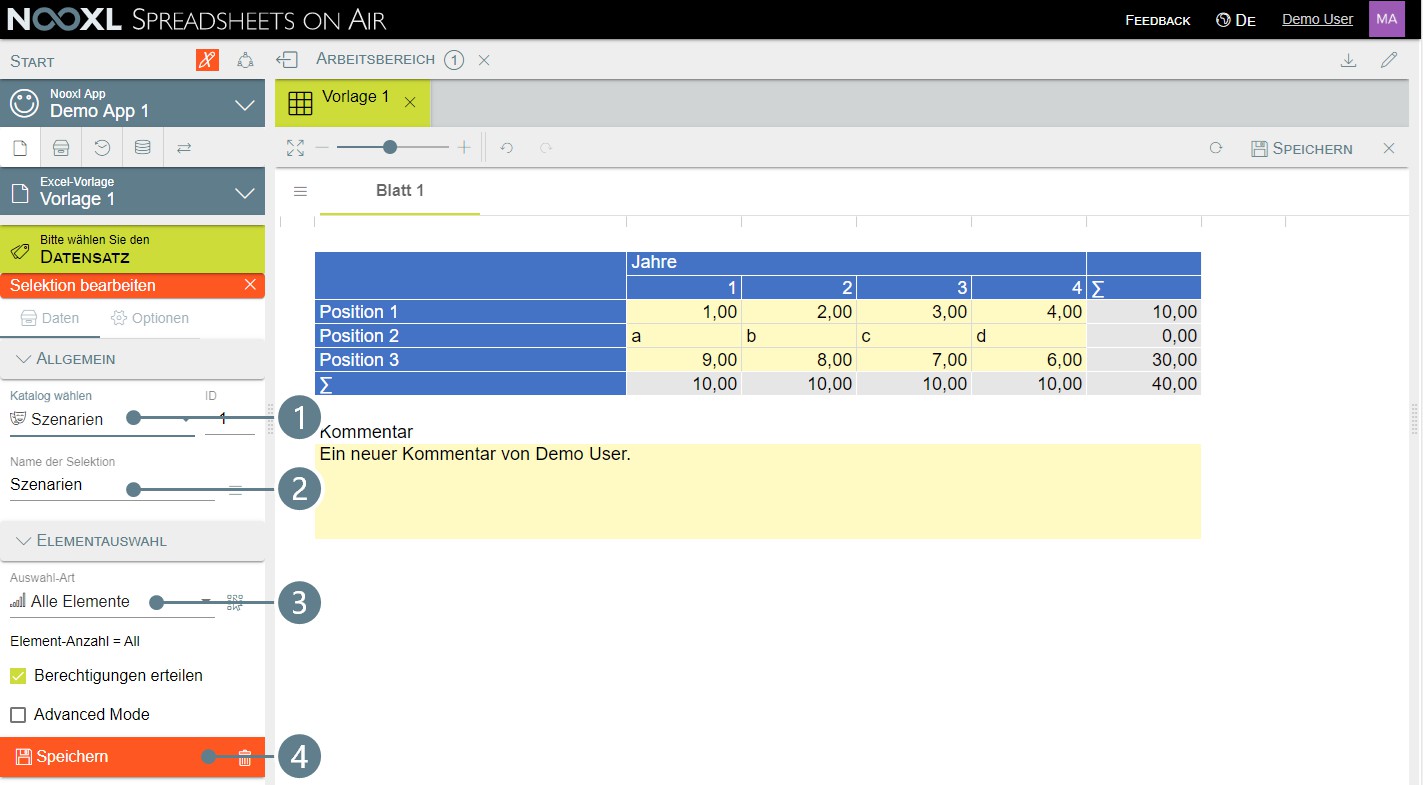
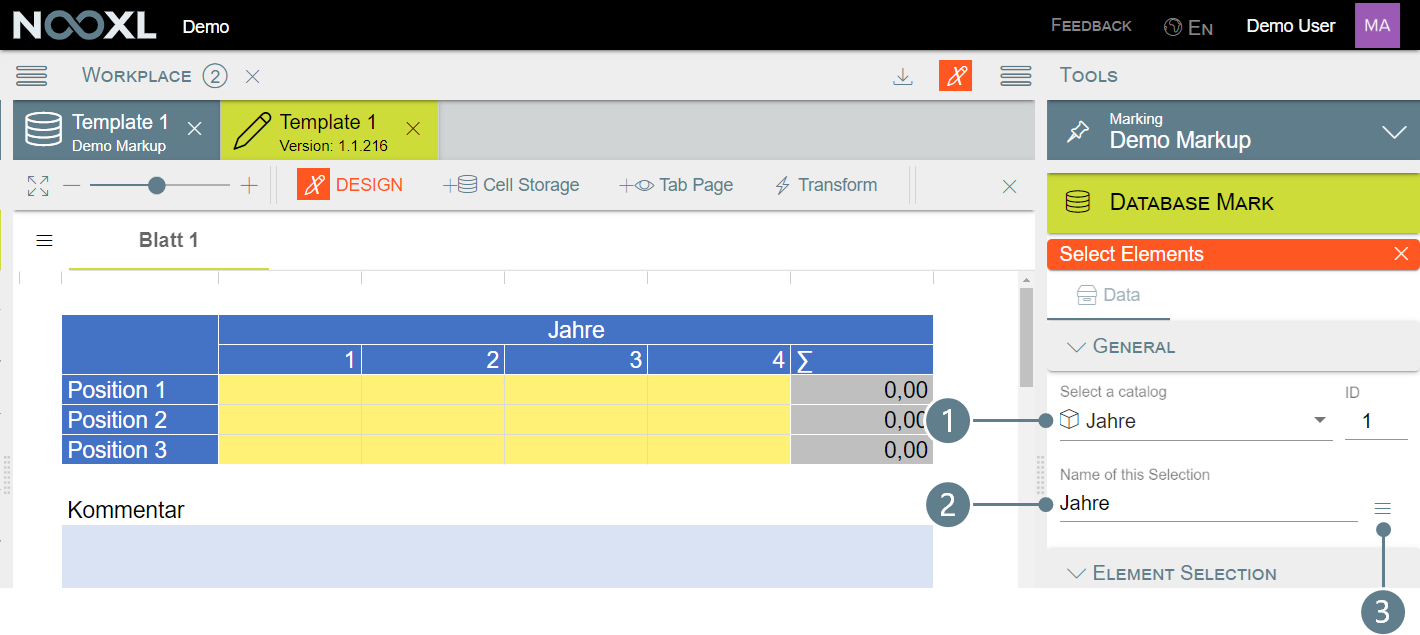
Now you can select the previously created "Scenarios" catalog (1). Nooxl automatically fills the field "Name of selection" (2) with the name of the selection.
In the Element selection area, Nooxl selects "All elements" (3) as selection type, so that you can complete the creation of the selection directly by clicking on Save (4).
Now leave the draft mode to test the new dataset selection.
The selection Scenarios (1) now appears in the dataset selection and as long as no element has been selected here, the button for displaying the dataset is grayed out (2).

Create a new template based on an existing template (copy/ clone templates)
This article explains how you can base a new template for your Application on an existing template. This process is called cloning or copying.
Step 1: Enter the Design Mode
First of all you need to switch to the design mode.
Step 2: Go to the version management of the template you want to copy
When you are in the design mode, please go to the template you want to copy.
Step 3: Clone the template as a new matrix
Next you need to open the context menu (1) in the the version management and select Clone as a new matrix (2).
Result
The new template will be created with a " copy" after the original name and you can go ahead and rename to your desire.
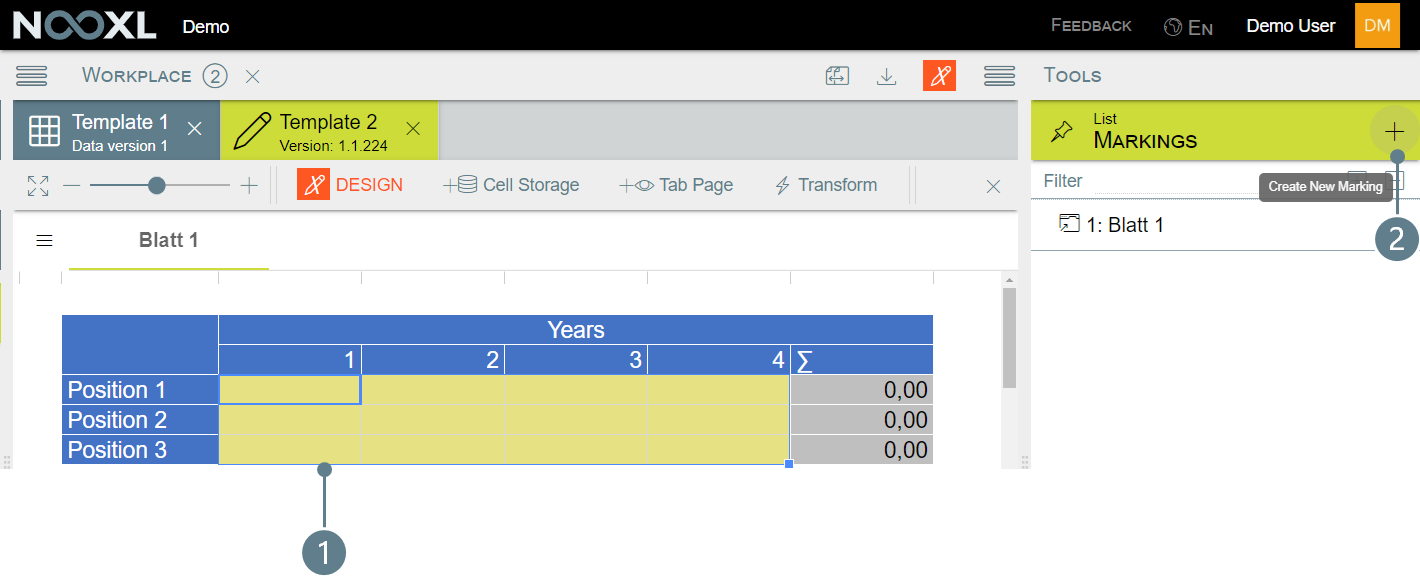
Markups/ Markings
As a designer, you can add so-called markups to a template in design mode . Markups can be used to show and hide views dynamically, to save data or to host further Nooxl functionalities.
Create a markup
To create a new markup, simply select the desired cells with the mouse.
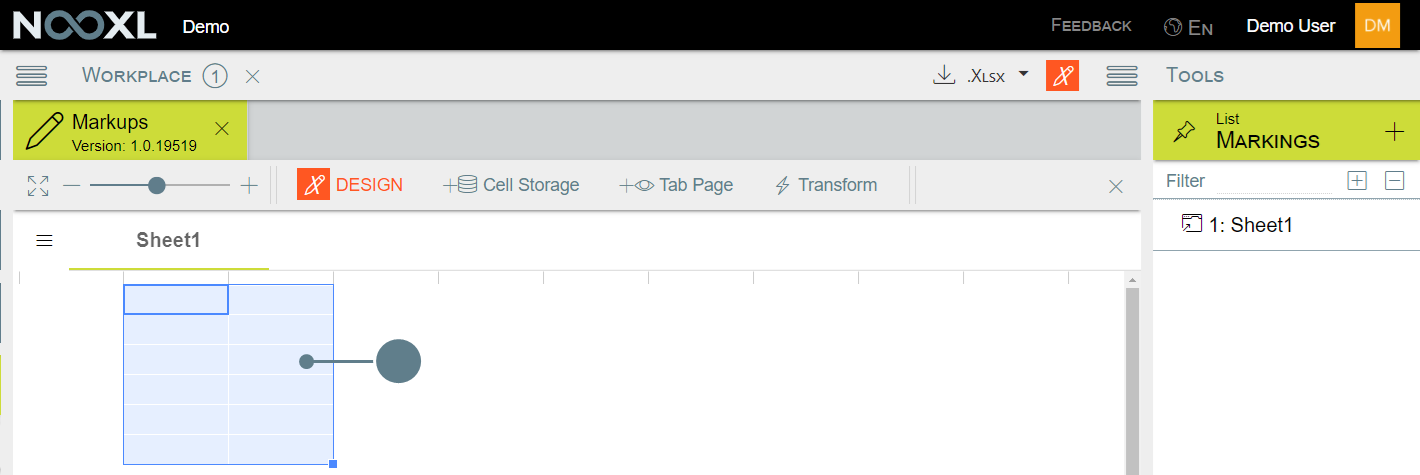
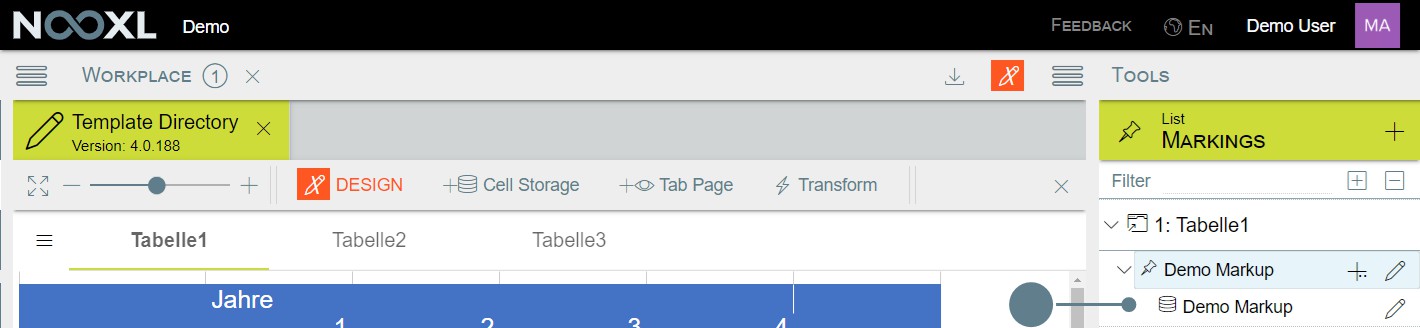
Then click on the plus to the right of "Markings" in the right-hand menu area "Tools".

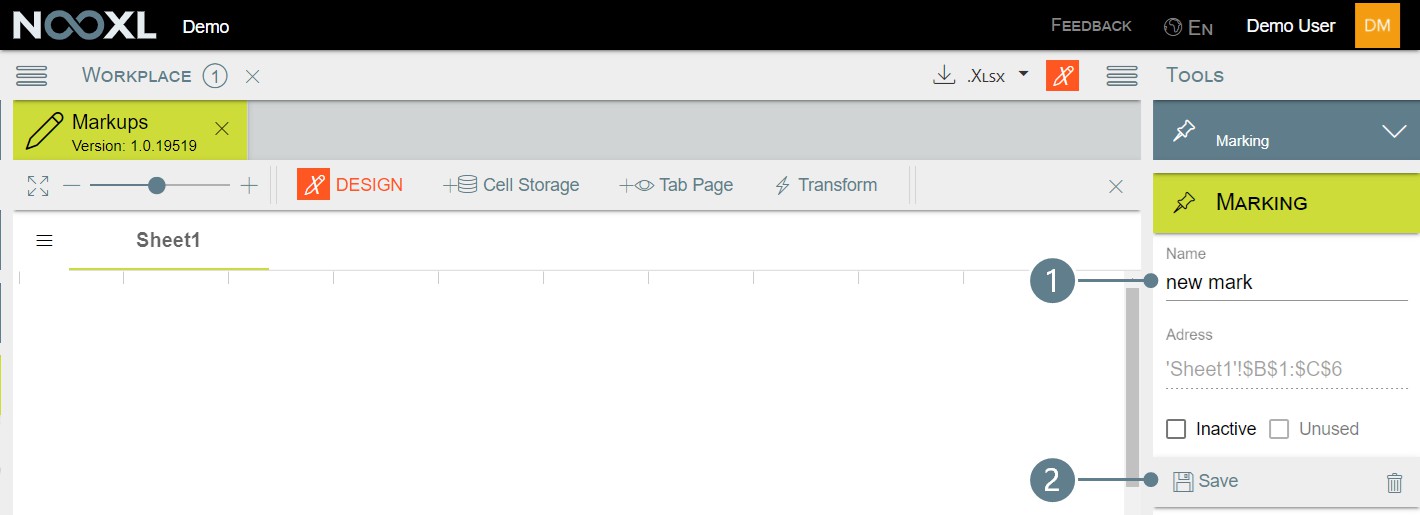
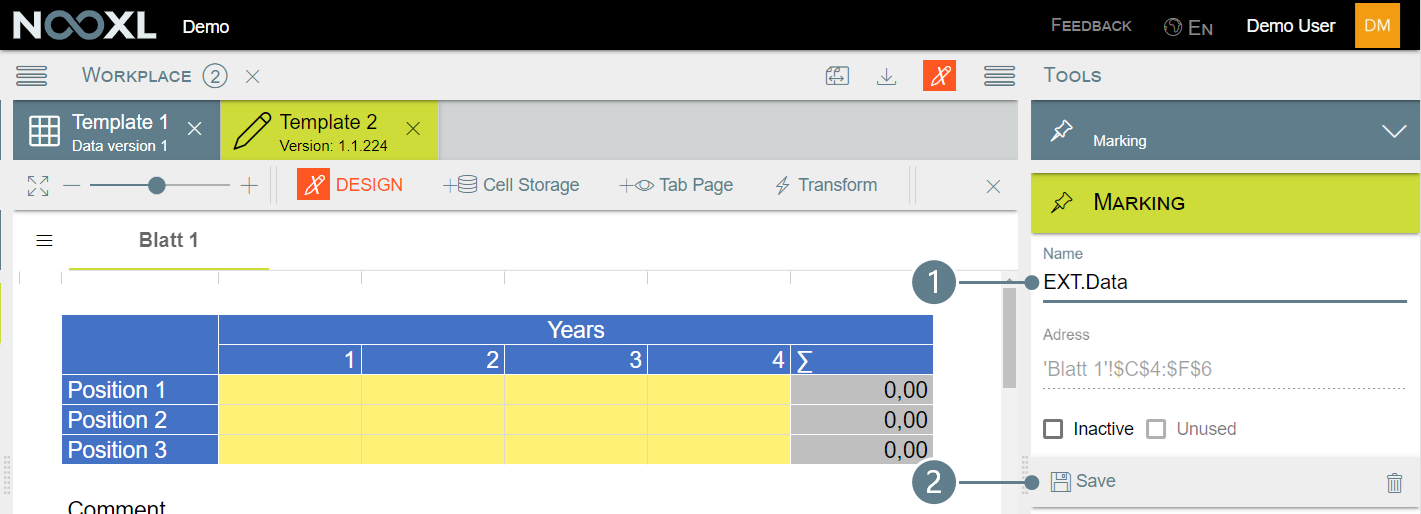
In the dialog that opens, assign a name (1) to the markup and save it (2).
If the check mark is set to Inactive here, this markup and all its "children" are ignored. This can be useful if you want to define and configure a markup, but want it to be active only at a later time.
If adjustments are made in the Excel template, it is possible that a markup is no longer present in the current file, for example because the cells have been deleted. If this is the case, you will be notified of the missing markups when uploading the template and they will also be displayed crossed out in the tool list on the right.
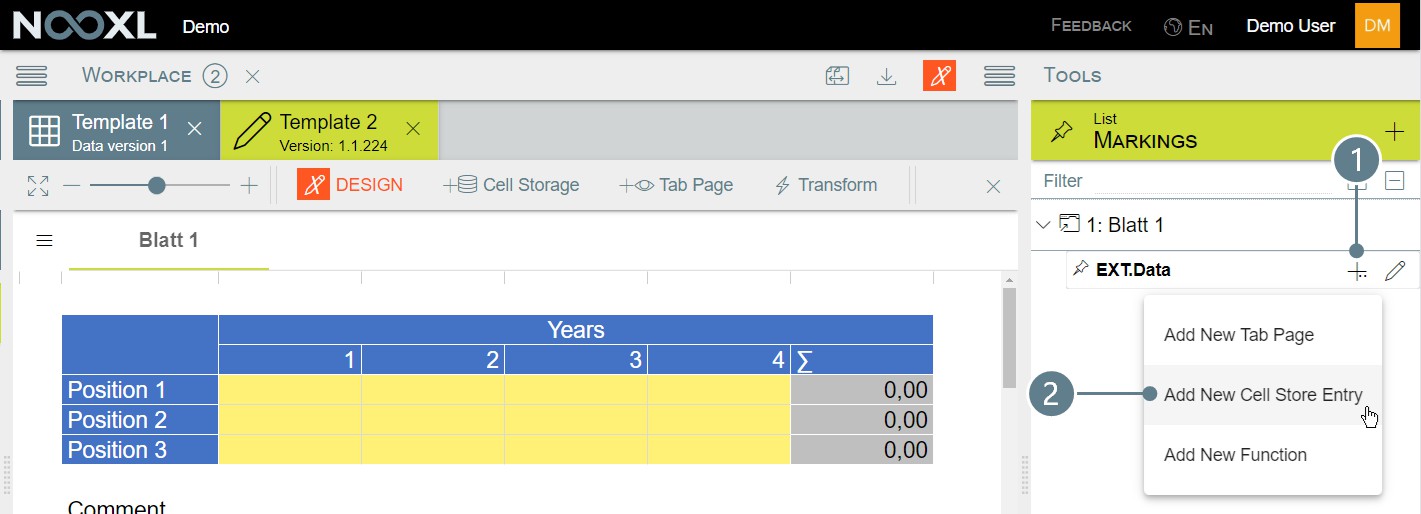
Add Nooxl functionalities to the markup
A markup itself has no functionality at all, but is only a shell that can contain one or more functionalities.
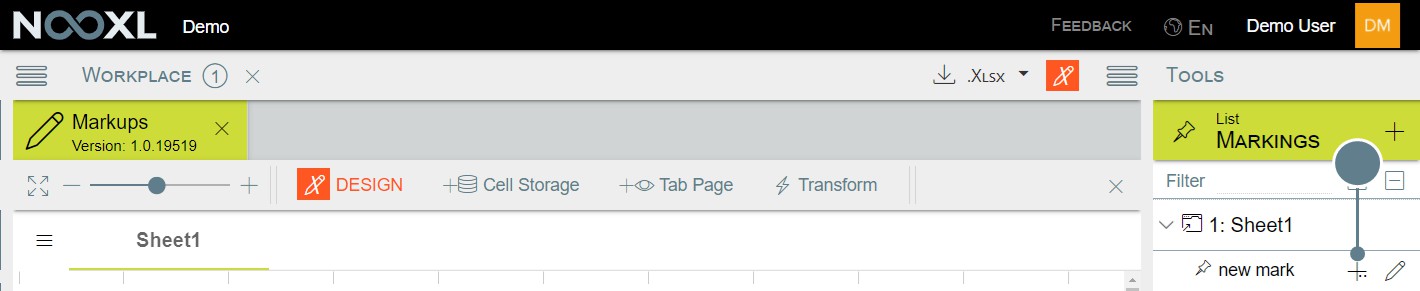
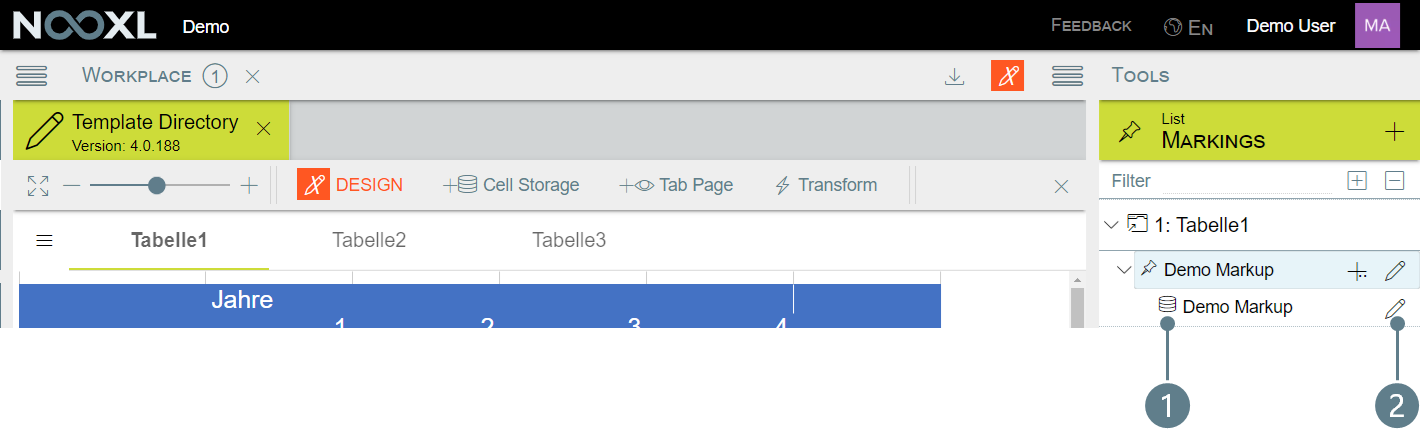
To bring a markup to life, click on the arrow ( ![]() ) to the left of the sheet in which you have just saved a markup in the Tools area.
) to the left of the sheet in which you have just saved a markup in the Tools area.

Using the button ![]() to the right of the created markup, further functionality can be added.
to the right of the created markup, further functionality can be added.
Information about the different Nooxl functionalities
Add New Tab Page
Add New Cell Store Entry
Add New Function
Tab pages
What sheets are in Excel are tab pages in Nooxl. Per default Nooxl will show a tab page for every sheet in your template.
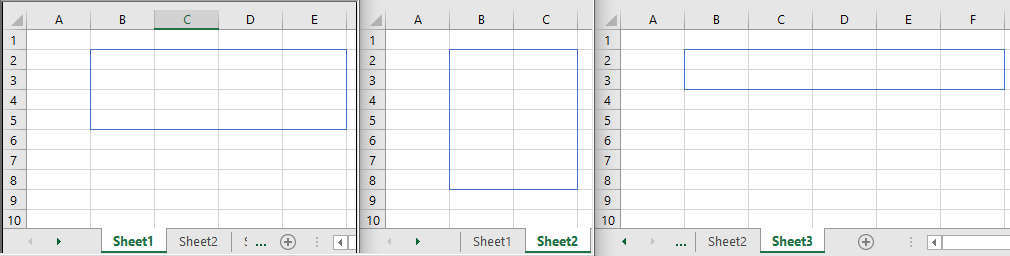
1: Excel template with three sheets and some bordered cells

2: Template in Nooxl without any adjustments
As soon as you start to create an own tab page, Nooxl will no longer show the sheets from the template.
Why should you use tab pages
Using custom tab pages offers some functionality to the designers, which are not possible with the default sheets:
- fixing certain rows and columns to make sure they are always visible
- hiding tab pages dynamically on run time
- hiding columns and rows dynamically on run time
- distribute content from one sheet in your template on multiple tab pages
- show only parts of a sheet to the end user
Create a tab page
Open a dataset with your template and then click on the ![]() button to open the template in the design mode.
button to open the template in the design mode.
Next you need to select all cells with your mouse, which should be part of the tab page (1). With the cells selected, click on Create new Tab Page (2).
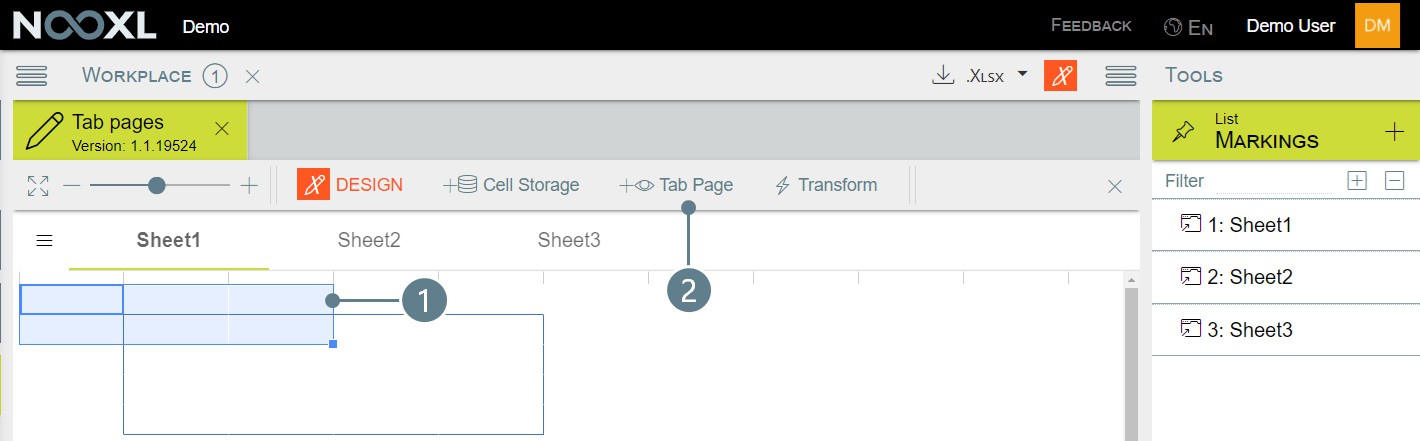
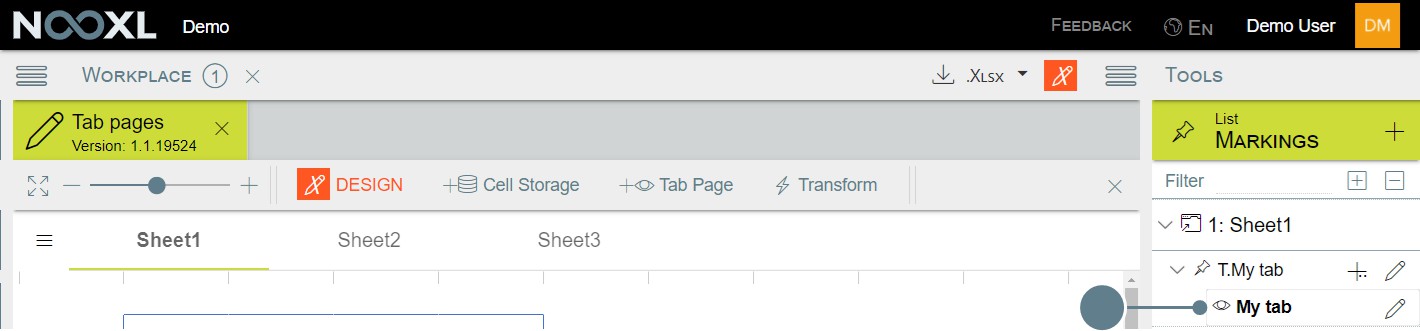
Give the tab a name (1) and click "Create" (2).

This will create a markup with a tab page inside. Both will have the same name you state here. However you can give the markup and tab page a different name and in order to be able to find all markups with tabs quickly later using filters, it is a good practice to name the markups according to a certain scheme. For example T.[tab name]
So later you can simply search for " T. " and find all markups with tabs.
![]()
Edit an existing tab page
To edit an existing tab page, make sure you are in the design mode of the template and locate the tab you want to edit in the right tools area.
Tabs can be recognized by the
To adjust the properties, click on the pencil to the right of the entry.
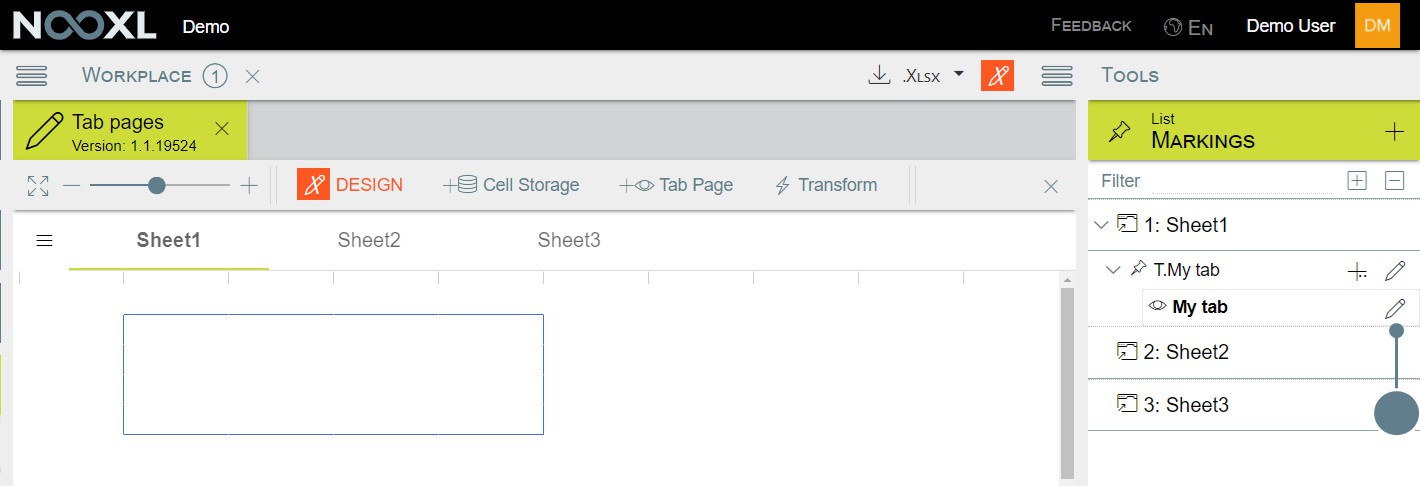
Then the properties for the tab page will be opened in the right menu.
Delete a tab page
To delete an existing tab page, make sure you are in the design mode of the template and locate the tab you want to delete in the right tools area.
Tabs can be recognized by the
To delete the tab page click on the pencil to the right of the entry.
Then at the bottom of the properties panel of the tab page you find a trash bin. click on it to delete the tab page.
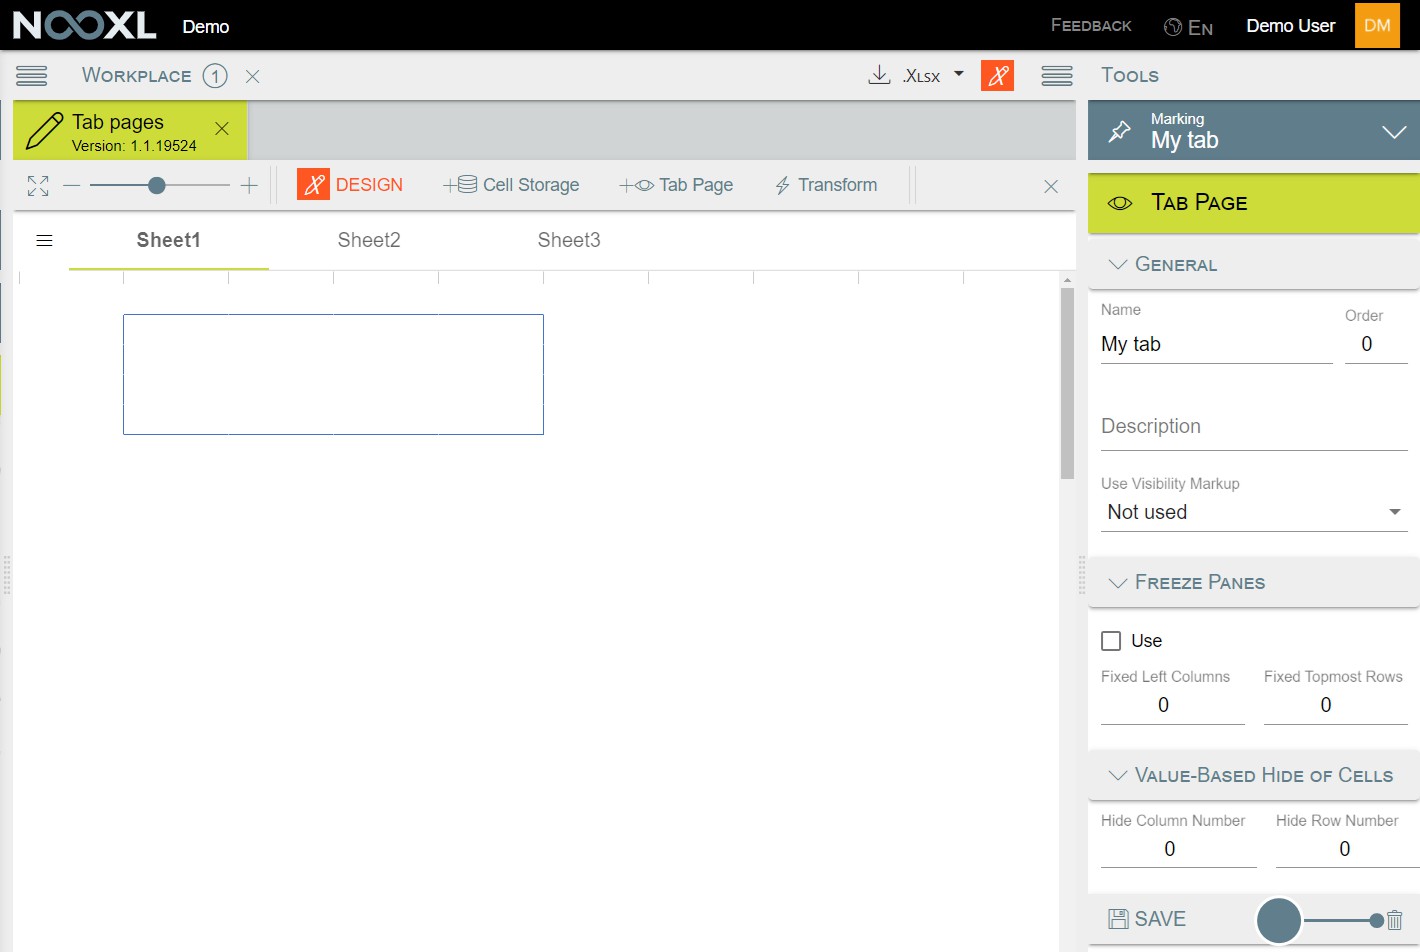
Tab page properties
General
Name
The name of the tab page. This name will be displayed to the user in the template.
Order
Position where the tab should be displayed. If the order number is the same, the tabs are sorted alphabetically.
Description
An optional description of the tab page.
Use Visibility Markup
!](../media/b6d52feb93afa557f1d80b0ba9db668b.png)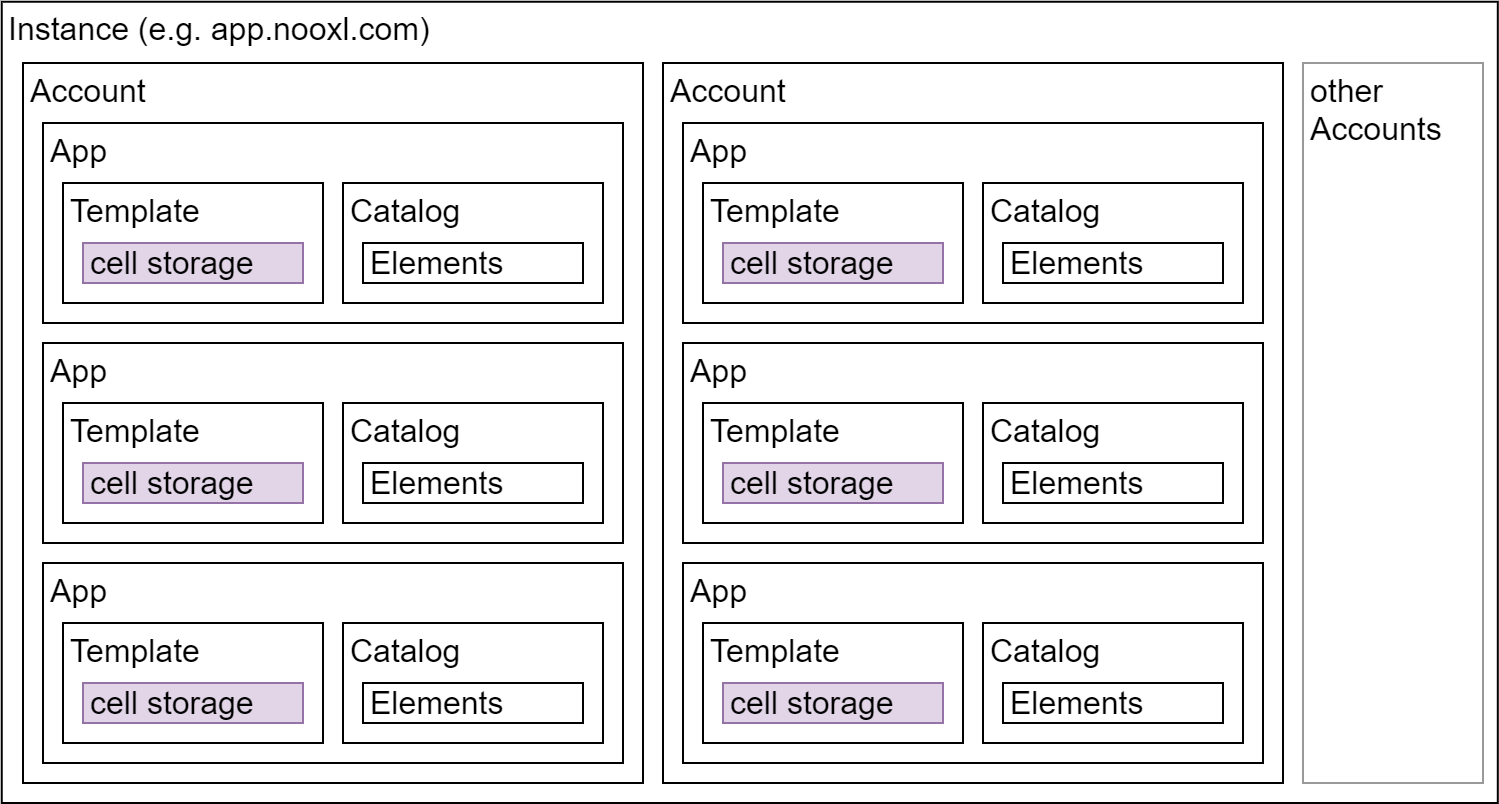
In order to permanently store data in the database and read it out again, so-called cell storages are used. The data stored in cell storages does not necessarily have to be just text and numbers, but can also include documents and images and be made available to other users.
The creation of a cell storage entry is always the same regardless of the type of data.
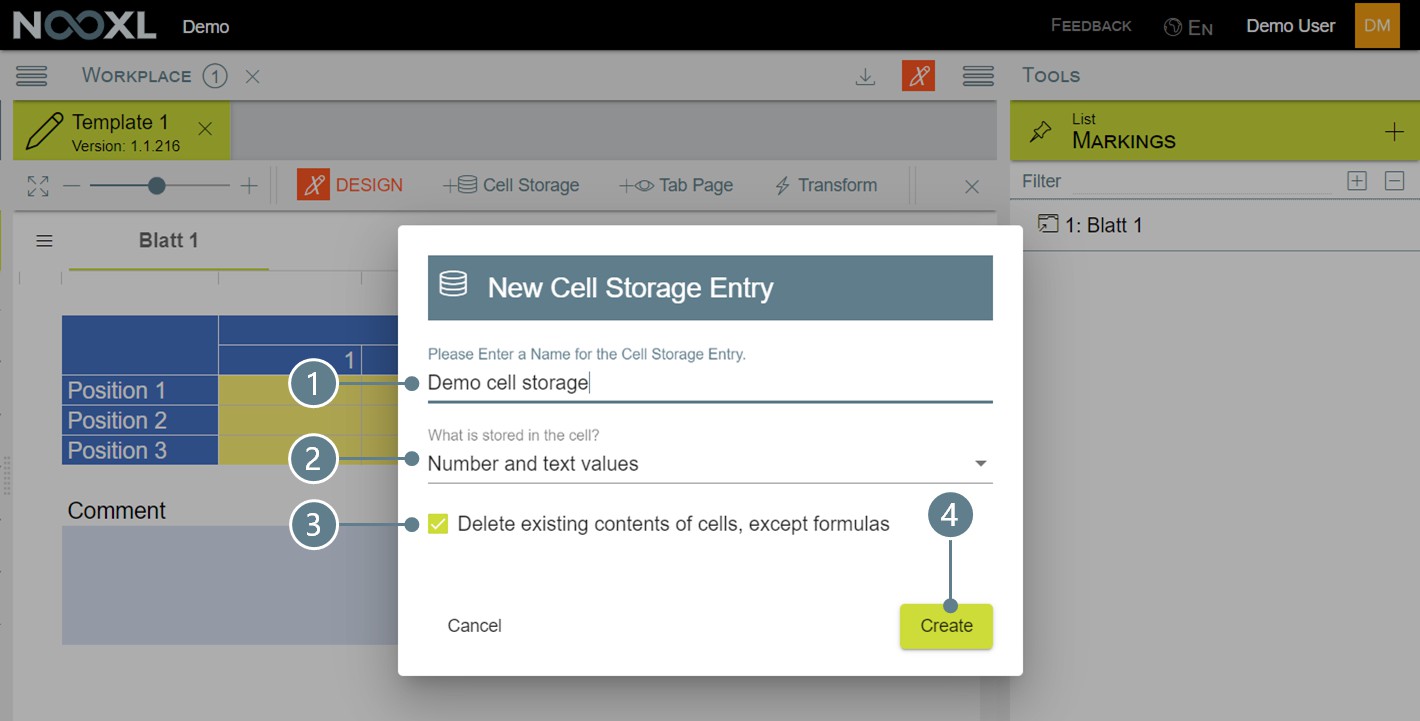
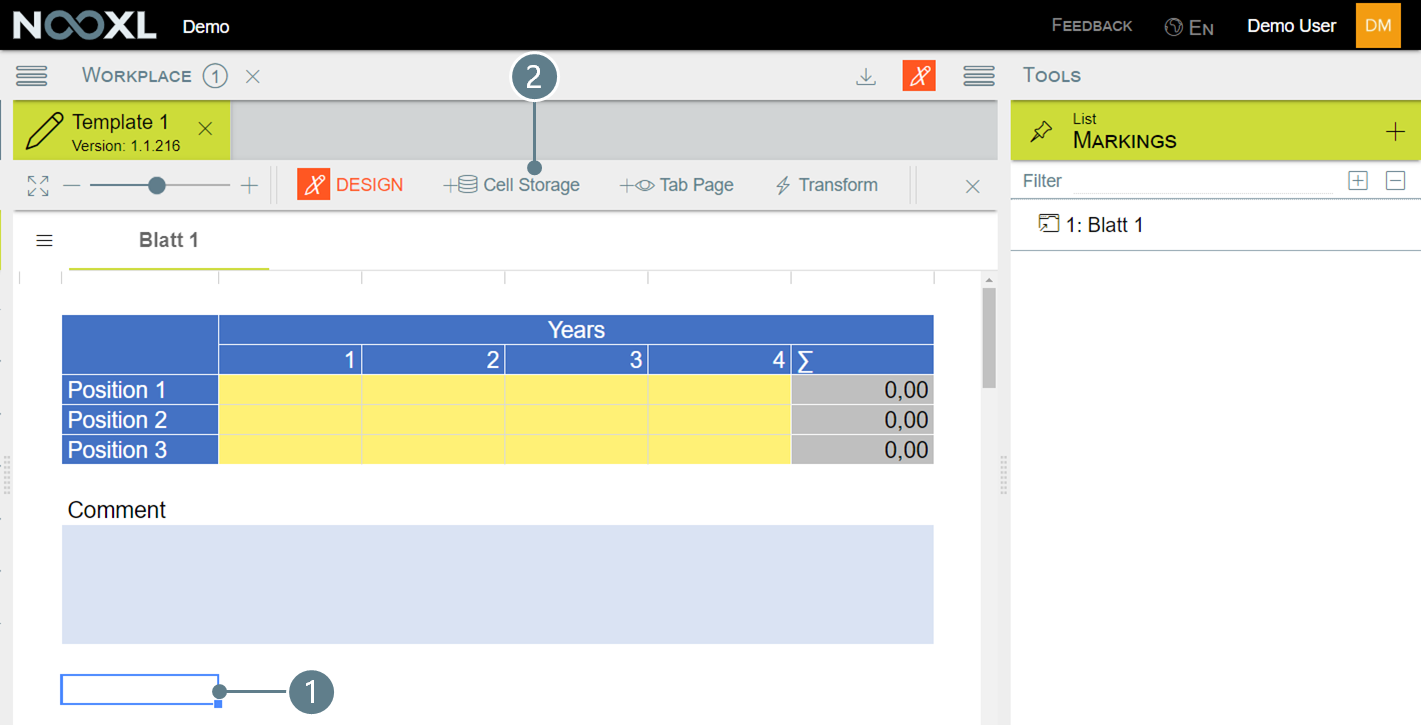
Create a cell storage
To create a cell storage in a template, switch to design mode (1). Then select the cell or cells whose
contents you want to save and click the button +Cell Storage (2) to create a new cell storage.

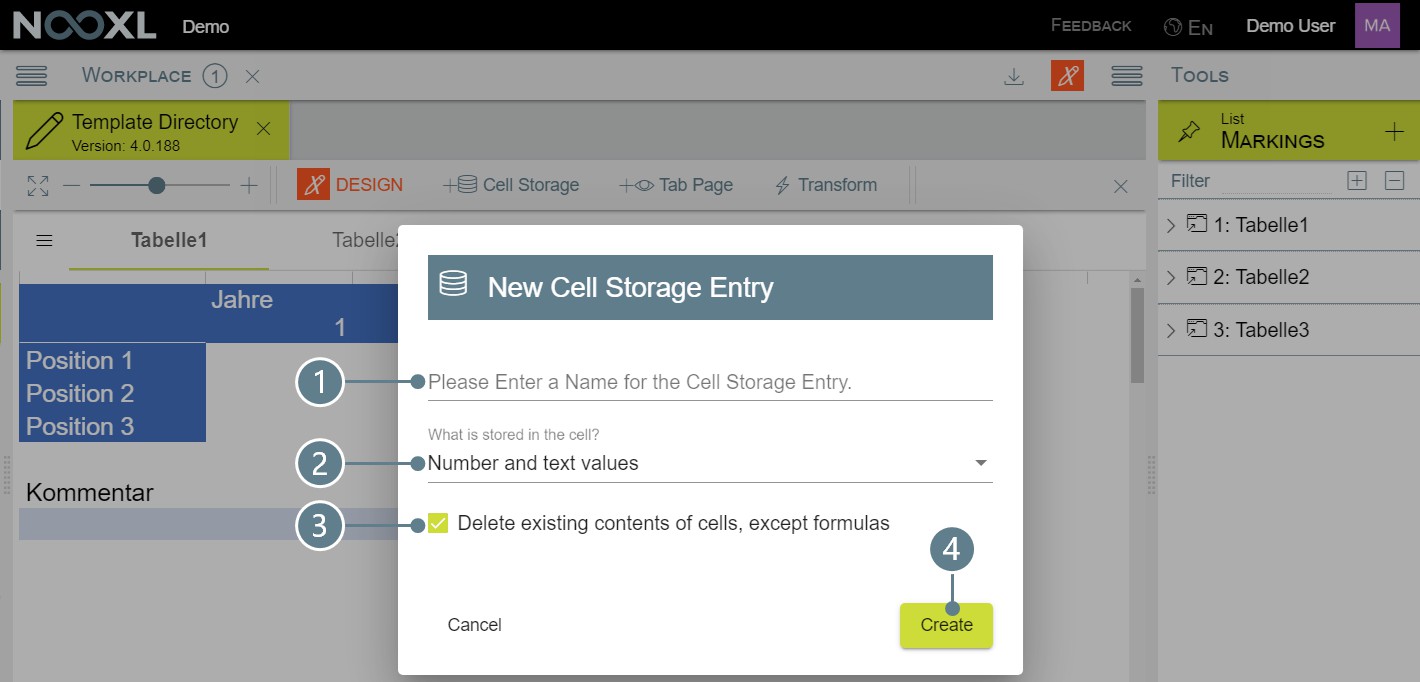
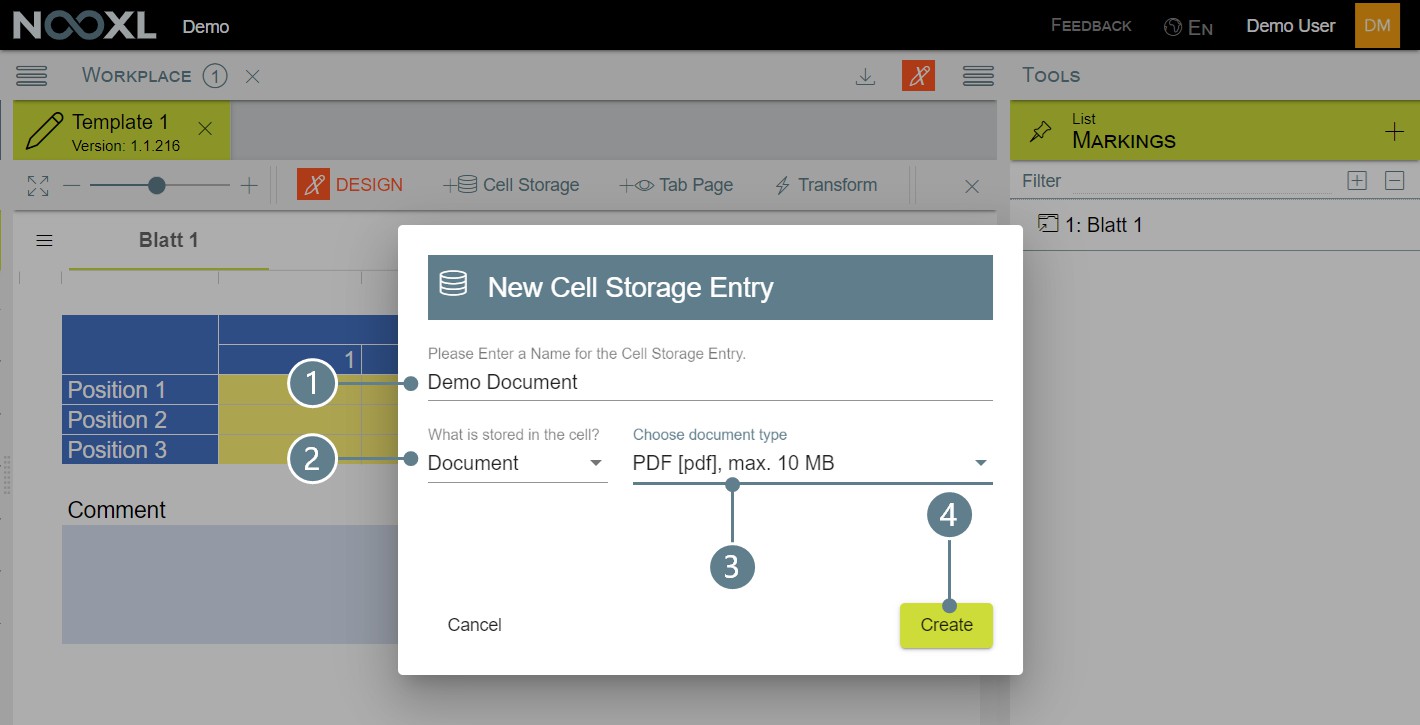
As soon as the button is clicked, a dialog opens. Enter a unique name (in the template) here (1). Then you have to specify what is to be saved (2). The following options are available:
- Number and text values
- Number values
- Text values
- Document
By placing a check mark at (3), you ensure that Nooxl removes any values contained in the Excel template from the selected cells. This is useful, for example, if your template contains sample values to test the calculation logic.
Then confirm the attachment by clicking the button Create (4).
The creation of a cell storage combines several actions:
Creation of a markup
Creation of a cell storage within the markup, according to the selected option
The markup and the cell storage get the name given in the dialog.
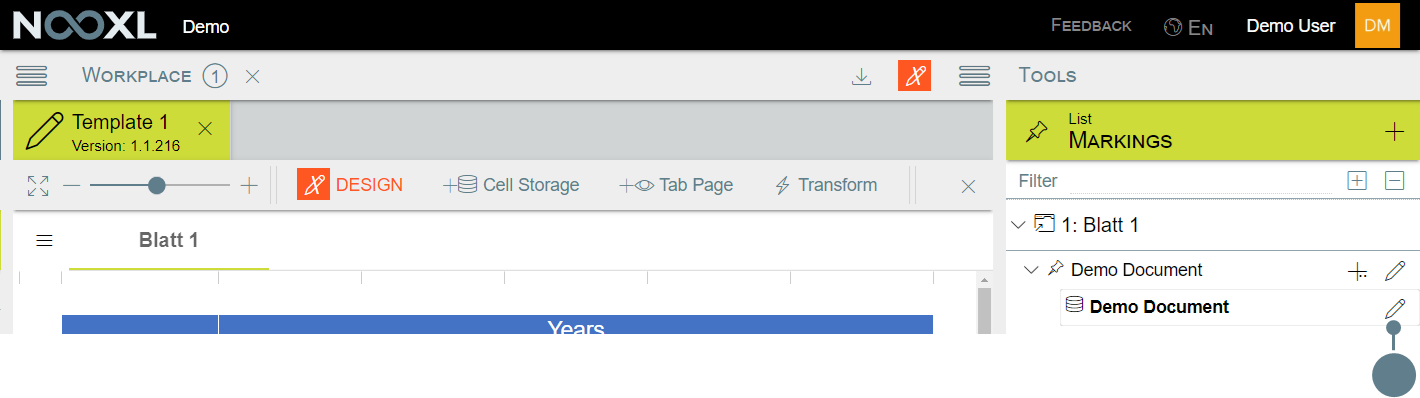
Edit a cell storage
In design mode, you can use the Tools area on the right-hand side of the screen to navigate to the Markups and thus cell storages and edit them as required.
Cell storages can be identified by the ![]() symbol (1). A click on the pen icon (2) will open the edit mode.
symbol (1). A click on the pen icon (2) will open the edit mode.
Newly created cell storage entries are configured in a way that the contents of the cells are stored and read out again. At the same time the cells are given the background color that allows user input.
Below you will find detailed descriptions of all the setting options of a cell storage using the Tools area on the right hand side.
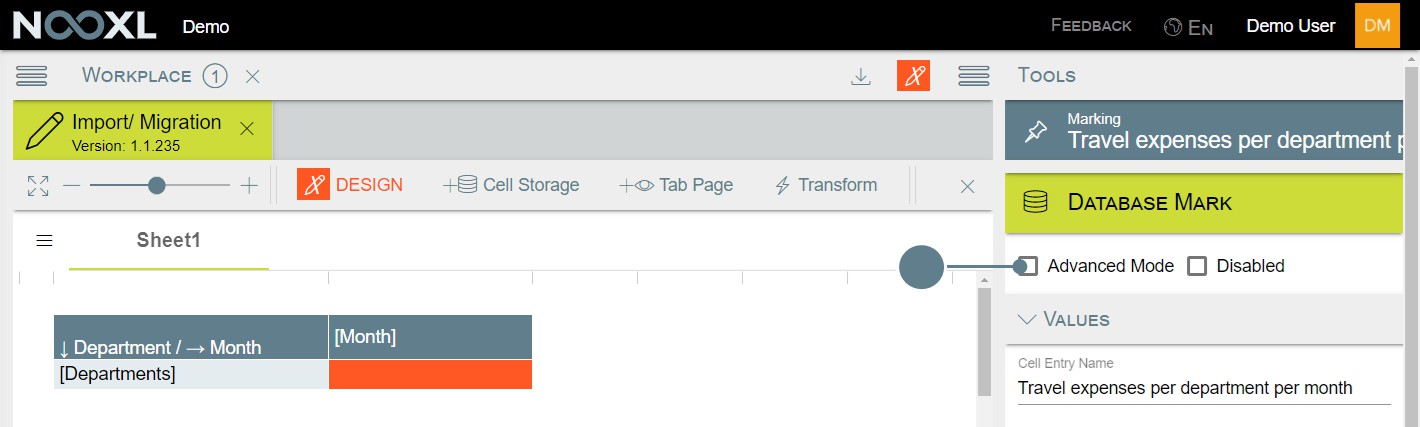
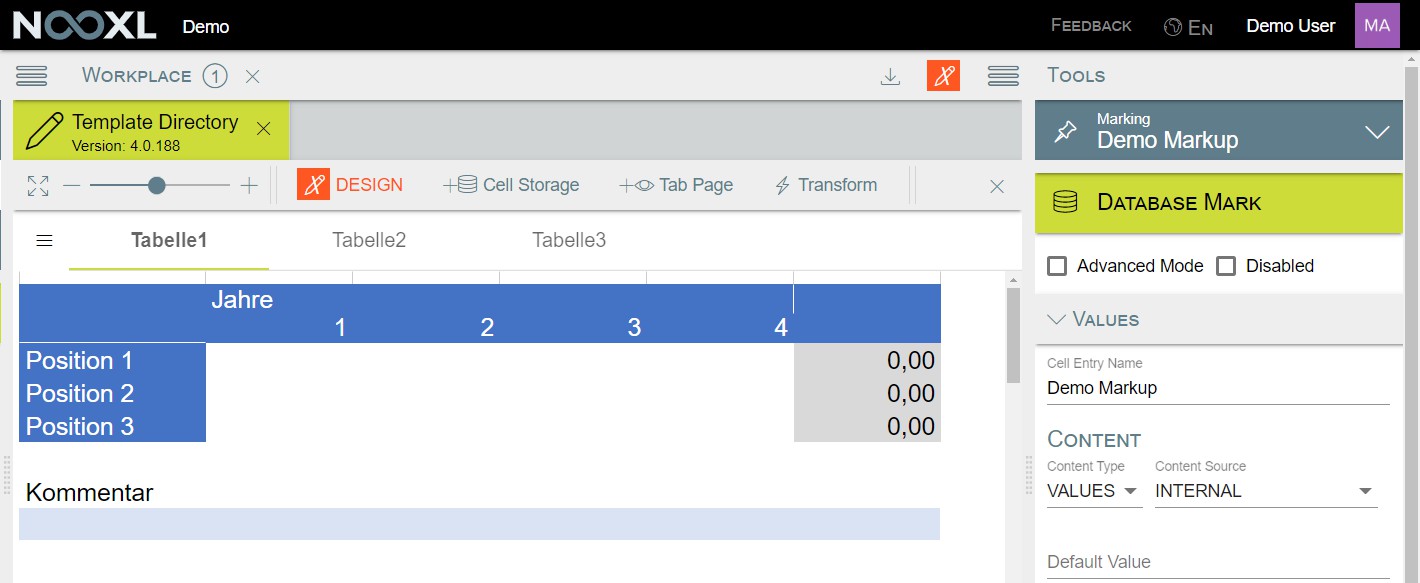
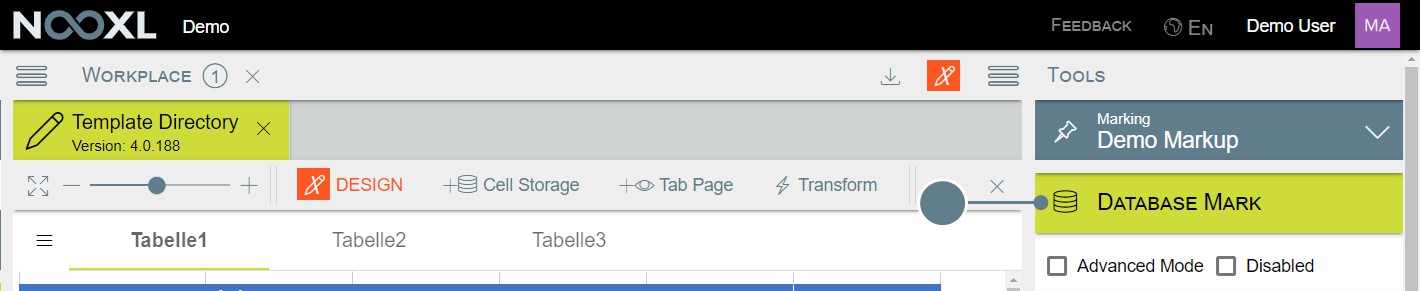
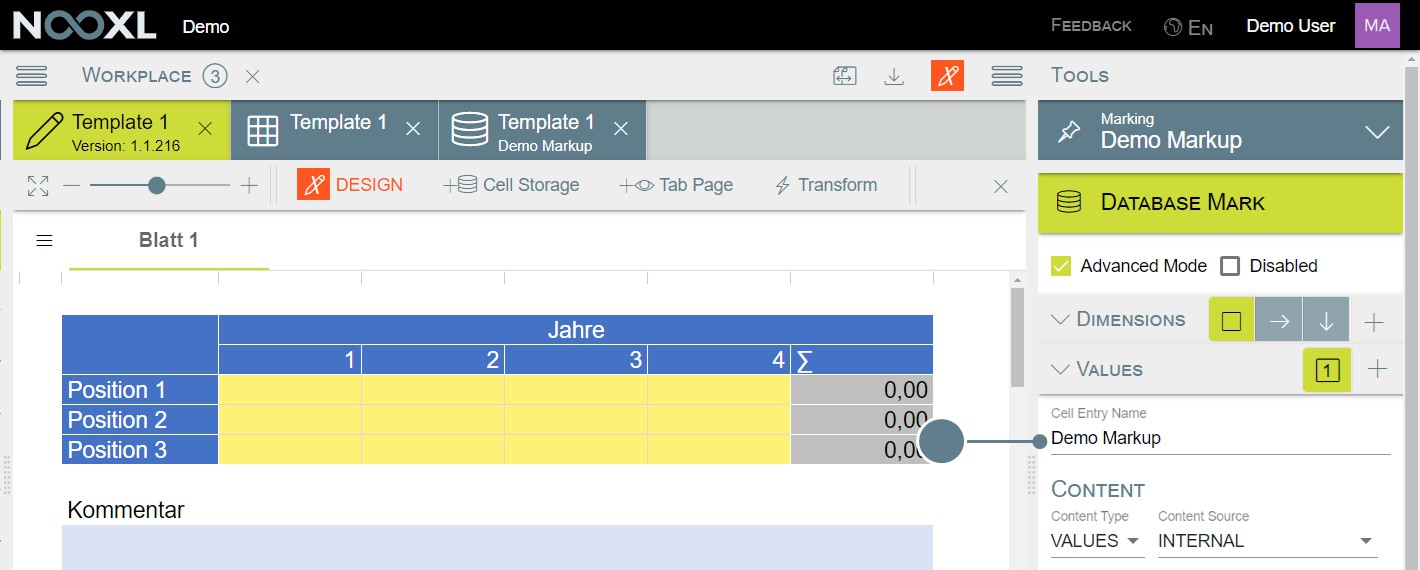
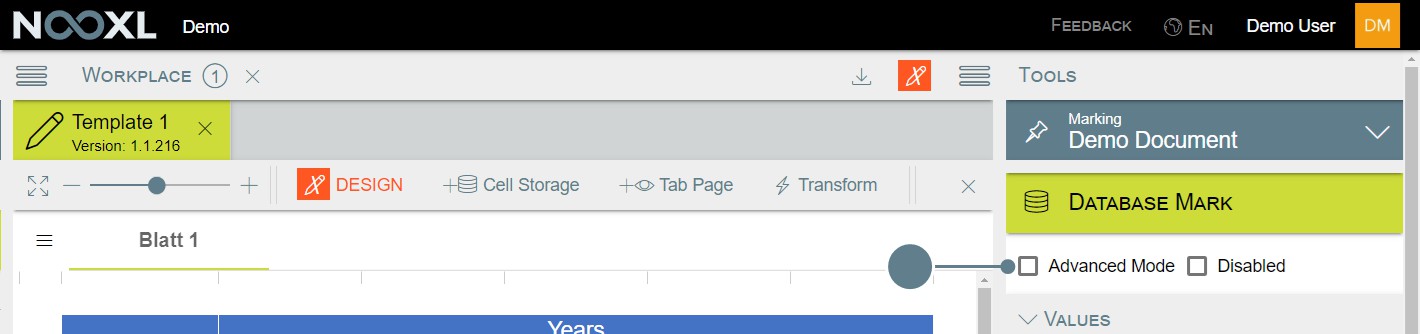
Database Mark
Tells you that you currently view a cell storage details page.
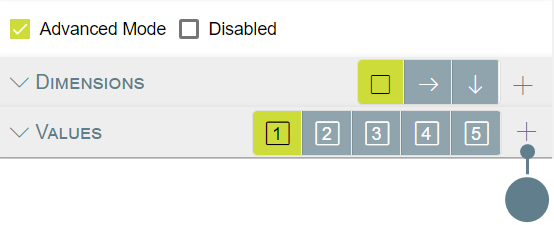
Advanced Mode
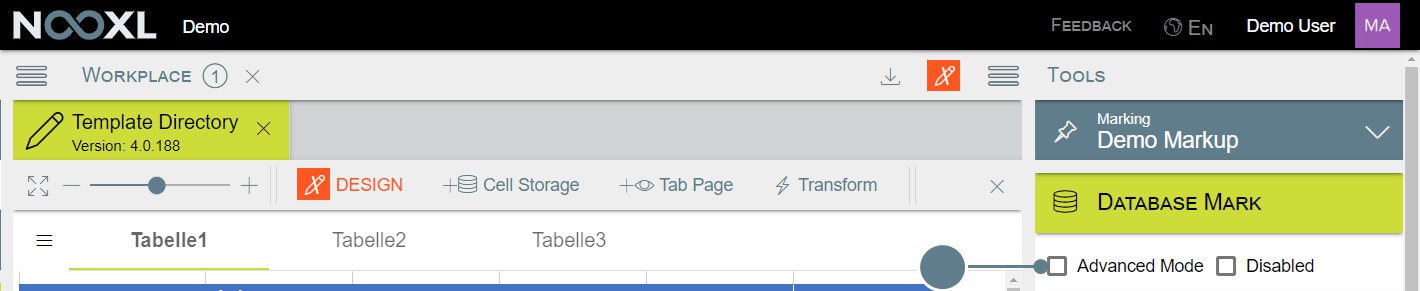
If the Advanced Mode is activated, Nooxl offers the possibility to configure cell storage entries beyond simple use cases:
- Use of own dimensions to clearly identify the cells of a cell storage
- Use more than one Values entry (output area), for example to simultaneously output data and information of the dimension used
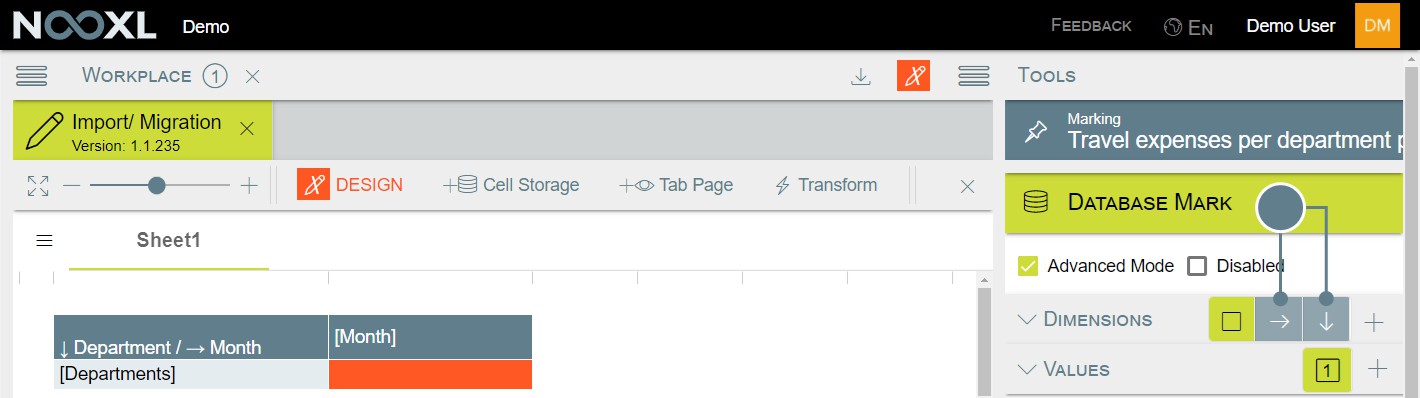
Use of own dimensions to clearly identify the cells of a cell storage
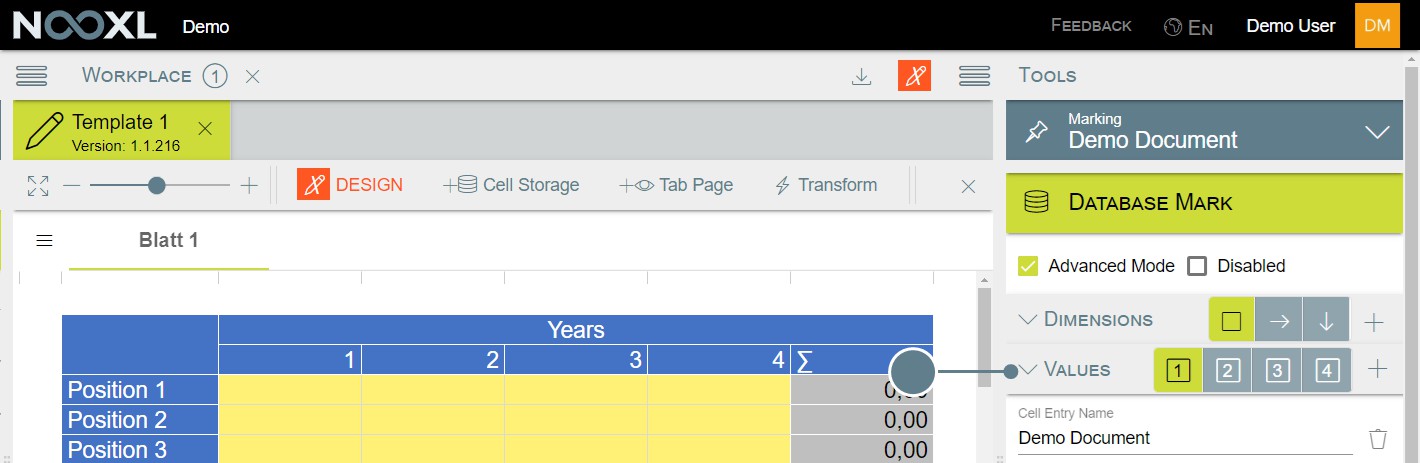
When a new cell storage entry is created, Nooxl automatically generates coordinates for the cells contained in the selection (horizontally → and vertically ↓), based on their position within the selection.
This is illustrated in the table below. The gray cells contain the coordinates of the two dimensions and the green cells contain the unique combination of these coordinates.
| 1 | 2 | 3 | 4 | |
|---|---|---|---|---|
| 1 | → = 1 ↓ = 1 | → = 2 ↓ = 1 | → = 3 ↓ = 1 | → = 4 ↓ = 1 |
| 2 | → = 1 ↓ = 2 | → = 2 ↓ = 2 | → = 3 ↓ = 2 | → = 4 ↓ = 2 |
| 3 | → = 1 ↓ = 3 | → = 2 ↓ = 3 | → = 3 ↓ = 3 | → = 4 ↓ = 3 |
| 4 | → = 1 ↓ = 4 | → = 2 ↓ = 4 | → = 3 ↓ = 4 | → = 4 ↓ = 4 |
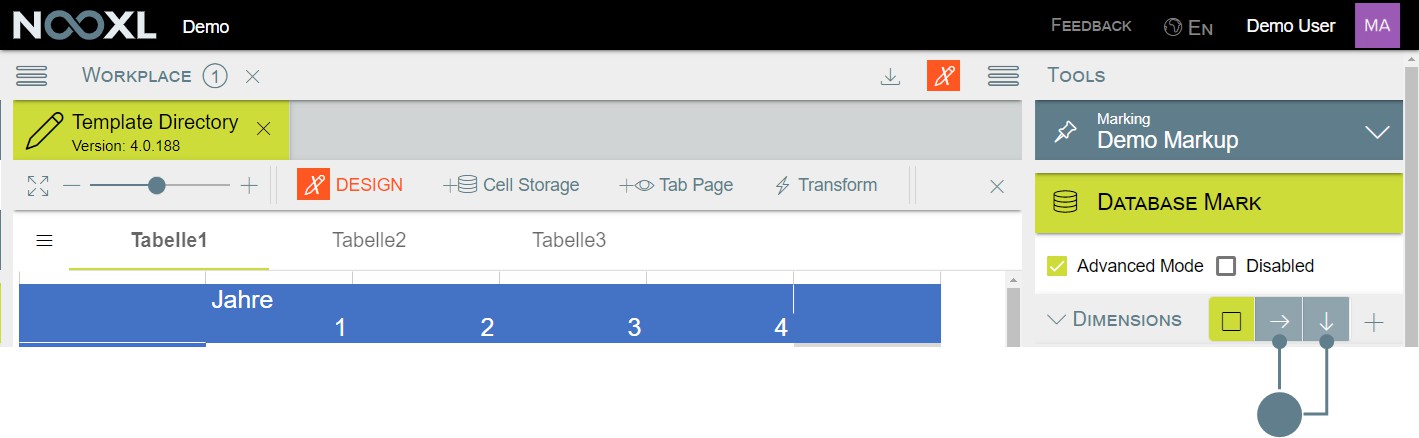
In Advanced Mode you can now define your own dimensions for the horizontal and vertical axis, which are used to identify the cells.
You can use any catalog selection available in the app as a dimension. You can also mix the contents of several selections for one dimension. In this case, a cross product of the existing catalog elements is created to represent all possible combinations:
- Selection 1 contains the elements A and B
- Selection 2 contains the elements 1, 2, 3 and 4
- The resulting vector from these two selections would have 8 entries, which would look as follows:
| !](../media/710fad4ce4aaf3e4a44169953b2d24ee.png)A | A | B | B | 1 | 3 | 1 | 3 | 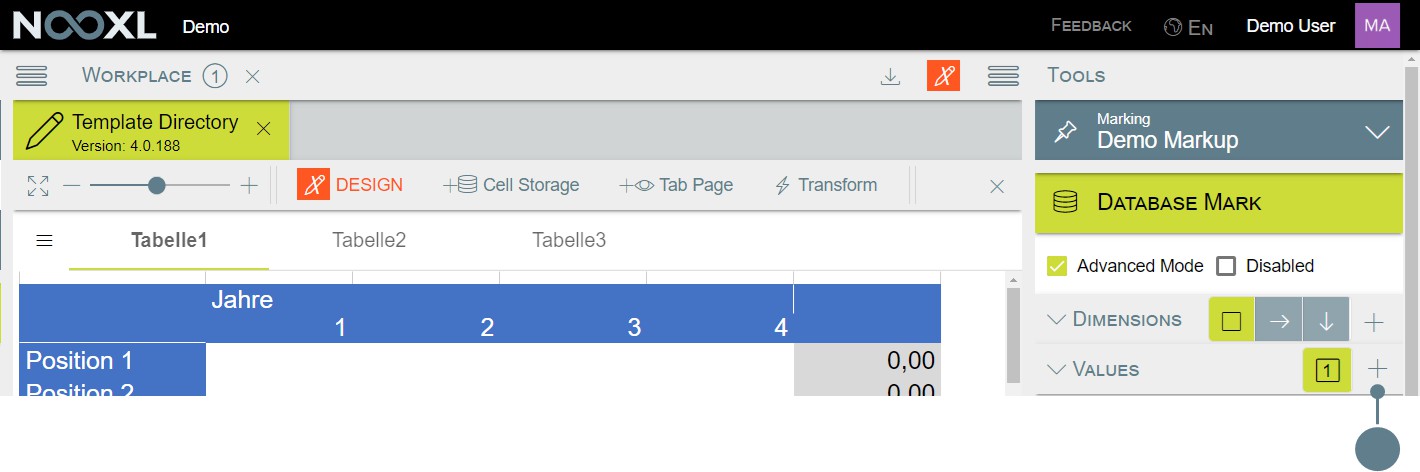
This is useful, for example, if you have used a catalog selection of elements as a dimension and would like to display the names of the elements in addition to the actual values:
| Element | Value |
|---|---|
| Element 1 | 123 |
| Element 2 | 456 |
| Element 3 | 789 |
Nooxl will process multiple values in the order displayed in the design mode. Here the order is determined by alphabetical sorting of the cell entry names. This means you can change the process order by just adding numbers at the beginning of the cell entry names.
You can find more on this topic in section Values .
Disabled
If the checkbox Disabled is set, the cell storage entry is deactivated. This means that all read and/or write
commands stored here will not be executed.
Deactivating a cell storage entry is useful if you need to setup something elsewhere to finalize the configuration of the cell storage entry. In the meantime, in order not to produce unwanted error messages if a user opens the template, the unfinished entries should be deactivated.
Dimensions (in Advanced Mode)
In Advanced Mode, selections can be used for the horizontal and vertical dimensions to identify the values of the cells. This makes it possible, for example, to read out only parts of a cell storage entry in another template instead of the entire area.
Settings
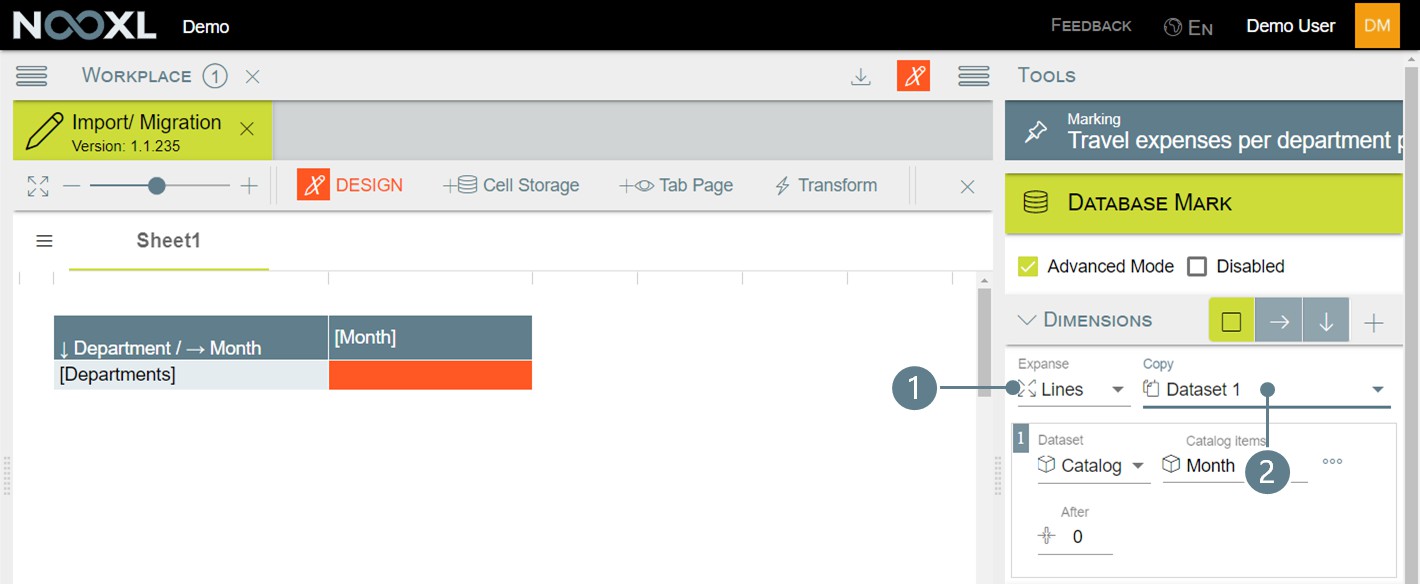
Expanse
The setting under Expanse controls whether or not cells or entire rows/columns are to be added for the elements of the selection used.
| Option | Description |
|---|---|
| Off - do not expand | Nothing is added. |
| Insert Cells | A cell is inserted for each element (except the first). Depending on whether it is the horizontal or vertical dimension below the first cell of the selection or to the right of it. Below you can see the effect of Insert Cells for a selection in cell 2. The selection used for the vertical dimension contains the following elements: Element 1 , Element 2 , Element 3 , Element 4 .  |
| Insert complete lines | A row or column is inserted for each element (except the first). Depending on whether it is the horizontal or vertical dimension below the first cell of the selection or to the right of it. Below is the effect of Insert complete lines for a selection in cell 2. The selection used for the vertical dimension contains the following |
| Option | Description |
|---|---|
 |
Only visible if something other than Off is selected for Expanse.
Copy
Controls whether newly inserted rows/cells should be provided with the content of the original cell/row. This is useful, for example, if there are Excel formulas in the original row that are to be copied over.
| Option | Description |
|---|---|
| Off - do not copy content to inserted cells | Nothing is copied. |
| Copy cells with size of dataset X | The contents and formating of the original cell/row are copied. If you use more than one selection in the dimension concerned, you will be able to choose between them. If you want the content to be inserted for all inserted rows/columns, you must select the "highest" dataset. Below you can see the effect of Insert complete lines for a selection in cell 2. The selection used for the vertical dimension contains the following elements: Element 1 , Element 2 , Element 3 , Element 4 . The option Copy cells with size of dataset 1 is selected.  |
Dataset
| Option | Description |
|---|---|
| Markup: size by markup size (variable) | Default setting, corresponds to the behavior of cell storage entries in "normal mode", i.e. for each contained row/column (depending on the selected dimension) all cells contained in the markup are assigned an index. If the markup in the template is changed, the cell storage entry is automatically adjusted as well. |
| Count: size by value (fix) | Independent of the columns/rows actually contained in the markup, a fixed size is provided for the dimension. If the markup in the template is changed, the cell storage entry is not adjusted. |
| Catalog: size by Catalog/Collection items (… | The width/height (depending on the selected dimension) of the cell storage entry depends on a catalog selection. |
Only visible if Count is selected for Dataset.
Length
Defines the fixed size for the dimension. Catalog items
Only visible if Catalog is selected for Dataset.
By clicking on Catalog items the following mask opens. Here you can select any catalog (1). Afterwards you can open a menu by clicking on the three dashes (2) and search for an already created selection (3).
If you want to create a new selection, you will find a description of the procedure in the chapter
on Selections .
After
With After you can specify whether you want to have an empty cell after each element of the dimension.
für die horizontale Dimension.
3: After = 0 für die horizontale Dimension.
4: After = 1 für die horizontale Dimension.
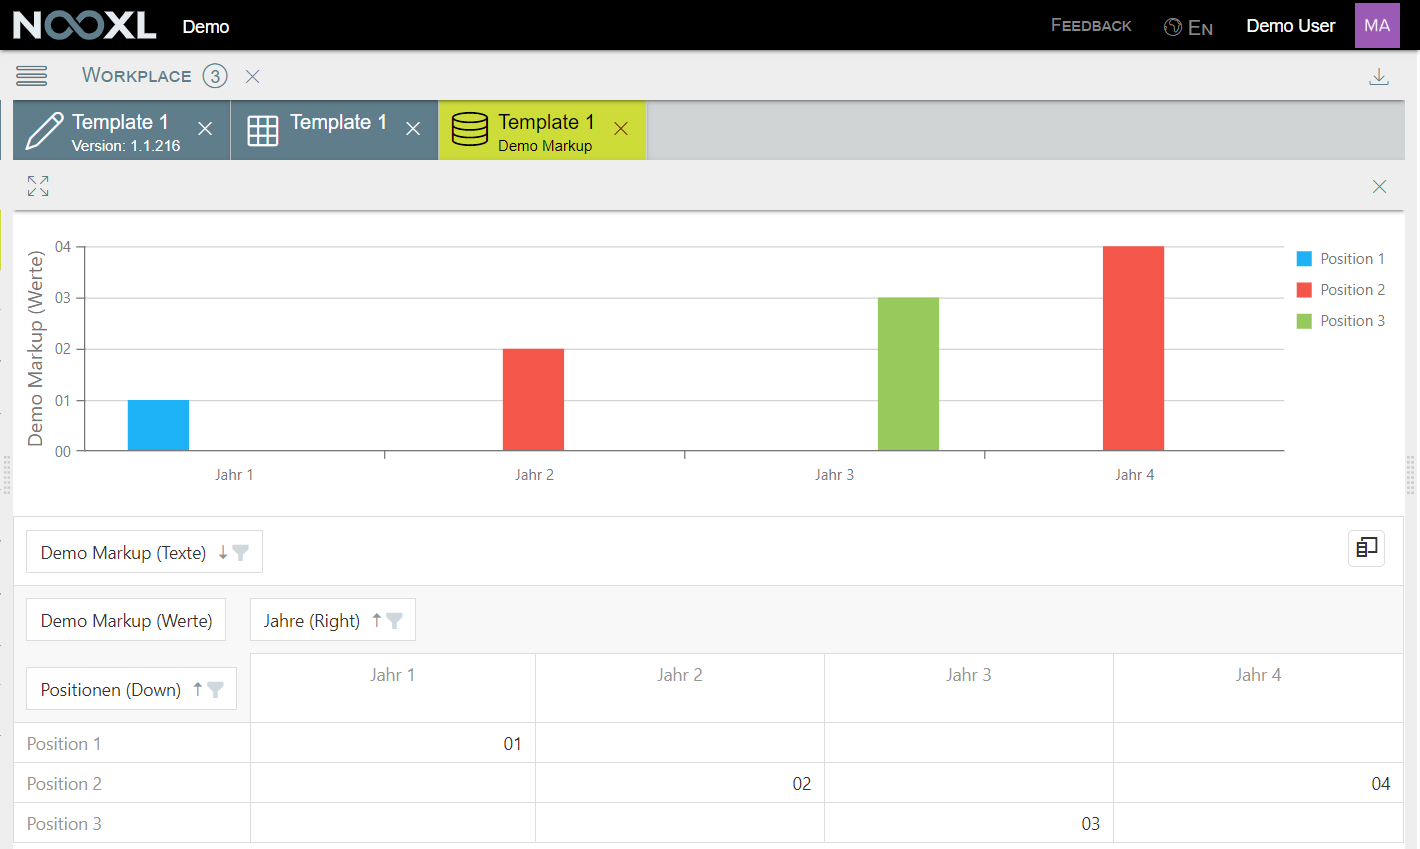
Example usage of the advanced mode
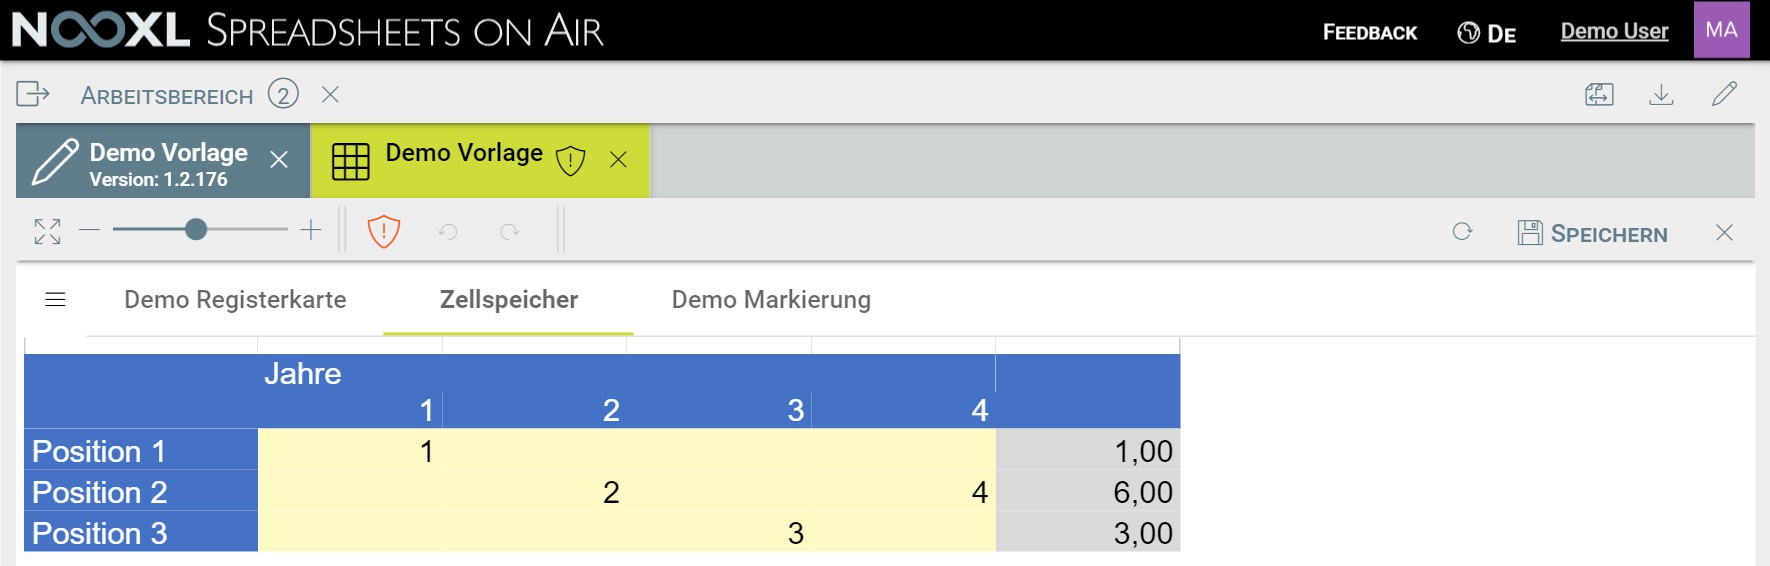
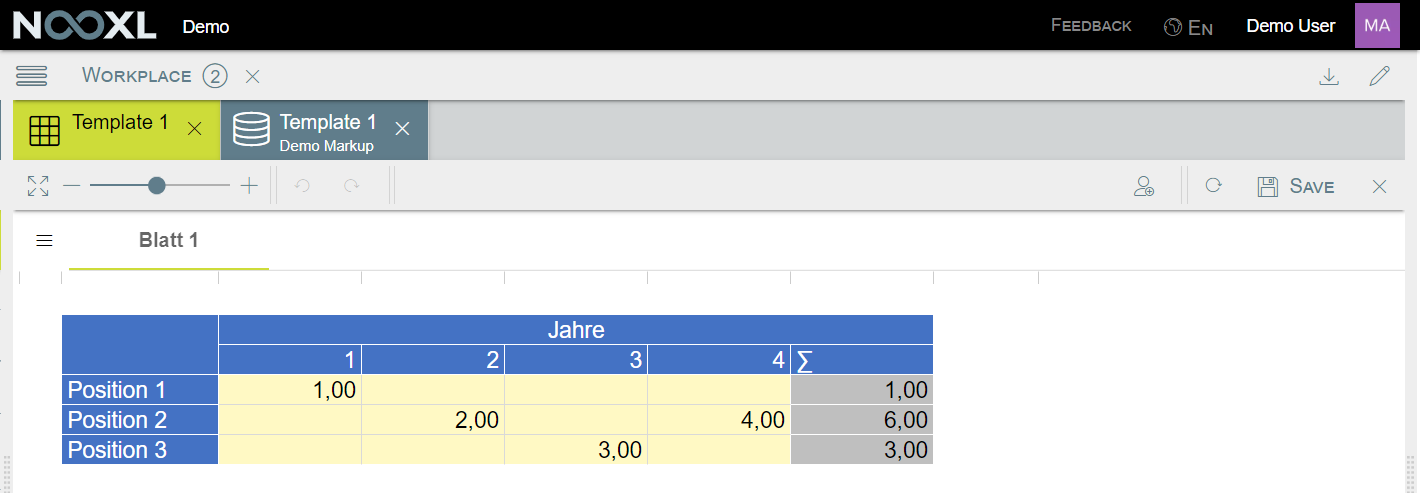
In the template shown below, the orange colored cells are marked as cell storage entries and the only existing dataset is filled with the following values
A look at the associated cell store shows that the values are only identified by the
automatically generated coordinates.
We want to achieve that for the horizontal the years 1 to 4 and for the vertical the positions 1 to 3 are used for identification. For this purpose, we are creating two catalogs with the respective desired elements.
After the creation you can click on the ![]() button to open the settings for the horizontal dimension.
button to open the settings for the horizontal dimension.
At Dataset select the entry Catalog (1) and then click on "-" in Catalog items (2).
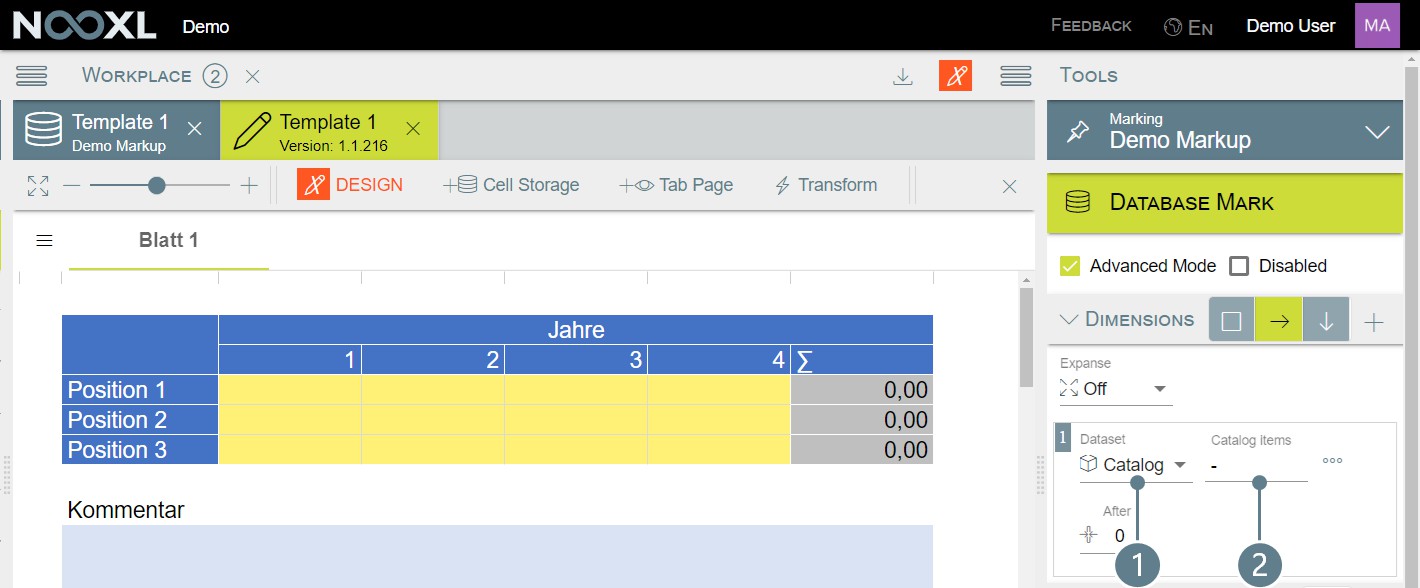
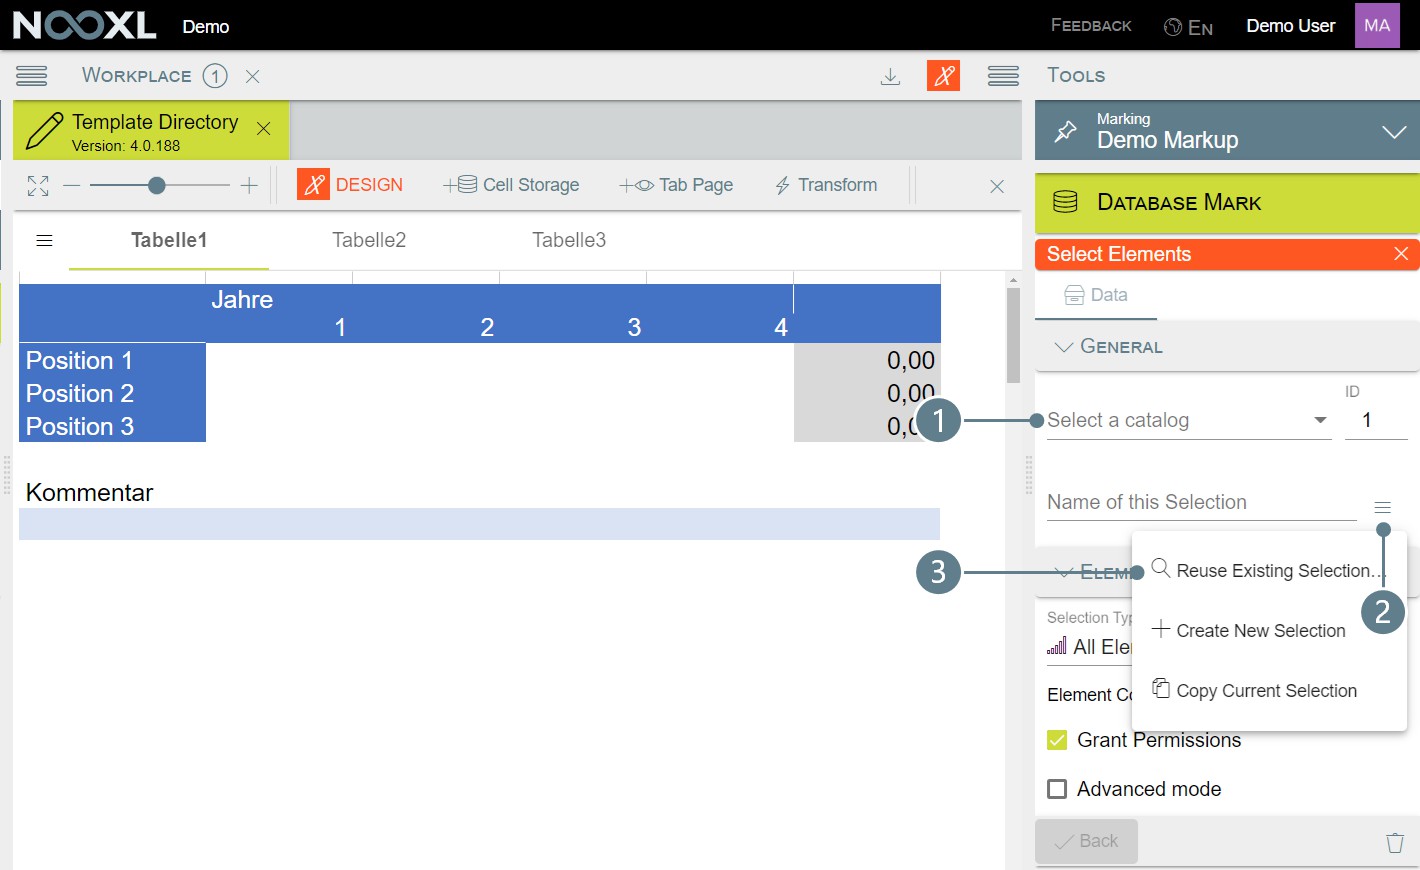
In the next dialog select the catalog with the year elements (1). If you never created a selection or want to create a new you need to specify a name of this Selection (2). If you already created a selection with the catalog elements you want to used, click on the three horizontal dashed (3) and choose Reuse existing Selection... to select the selection.
Please be aware, that by changing the associated dimensions of the cell storage you will not be able to access the previously stored data! So in a real life case you would want to export all datasets prior to such a change.
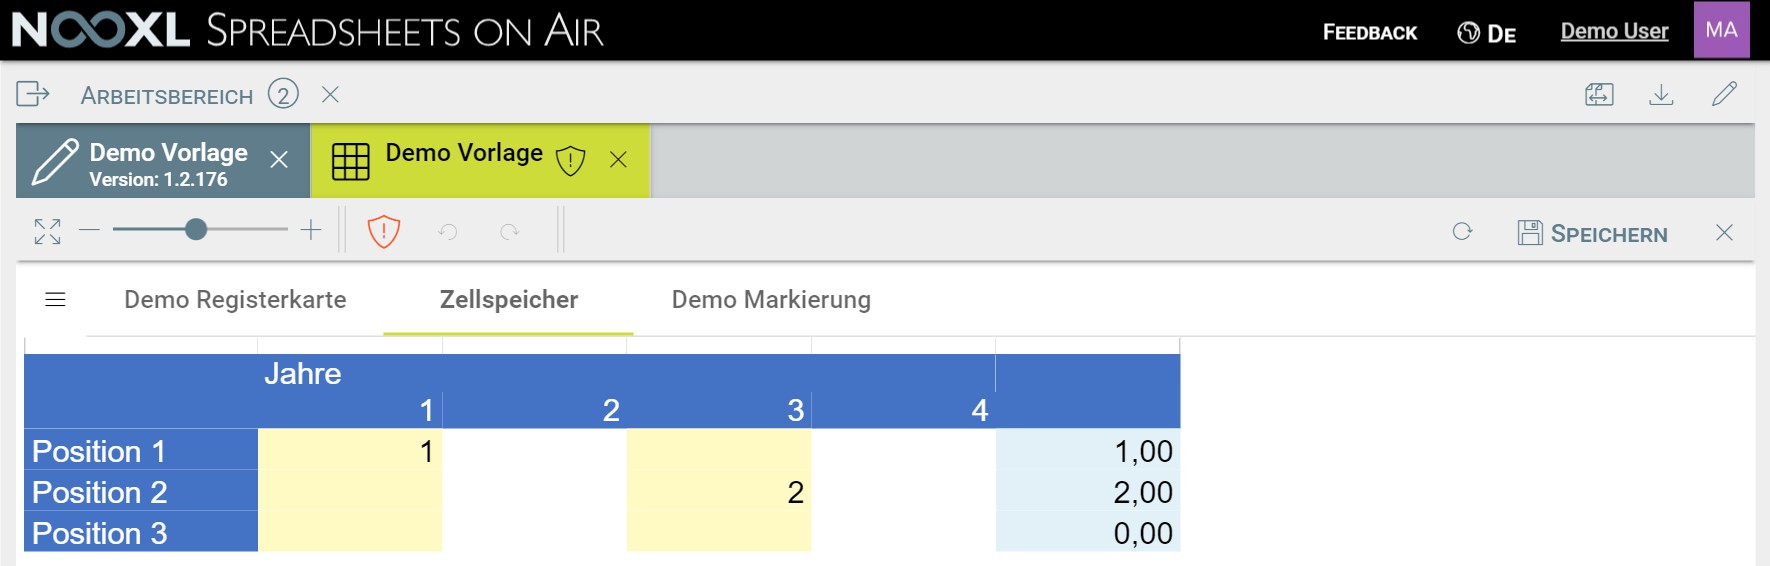
After the dataset in the template is reopened and saved, it is visible n the cell store , that the
values are now clearly identified by the two dimensions and their elements we have stored.
Values
In the value area of the cell storage entries all details concerning the way how to handle the contained data are stored.
In Advanced Mode, more than one value area can be set by clicking on the "+" on the right side.
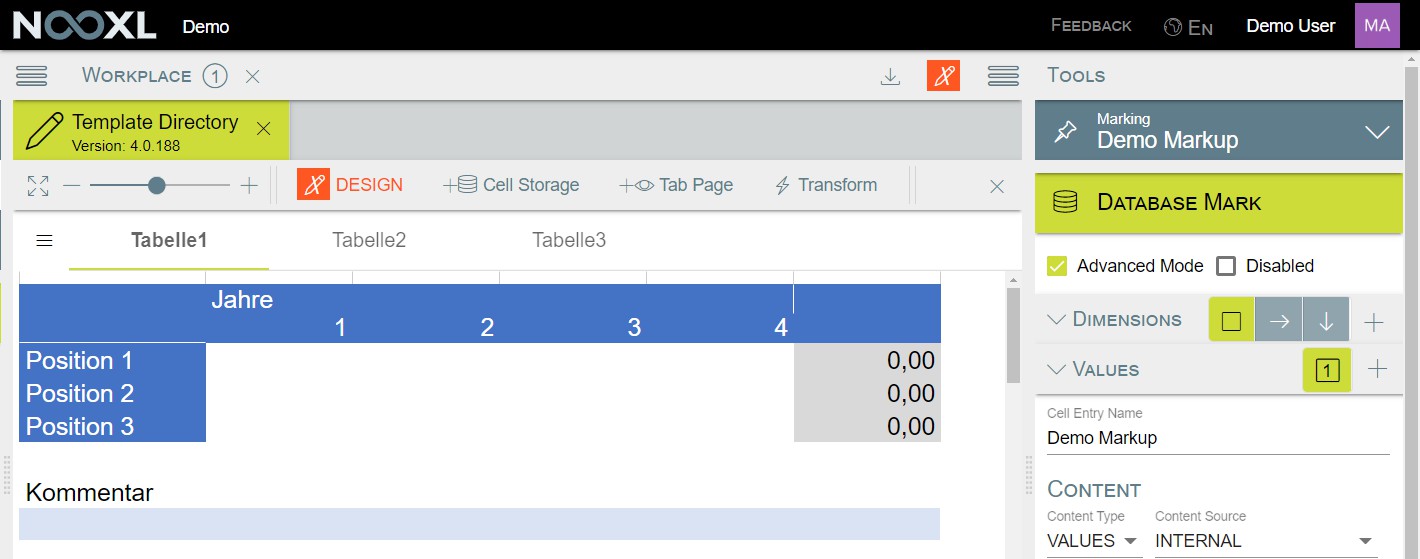
Cell Entry Name
The name of the cell storage entry. This can be chosen freely as long as it is unique within a template.
If an already used name is assigned, Nooxl automatically adds a hash ("#") and a consecutive number to your name.
If possible, give them names that speak for themselves! You will encounter them again in the
following places:
You can search for the names in the tools list.
Names are used in the cell store .
You refer to this name to read the data in another template .
Content
Within the area Content you set the details for the data.
Content Type
The content type of the cell.
| Cont ent Type | Beschreibung |
|---|---|
| VAL UES | The default setting for a cell storage entry. The Content Type Values allows you to store and/or read the data entered in a cell. |
| This feature is currently under development. | |
| REC ORD | Allows to output the details of the dimensions of the markup. For example, the content of dimensions set up in Advanced Modus . |
| Cont ent Type | Beschreibung |
|---|---|
| SEL ECT ION | Allows you to select a selection of the current dataset. |
| DOC | If documents (images, files, etc.) are to be stored in the cell storage instead of data, select DOC as content type. |
| DET AIL S | The content type DETAILS allows to open another dataset in any template within the app. This is useful, for example, if you have a template with a list of elements and another template exists in which detailed information is stored for specific elements. With a DETAILS entry you can quickly jump to the respective detail page. |
Content Source
The options of this dropdown depend on the previously selected content type.
Content Type = Values
For
Determines whether the data is to be saved within the current template ( INTERNAL ) or whether it is to be saved in another template ( EXTERNAL )
Content Source = EXTERNAL
You always need the current load.
if you want to load data from another template into
It is also possible to change EXTERNAL data. To do this, the storage type must be set to READ_WRITE or WRITE . Nooxl assures that the same dataset is not being worked on in parallel.
For Content Type = View
The content type = COMMENT is set for views.
For Content Type = dataset
Content Source = Index returns the index of the selected dimension. The index starts at 0.
Content Source = Condition
returns the details of a selection set in advanced mode.
Content Type = Selection
For Content Type = Selection
The C ontent Source = CONDITION is set for .
Content Type = DOC
For
Determines whether the data is to be saved within the current template ( INTERNAL ) or whether it is to be saved in another template ( EXTERNAL )
Content Source = EXTERNAL
You always need the current load.
if you want to load data from another template into
It is also possible to change EXTERNAL data. To do this, the storage type must be set to READ_WRITE or WRITE . Nooxl assures that the same dataset is not being worked on in parallel.
For Content Type = Details
Content Type = EXTERNAL
For Details the
Default Value
is set.
Only visible when Content Type = VALUES in combination with Content Source = Internal
In case there is no value for the cell storage in the dataset opened by the user, a default value can be specified. This will be used instead of leaving the cell(s) empty.
Dimension
![]() Only visible when Content Type = dataset and Content Type = Selection .
Only visible when Content Type = dataset and Content Type = Selection .
Depending on the dimensions used, you will find at least two entries ( ↓ Down , → Right ). If you have created nested dimensions using Advanced Mode, you will find additional dimensions to choose from, for
example .
Content Type = dataset
For
You use this selection to determine the dimension from which the contents are to be output.
Content Type = Selection
For
![]() This selection is important if the selection is a multiselect selection. Then you can specify over here whether the selections made by the user should be output downwards ( ↓ Down ) or to the right ( →
This selection is important if the selection is a multiselect selection. Then you can specify over here whether the selections made by the user should be output downwards ( ↓ Down ) or to the right ( →
).
Property
The options of this dropdown depend on the previously selected Content Type.
Content Type = Values
For
Nooxl provides for three different ways of storing cell contents: texts (strings), numbers and (Excel) formulas. The Content Type can be used to determine which type(s) should be used to save the content. Any combination of the three types is possible.
| Property | Description |
|---|---|
| DATA_TEXT | The contents are stored as texts. |
| DATA_NUMBER | The contents are stored as numbers. |
| Property | Description |
|---|---|
| If the content is not a number, the content is not saved. | |
| DATA_TEXT_NUMBER | The content is stored both as text and as numbers, provided that the content is a valid number. |
| DATA_FORMULA | Only the contained Excel formula is saved. |
| DATA_FORMULA_TEXT | The contained Excel formula and the resulting text is saved. |
| DATA_FORMULA_NUMBER | The contained Excel formula and the resulting number is saved. If the content is not a number, the content is not saved. |
| DATA_FORMULA_TEXT_NUMBER | The contained Excel formula, the resulting text and the resulting number is saved. If the content is not a number, the content is not saved. |
If you read cell contents in another template using Content Source = EXTERNAL , you must make sure that you select a method here that was also saved originally. Reading DATA_NUMBER will not work if you only save DATA_TEXT .
If you limit the writing of data in certain ways, this will improve the performance of your application, since there is less data to read, write, save and process.
For Content Type = View
The property = COMMENT_TEXT is set for views.
Content Type = dataset and Content Source = Index
Property
Description
VECTOR_INDEX
The index of the dimension is output. This starts at 0.
For
| Property | Description |
|---|---|
| VECTOR_INDEXNAME | The name of the index is displayed. This is structured as follows: "Index "+index number. |
| VECTOR_COUNTER | Corresponds to Index + 1 . |
| VECTOR_COUNTERNAME | The name of the index is displayed. This is structured as follows: "Index "+Counter number. |
| dataset_RANK | Always 0. |
For Content Type = dataset with Content Source = Condition and f Selection
Content Type =
or
| Property | Description |
|---|---|
| ELEMENT_ID | The unique ID of the catalog element of the selected dimension. ID's of elements do not change when element names are changed and are unique across all catalogs. |
| ELEMENT_NAME | The name of the catalog element of the selected dimension. |
| ELEMENT_DESCRIPTION | The contents of the Description field of the catalog element of the selected dimension. |
| ELEMENT_TAGS | The tags of the catalog element of the selected dimension. If there are several tags, they are printed separated by spaces. |
| CONDITION_ID | The unique ID of the selection of the chosen dimension. |
| CONDITION_NAME | The name of the selection of the chosen dimension. |
| Property | Description |
|---|---|
| CONDITION_CATALOGDISTINCT | The information if this catalog was used only once in the current template. |
| CATALOG_ID | The unique ID of the catalog of the selected dimension. |
| CATALOG_NAME | The name of the catalog of the selected dimension. |
Content Type = Doc
For
| Property | Description |
|---|---|
| DOC_DATA | Saves the actual document. The file name is displayed as the cell content. |
| DOC_ID | The unique internal ID of the document. |
| DOC_FILE_NAME | The file name of the document. |
| DOC_FILE_TYPE | The file type (file extension) of the document. |
| DOC_FILE_SIZE | The document size in bytes. |
| DOC_UPLOAD_DATE | Date and time of the upload in format MM/DD/YYYY HH:MM |
| DOC_UPLOAD_USER | Display name of the user who uploaded the document. |
| DOC_CMD_UPLOAD | Provides a functionality for users to upload a new document. This can be done with a normal click or via a context menu (right click). |
| DOC_CMD_DOWNLOAD | Provides a functionality for users to download the document. This can be done with a normal click or via a context menu (right click). |
| DOC_CMD_CLEAR | Provides a functionality for users to remove the document. This can be done with a normal click or via a context menu (right click). |
Content Type = Details
For
| Property | Description |
|---|---|
| DETAIL_MATRIXNAME | As cell content or as label in the context menu, the name of the template is displayed. |
| DETAIL_CELLNAME | As cell content or as label in the context menu, the name of the cell to be selected is displayed. |
Viewer
Currently always .
Content Type = Values
Storage For
| Storage | Description |
|---|---|
| READ | Cell contents are only read from the database. This setting is useful if external contents are read in and should not be changed. |
| WRITE | Cell content is only written. This setting is useful if the calculated results of Excel formulas are to be saved. |
| READ_WRITE | Cell contents are written and also read when displayed. This setting is useful if the cell is to store manual user input. |
For Content Type = View
Always Read .
For For
Content Type = dataset Content Source = Index
always .
For Content Source = Condition
ELEMENT_ID .
always
, except for the properties
ELEMENT_NAME
and
Content Type = Selection
For
| Storage | Description |
|---|---|
| READ | Selected item is read. |
| WRITE | Selected item is set. This setting is used if the Selection is an additional selection that is saved with the dataset. |
| READ_WRITE | Selected item is read and set. This setting is used if the Selection is an additional selection that is saved with the dataset. |
Content Type = Doc
For
For Property = DOC_DATA
| Storage | Description |
|---|---|
| READ | Document is read. |
| WRITE | Document is written. |
| READ_WRITE | Document is read and written. |
Content Type = Details
Storage
Description
CLICK
Functionality is triggered by a click on the cell.
CONTEXTMENU
Functionality is provided via a context menu that can be opened with a right click.
With this option several functionalities can be made available on one cell.
This functionality requires a modern browser. On mobile devices (without a mouse) the functionality is triggered by holding down the cell.
For Property = DOC_CMD_XYZ
For
| Storage | Description |
|---|---|
| CLICK | Jump to detail template is triggered by a click on the cell. |
| CONTEXTMENU | Jump to detail template is made available via a context menu that can be opened with a right click. With this option several detail templates can be made available on one cell. This functionality requires a modern browser. On mobile devices (without a mouse) the functionality is triggered by holding down the cell. |
Output
Clear
The Clear option ensures that data contained in the cells of the template is cleared before being read from the database. This is necessary so that the data contained in the template is not unintentionally displayed if "nothing" is read from the database.
Overwrite Formulas
By default, Excel formulas contained in cells are not overwritten by values from the database. If this is desired, this behavior can be explicitly activated here.
Offset Columns und Offset Rows
Offset Columns
Offset Rows
Contents read from the database are read exactly at the position marked in the template. This behavior
can be overridden by and .
When to use this
This option can be used to output the contents of the cells as well as the contents of the corresponding dimensions with only one cell storage.
Storage
Ignore Zero/Empty
This option is only visible if values are saved. If this option is checked, "0" and "" are not stored in the database.
This can be useful to save space and achieve better application performance. However, it must be decided individually for each application (Excel logic in the template) whether a "0" or a "" does contain information and must be saved accordingly.
Style
Ignore Cells with unknown background color
If this option is activated, only cell contents of cells whose background color already corresponds to the background color of cell storages in the template will be saved.
This option is useful if you only want to save some cell contents in a large cell range, but do not want to create a separate markup for each of these sub-ranges.
Since the additional background color check during saving takes some time, this procedure is somewhat slower than creating many small cell storage entries.
Cell Style
If Auto is not checked, a desired style can be assigned to the cell using this selection menu.

Auto
If the check mark is set, Nooxl will automatically assign the "Normal" style to the cells, which
corresponds to the set functionality ( READ ,
Create a cell storage entry for texts and numbers
, ).
To create a cell storage entry for texts and/or numbers you open up the template in the design mode, select the cells whose content you want to save (1) and click on the +Cell Storage button (2).

In the next screen you need to give the markup a name (1).
Since this name is used throughout the system, try to give a meaningful name. Please also consider to use naming patterns/conventions to easily sort/filter through your markups. For example, start all markups with texts and/or numbers with a D. for data.
![]()
Next, you can tell Nooxl what kind of data will be stored in the marked cells (2). By default Number and text values is selected, which is exactly what we want to do. The checkbox Delete existing contents from the cells, except formulas (3), is automatically checked for you. If you do not want to delete the data contained in your Excel template from the selected cells, please turn this option off.
Then you can create (4) the cell storage.
Create a cell storage for files/ documents
How to create a cell storage for files/ documents
To create a cell storage for the users to upload documents to your app, open up the template in the designmode, select the cell you want the user to interact with (1) and click on + Cell Storage (2).
In the next screen you need to give the markup a name (1).
Since this name is used throughout the system, try to give a meaningful name. Please also consider to use naming patterns/ conventions to easily sort/ filter through your markups. For example start all markups with texts and/ or numbers with a f. for file.
![]()
Next you can tell Nooxl what kind of data will be stored in the marked cells (2). Per default Number and text values is selected. Since we want the users allow to upload documents, we choose Document. Next you need to specify what kind of files the upload should accept (3).
Then you can create (4) the cell storage.
Result
Nooxl will indicate to the user that the cell can be interacted with, by using the following cursor: ![]()
This cursor means that the user can right click on the cell to get a context menu with different actions:

The actions will be sorted alphabetically.
How to change the appearance
Of course you can change the appearance of the functionality in the design mode of Nooxl.
Enter the design mode of the template, navigate to the cell storage marking in the right site tools section and click on the edit button:
In the Database Mark you need to activate the Advanced Mode:
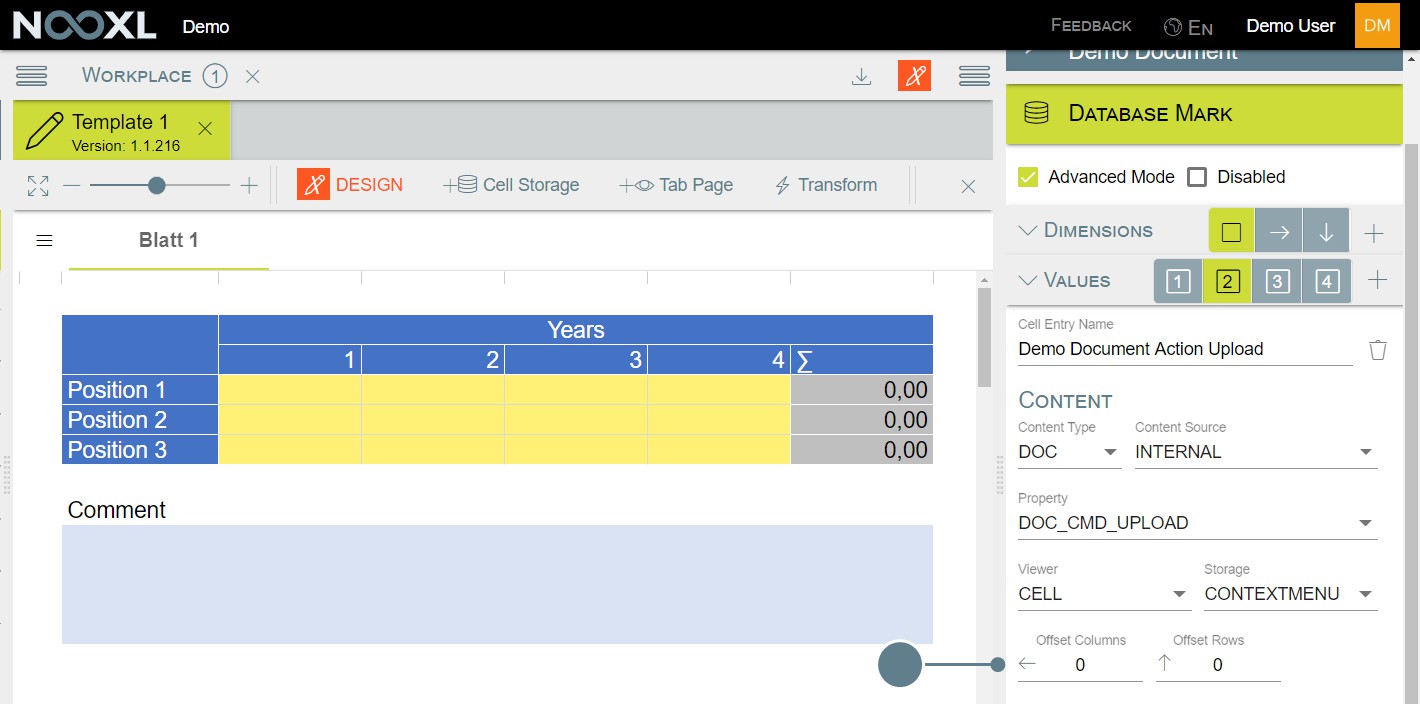
After this you can see that there is not only one Value, but four:
| Value | Purpose |
|---|---|
| 1 | This will store the actual document, which is uploaded by the users. |
| 2 | Upload functionality. |
| 3 | Download functionality. |
| 4 | Delete functionality. |
Storage = CONTEXTMENU
Storage = CLICK
Let us assume you want to provide all actions as separat buttons, to better accommodate mobile users. To achieve this you can use the Offset Columns and Offset Rows settings in the Content section of the
values. You also need to change the behaviour from to to trigger the functionality by a left instead of a right click.
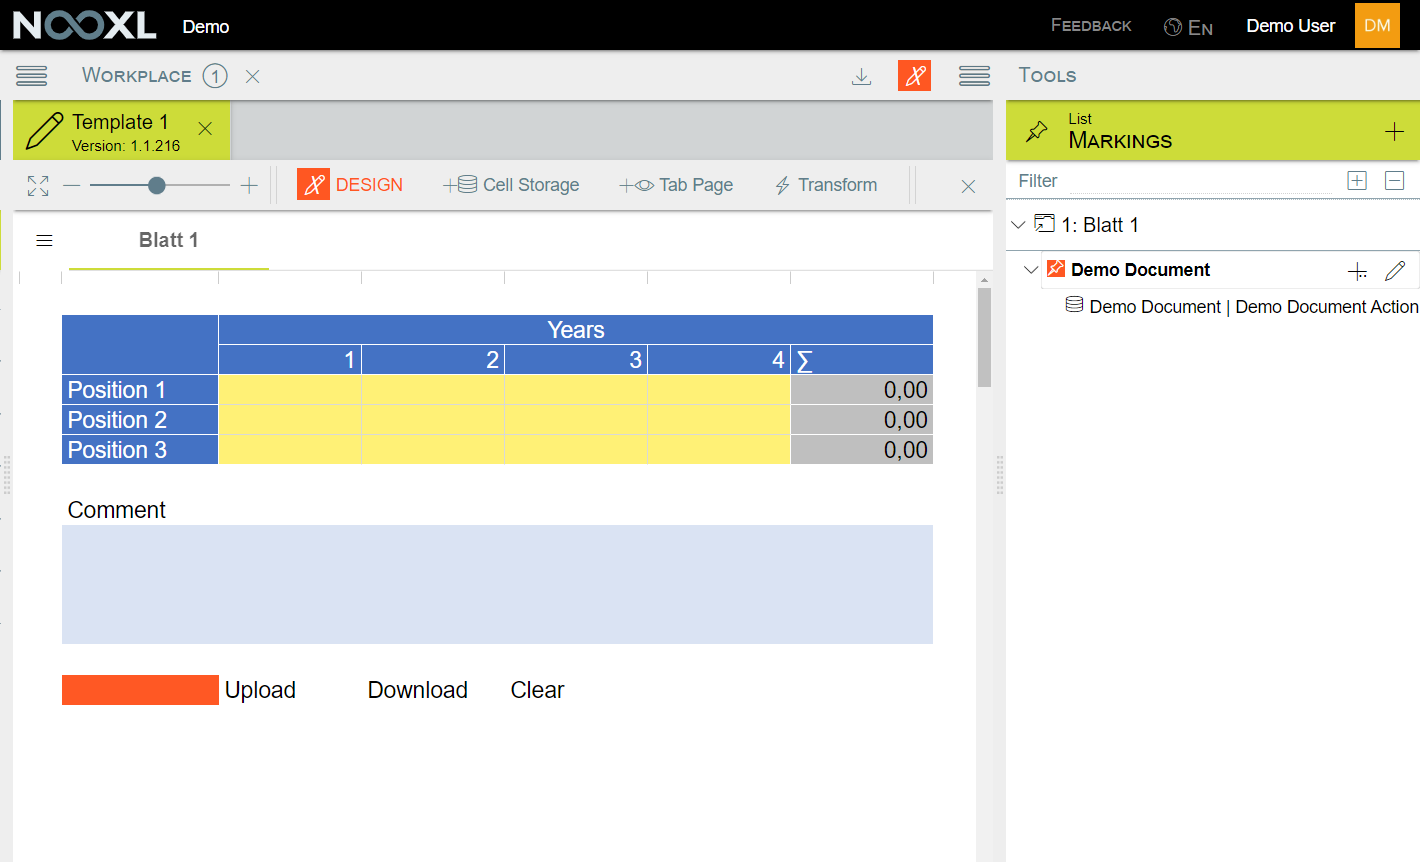
When you input the following settings
| Value | Offset Columns | S t o r a g e |
|---|---|---|
| 1 | 0 | R E A D _ W R IT E |
| 2 | -1 | C LI C K |
| 3 | -2 | C LI C K |
| 4 | -3 | C LI C K |
Then you can also change the template and add labels to your new buttons, by just typing in the label texts:
Create an external cell storages to read and write data from another template
In most of your applications you will want to use data entered in one template in another, at least read them, but sometime you also want to be able to alter that data directly without going back and forth.
How to read and write data from an external cell storage
For the following example we have two templates, Template 1 and Template 2. Both use the same layout, but in real life cases those could be different. The users have to select a data version for each dataset and for this demonstration we have already some data entered for data version 1:
Open the template were you want to read in the data from your first template and enter the design mode. Create a new markup, which is exactly the same size (amount of rows and columns) as the original, by selecting the cells (1) and clicking on Create New Marking (2):
Assign a name to your markup (1) and click on save (2):
In the Tools section on the right navigate to your new markup and click on Add a New Entry (1) and choose Add New Cell Store Entry from the dropdown (2):
Content Source
Enter the new cell storage by clicking on it and change
.
from to
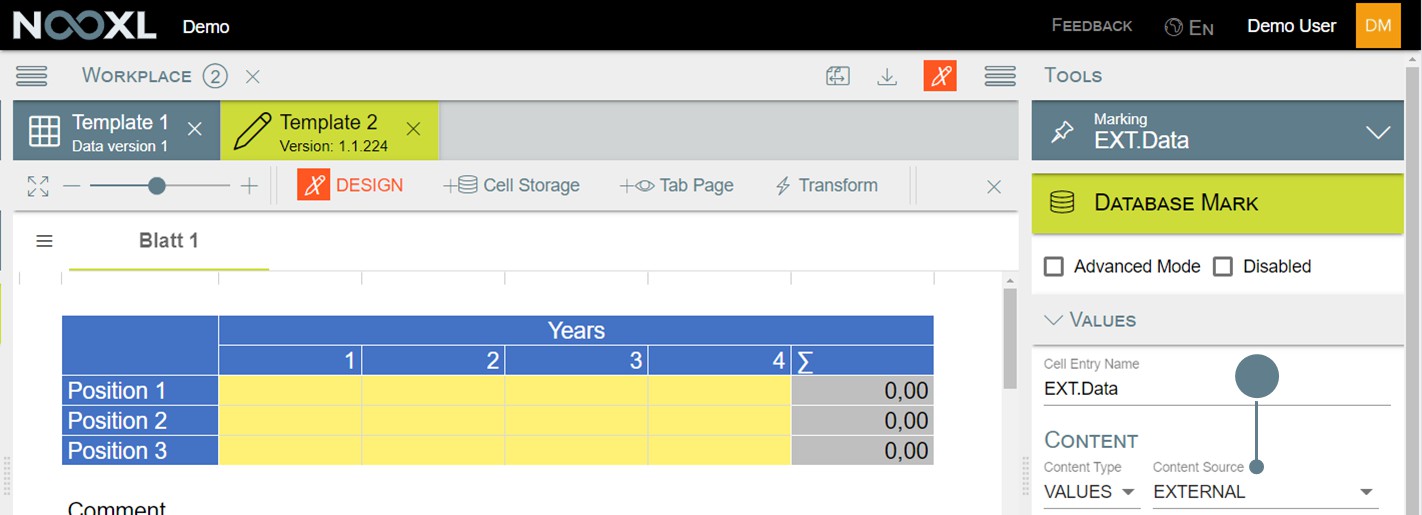
External Cell
Now click on the + right next to :
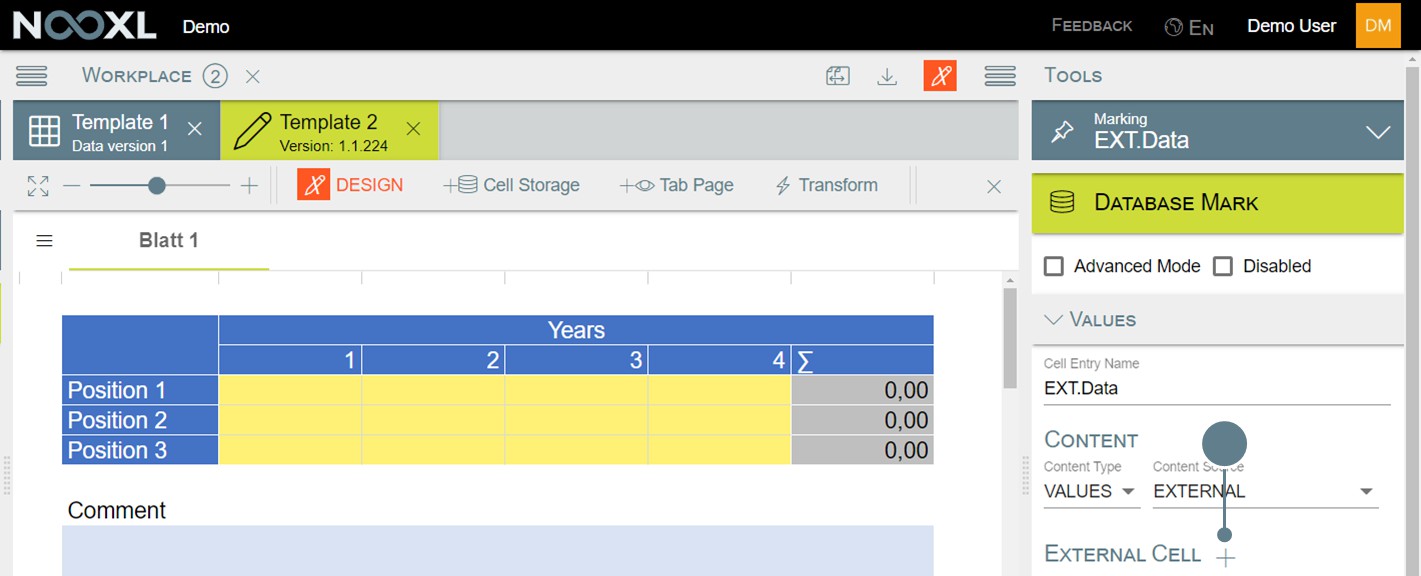
In the next mask you need to provide the information from were Nooxl should read the data:
| Settin g | Description |
|---|---|
| Extern al Matrix | The template were your cell storage is you want to read from. If you have several major versions of your template, you will need to specify the version. This means when you create a new major version for your source template, all templates reading from this, will need to be updated as well, to then read from the new major version. |
| Data Entry | The cell storage to read |
| Aggre gate | Nooxl can automatically aggregate the data you read if you want to. If this should be done, please specify how the aggregation should be done. |
| Extern al Data Links | For all external cells you need to specify at least two external data links, this is for the two dimensions each cell storage does at least have (down and right). If your source template has selections prior to opening the dataset, those selections will also be presented in the external data links and need to be specified. External Data This is either a selection of the template or a dimension of the cell storage. Usage Here you need to specify which information from the current template should be used to match the data. If you chose a Aggregate, you can also say to use that aggregate for (multiple) external data links. |
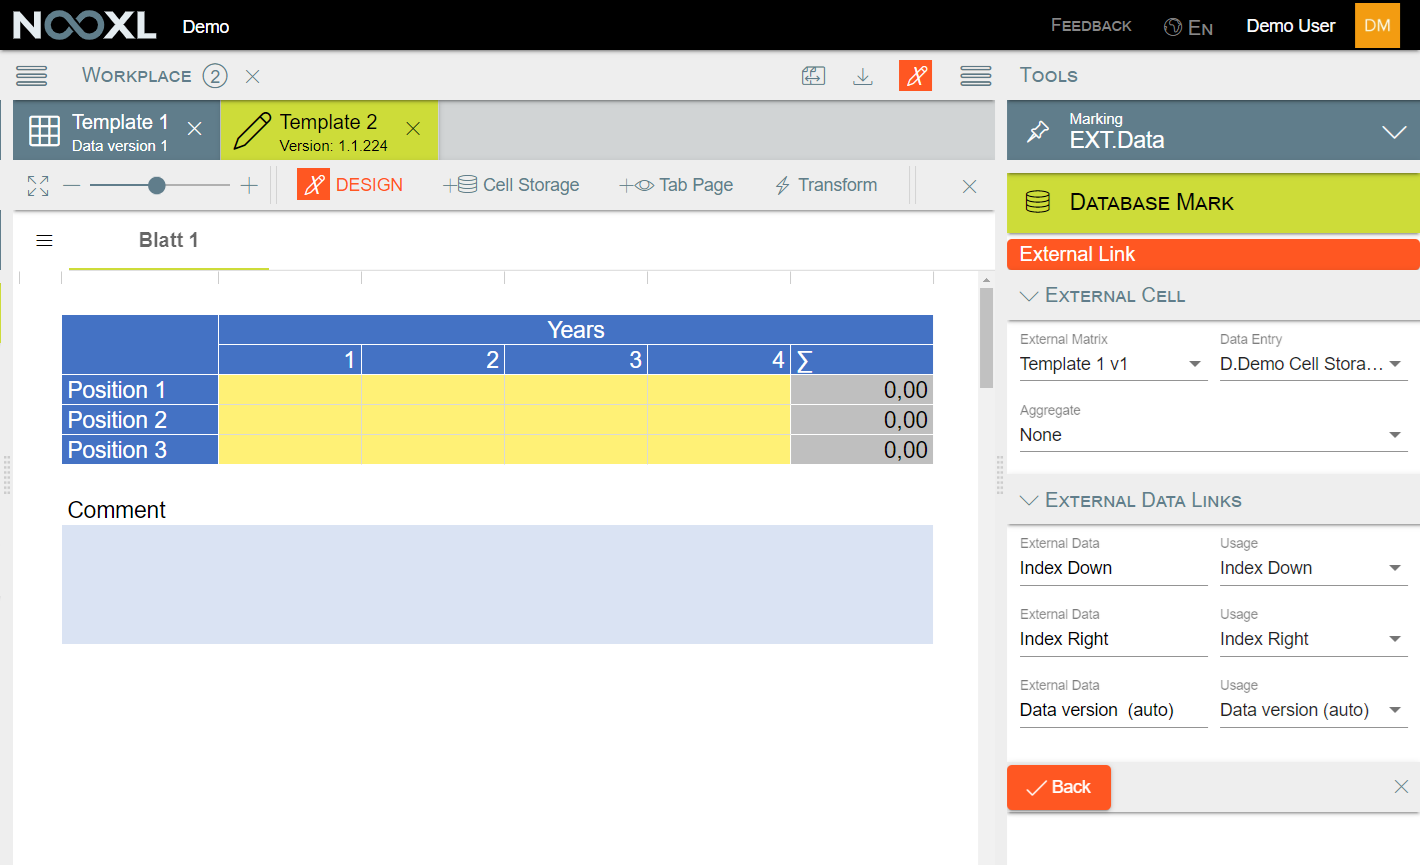
When you finished setting up the external data links please click on BACK and after that on SAVE.
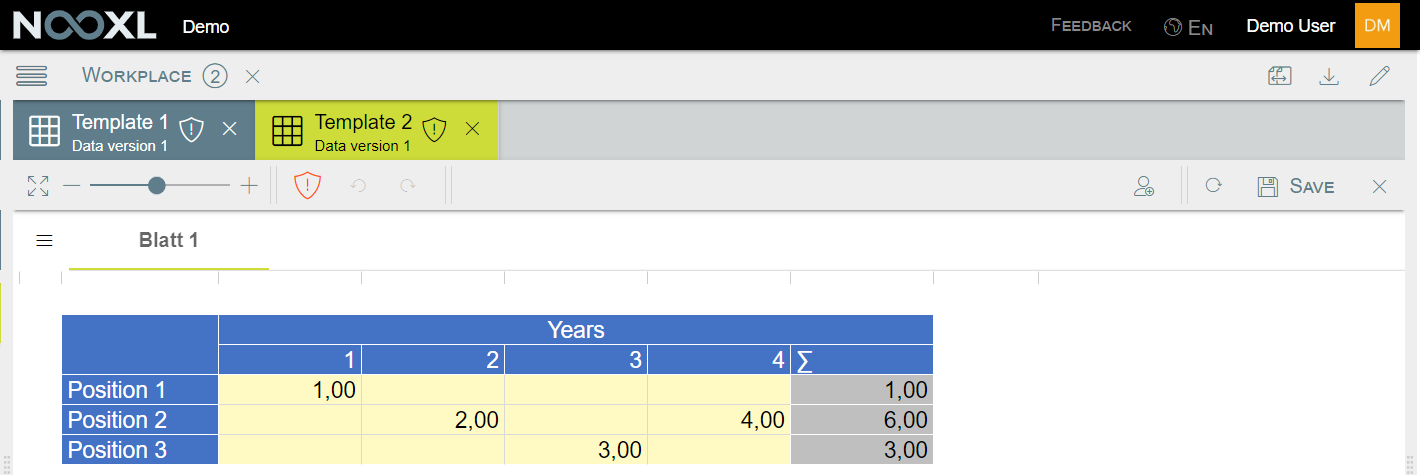
Result
After this you established a bi directional link (reading and writing) for the data between those two templates. If you open up the template with the external link you should see the data entered in the source template:
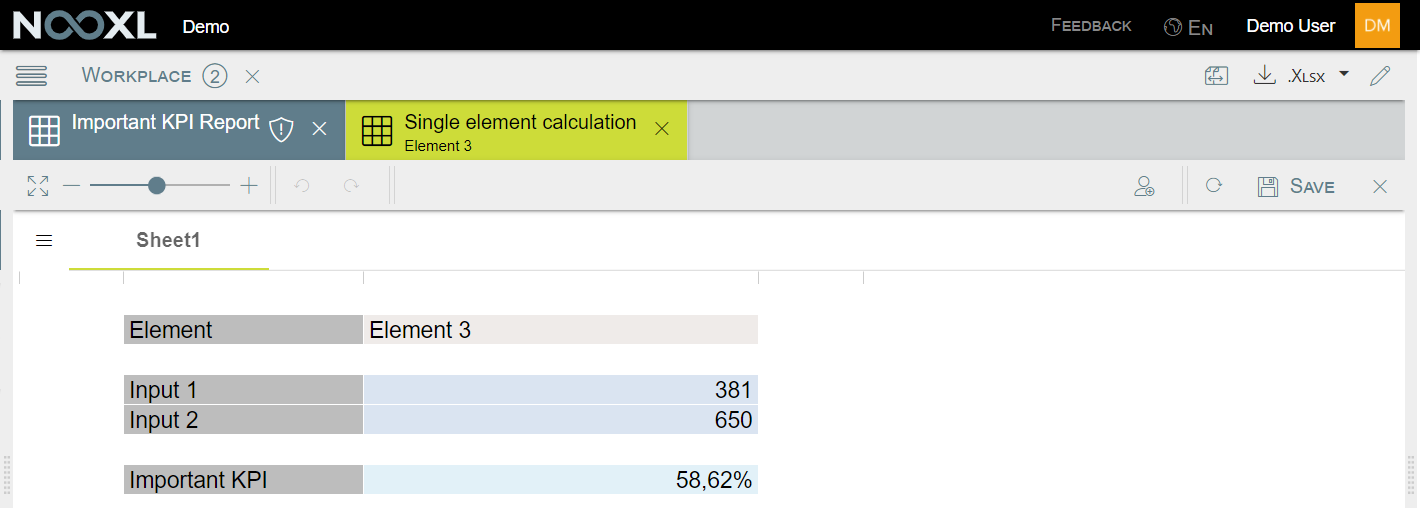
Details - jump to a dataset in a template
Content Type = Details
The of database mark enables you to create clickable links or context
menus which enable your users to directly open a specific dataset of another template (or the same).
How to set up a details markup
The setup of a DETAILS cell is similar to setting up an external cell .
Example usage
Imagine you have a detailed calculation for the elements in your app.
For reporting purposes you show the most important KPI of that calculation in a list for all elements.
Here you can use the Details Content Type to provide your users an easy access to the detailed calculation, so they can inspect the shown data. The little black arrow on the mouse cursor ( ![]() ) indicates to the user that he can right click on the cell.
) indicates to the user that he can right click on the cell.
If he does a context menu will show up, with the calculations name he can jump to. Here you can also have multiple details jump points, not only one.
With a click the template will open up and load the chosen dataset.
Functions
In order to realize advanced logics in Excel, which cannot be implemented with standard formulas or to automate time-consuming tasks, Visual Basic for Applications (VBA) is used. Since Nooxl does not support VBA for security reasons, so-called Function Mark(up)s are used here. On the following pages you will get an overview of the possibilities, which the Nooxl Function Marks offer you.
Function Mark properties
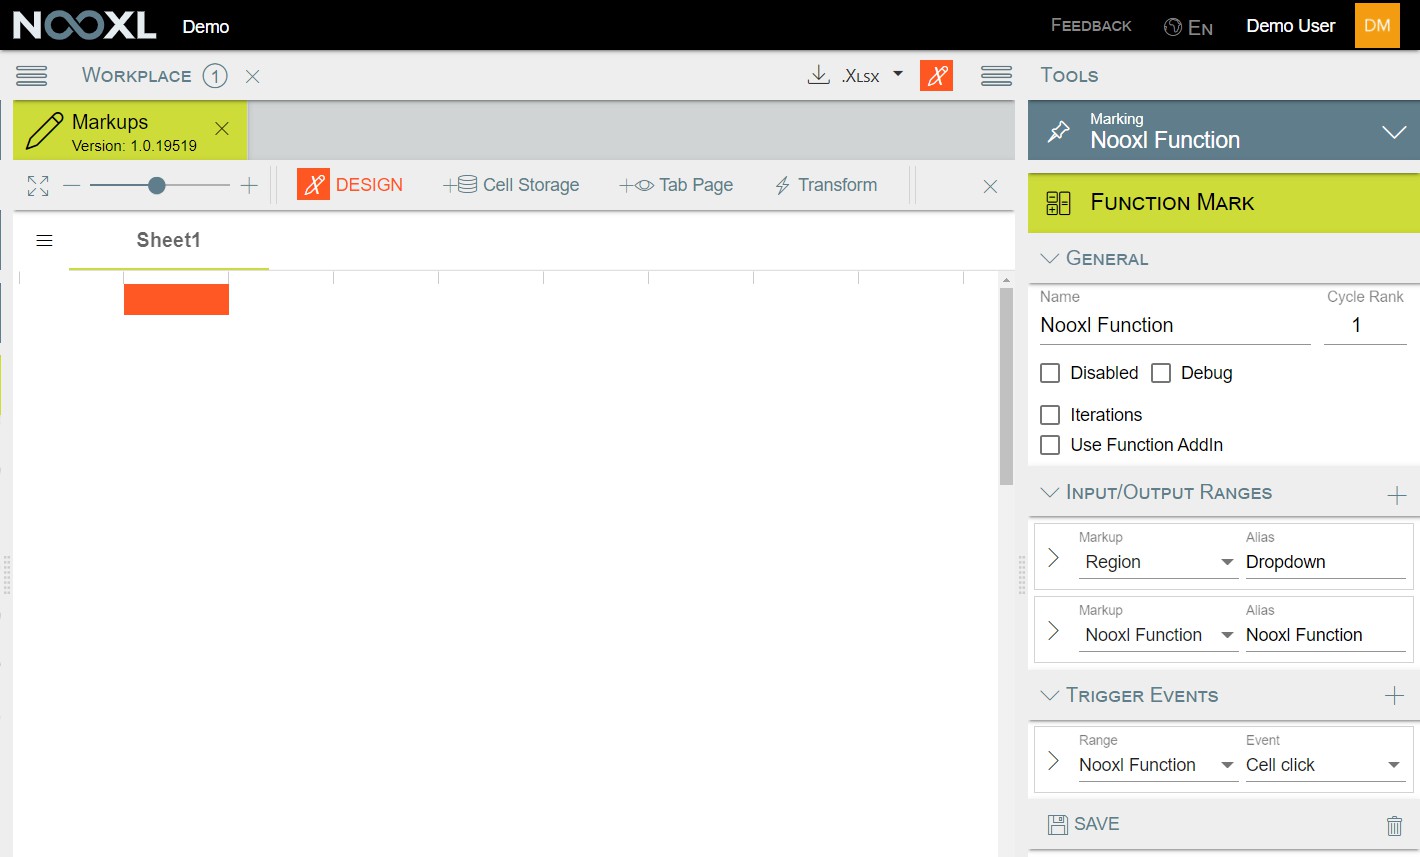
General
Name
Name of the function.
Cycle Rank
Is used to determine the order in which multiple functions are executed if more than one is triggered. Is the rank the same it will be executed in alphabetical order of the function names.
Disabled
Disables the functions logic.
Debug
Turns on debug mode. With this you will get information boxes on the bottom of your screen with debug information as soon as the function is triggered.
Iterations
You can turn on iterations if your output formula has a logical circle reference in it. In this case the formula will be executed multiple times.
Max. Count
The amount of times the formula should be executed.
Max. Change
The minimal change from iteration to iteration to trigger another iteration. If the change in the value is below this threshold, no more iterations will be executed, no matter if the Max. Count is not yet reached.
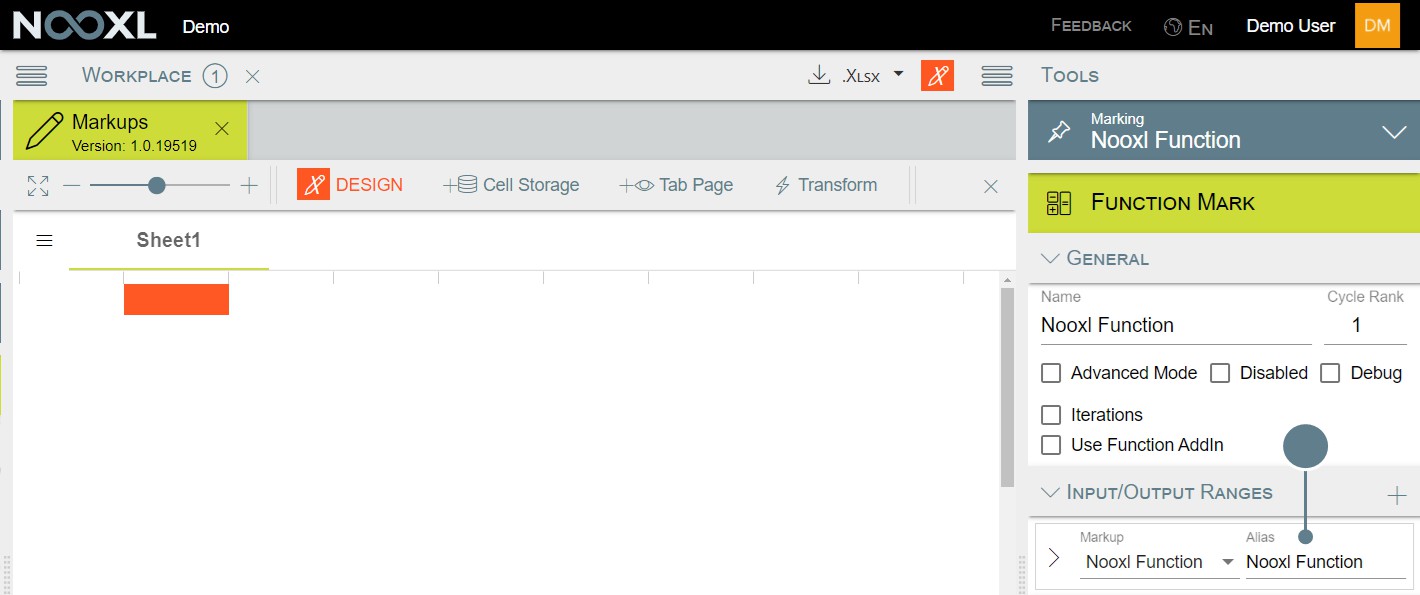
Use Function AddIn
Turn this on if you want to use a Nooxl Function AddIn .
AddIn
Name of the AddIn.
Function
Name of the Function.
Input/ Output Ranges
This sections purpose is to specify all markups you want to use in your function. This includes every markup containing information you need (inputs) as well as all the markups where you want to write new content to (output).
Markup
Use this dropdown to choose your markup.
The numbers in front of the markup names is the index of the sheet where the markup is located. This can help you to speed up the process of finding a specific markup.
Alias
The alias will be used in your Output formulas .
Is Output Range
Turns your cells into an output range, meaning that you can use excel formulas to determine its content
dynamically. More about Output formulas .
Set Next Region
If you check this box, Nooxl will use the content of Output formula to determine the name of the tab/ region it will jump to .
With Input-Event
Check this box if you want Nooxl to produce an input event for the cells which can trigger other functions.
Output formula
The output formula specifies the logic to determine the new content Nooxl will put into the cells of your
markup. There is a whole article about Output formulas available.
Trigger Events
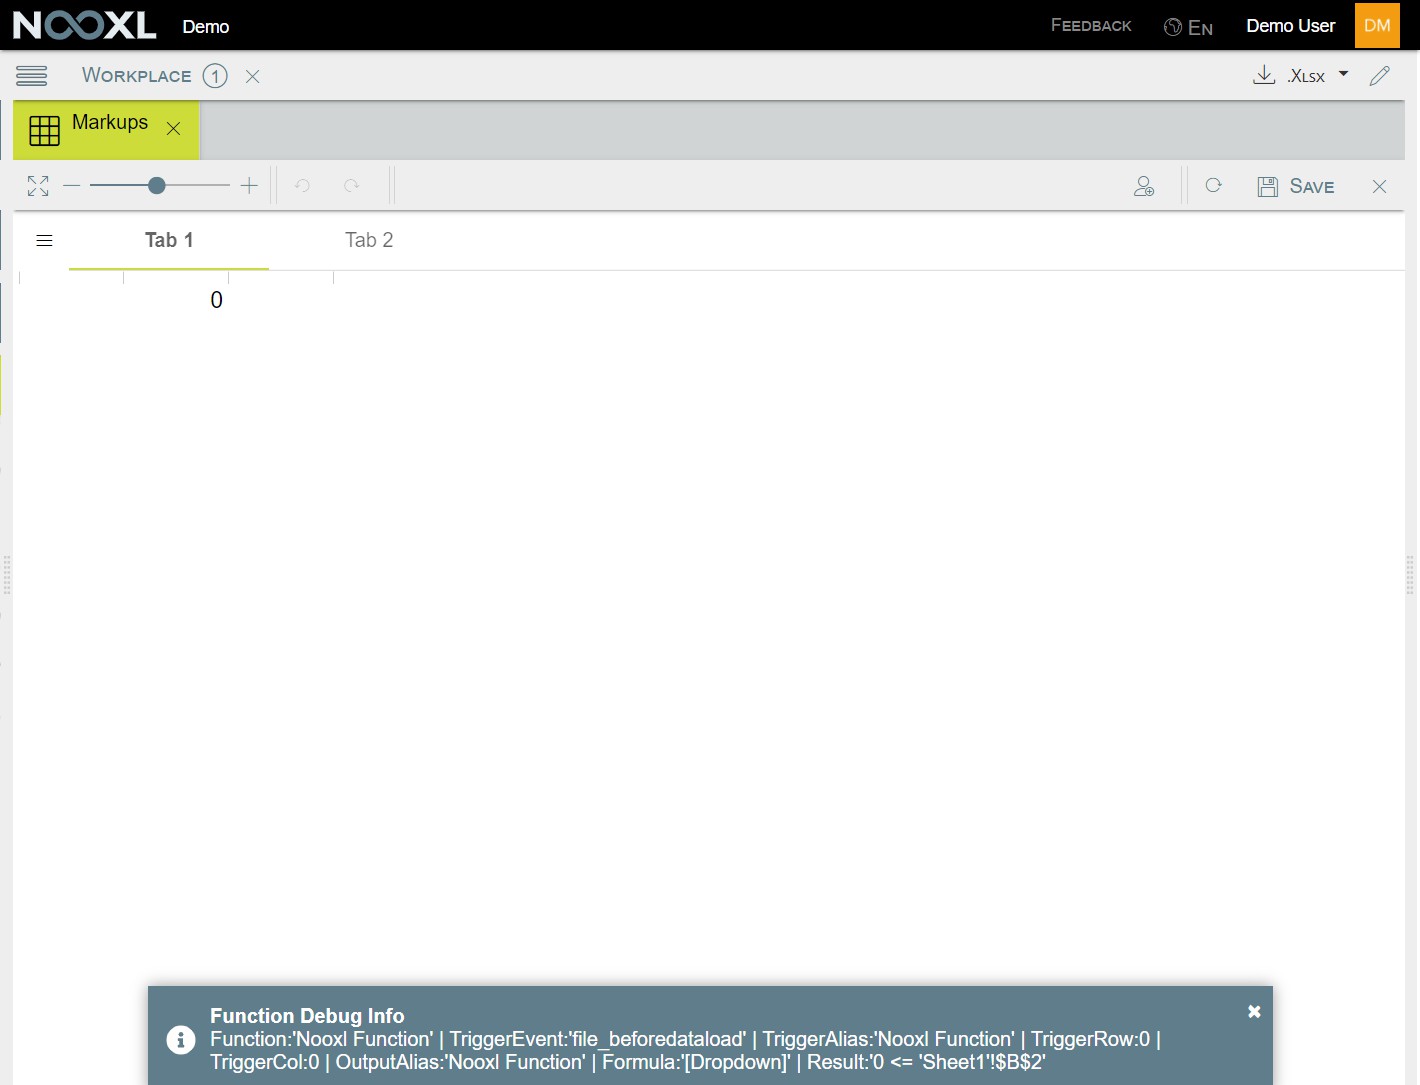
Every Nooxl function is triggered through specific events. In the section Trigger Events you tell the system what events you want to use.
Range
In this dropdown you find all aliases for all input and output ranges part of your function.
Event
The event type which will trigger your function. Please refer to the article event types for triggers for in detail information about the different events.
Calculate All Rows/ Columns
Please activate those options in case your output ranges contain more than one cell and you want that the function is applied to all the cells. Are those options not activated, the output formula will only be applied to the first (most upper left) cell of your output range.
Prevent Input
If this option is checked Nooxl will ignore the input made by the user and reset the cells content. This can be useful when you have a cell with a formula in it and you want to preserve the formula but also allow users to input data into this field.
Output formulas
As soon as a markup in a function has been declared as an Output Range in the details area (Output Range is checked (1)), a field for storing the Output formula appears below it (2).
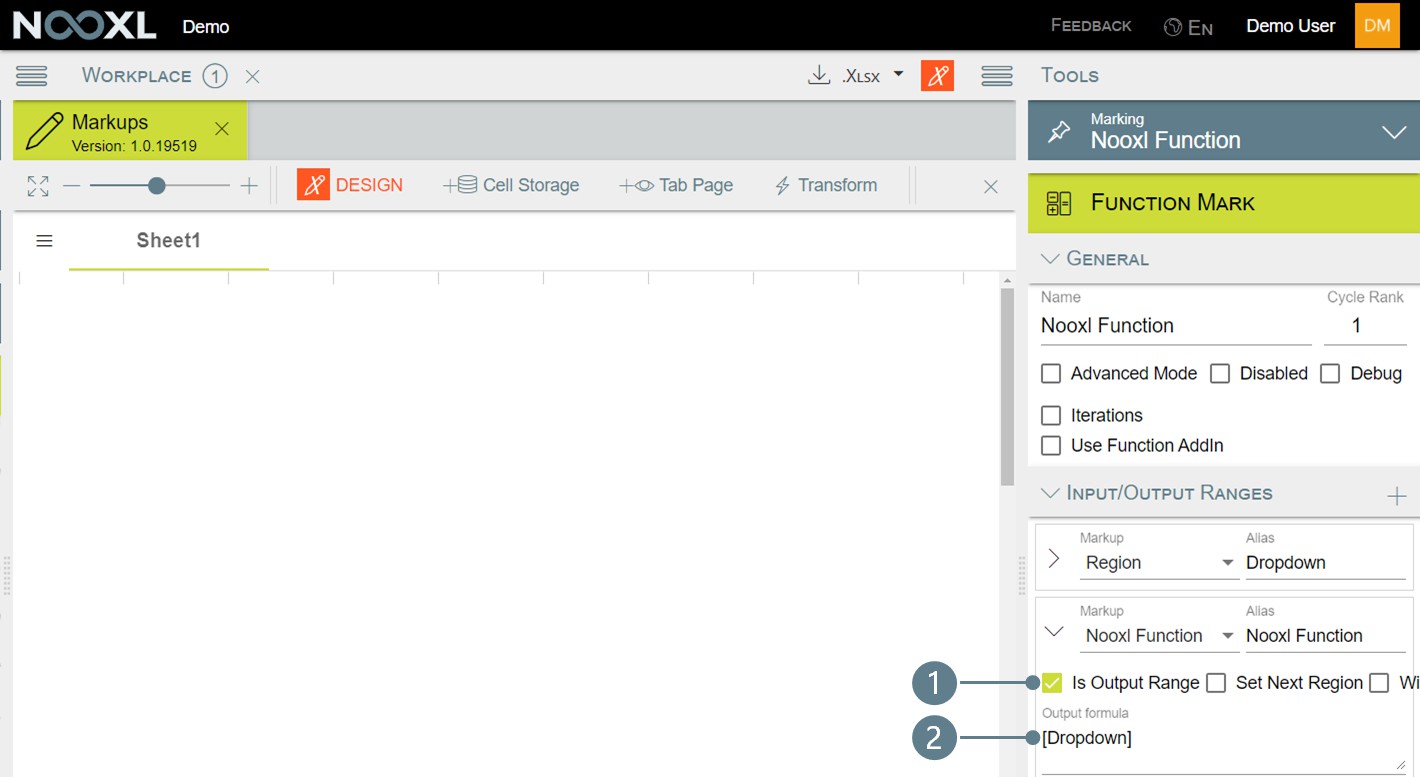
In the Output formula field you write down the logic on whose basis the value is determined, which is to
be output in the markup cells. The "programming" language used is Excel.
The output formulas support like Nooxl itself (nearly) all Excel formulas.
List of unsupported excel formulas
Language
You must use the english excel formulas in Nooxl.
If you normally use excel with german formulas, you can find all translations here: https://de.excel-translator.de/funktionen/
There are similar services available for other languages, please use google4 to find yours.
Syntax
Unlike Excel, all formulas start without =.
A comma (, ) or semicolon (; ) can be used as separator of statement blocks.
You can even mix comma and semicolon within an output formula and Nooxl will find a correct interpretation in most cases.
However, this is not recommended, as it greatly reduces the readability of the formulas.
Example
The following example function will produce the excel date value for the current date in the cell currently holding the value "Click", after the user clicked the cell.

Please be aware that cells with the trigger event Cell click must contain something (at least a space). If the cell is totally empty the cell click event will not trigger.
Example output formula
TODAY()
Variables
Various variables can be used in the output formulas. A list can be found here: Variables for Output formulas
Numbers in output formulas
If you (must) use hard-coded numbers in your formula and these are floating point numbers, use a dot as
decimal separator.
Example of multiplying a value field with the factor 1.25
1.25 * [VALUE]
Upper and lower case of aliases (case sensitivity)
Nooxl Function Marks are not case sensitive regarding the names of aliases and functions. But this also means that markup aliases must be unique within a Function Mark if you would send them through a
function!
References
If you want to use cell contents in your Output formula, you do not necessarily have to define them as Input Range in the Function Markup. You can also refer to an area or a cell in the original Excel by using the variants known from normal Excel formulas:
- named ranges
- Formula
- direct referencing via A1 Notation5
All references can of course be combined with other functions like OFFSET() .
Use of points (.) in Output Formulas
All "." (without "") in Output Formulas are replaced by commas (,) before interpretation. This is done so that numbers, which may have been entered in English format (e.g. "1.05" instead of "1,05"), are interpreted correctly.
WEBSERVICE()
However, if you really need a ".", for example because it is used at the end of a note to close a sentence,
or if you want to use Excel's So instead of
function, use Excel's
formula.
in the output formula you would use
"www"&CHAR(46)&"google"&CHAR(46)&"de"
Dynamic positioning and size of output ranges
Since the output range is declared as a Named Range in the Excel file, you can also use the Name Manager to make it dynamic.
For example, you can move the Named Range in Excel based on another value, so that the output occurs at different locations without having to declare a complicated logic and N many Output Ranges as part of the Function Markup.
Please note that the dynamic design of the area always produces a valid result
If the area is not valid because it
is located outside the sheet
is located on a non-existent sheet
does not contain any cells
Nooxl will produce errors which will block your App for a while!
Variables you can use in output formulas
The following table gives you an overview of the variables that can be used in the calculations of Nooxl Function Marks.
[Nooxl Function]
in the Variable columns stands for the ALIAS you have assigned to the markup. So in the
following example it would be and not .
| Variable | Description |
|---|---|
| [ALIAS] | The cell content. |
| [ALIAS@Before] | The cell content, before any functions were applied. |
| Variable | Description |
|---|---|
| [@TriggerAlias] | Contains the ALIAS of the range which triggered the current function. This is useful if you have defined multiple triggers for a function and have to implement different behaviors depending on which trigger was triggered. |
| [@TriggerRow] | If the trigger's markup includes multiple rows, [@TriggerRow] contains the row number within the range that triggered the trigger. The Index starts at 0. |
| [@TriggerCol] | If the trigger's markup includes multiple columns, [@TriggerCol] contains the column number within the range that triggered the trigger. The Index starts at 0. |
| [@RegionName] | Name of the currently selected region/tab. Usage "[@RegionName]" |
| [@UserName] | Name of the current user. Usage "[@UserName]" |
Event types for triggers
In the following table the different event types for Function Mark Trigger are explained.
| Event | Description |
|---|---|
| not used | Trigger is deactivated / not used. |
| Value input | Is triggered when a user makes an entry in a cell of the markup. If the cell is a dropdown, Value input cannot be used as a trigger. |
| Value changed | Is triggered when a user makes an input in a cell of the markup and the value differs from the previously contained value. |
| Cell click | Is triggered when a user clicks a cell of the markup. If the cell is empty, the event is not triggered. If you want to use a cell without visible content as a trigger, insert a blank as content. |
| File, before data load | Is triggered after a user clicks on Show in the dataset selection and before any manipulations are made to the template. Such manipulations are: Reading data Inserting cells by read conditions |
| File, after data load | Is triggered after a user clicks on Show in the dataset selection and after all manipulations are made to the template. Such manipulations are: Reading data Inserting cells by read conditions |
| File, before save | Is triggered when a user clicks Save, but before the data is stored in the database. |
| File, after save | Is triggered as soon as a user clicks on Save and after the data has been stored in the database. |
| Tab, before change | Is triggered as soon as a user clicks on another tab in a template. The change is done before the user changes the view. |
| Event | Description |
|---|---|
| Tab, after changed | Is triggered as soon as a user clicks on another tab in a template. The change will be made after the user's view is changed. |
| Context Menu | Is triggered when a user right clicks on a cell of the markup and selects the corresponding entry from the context menu. |
Function AddIns
If the desired functionalities themselves become too complex for the normal Function Markups, they can be implemented as so-called Function AddIns in C# and used in Nooxl.
Nooxl already offers a handful of such AddIns, which you can use. Each AddIn consists of one or more
functions, which are combined in the AddIn.
How it works
The Functions use the Aliases of the Input/ Output Ranges in the Function Markup to map their input and output. For example you could have a simple Function AddIn which calculates the SUM of all cell in a range and gives back the result.
So it would require the following setup:
| Range Alias | Is Output | Description |
|---|---|---|
| IN | A range of cells. The cell count does not matter, it can be a single cell or several thousand cells. | |
| OUT | A single cell or a range of cells. If a range of cells is provided, the result will be printed in the first (left/ top) cell. |
Usage of AddIns
To use an AddIn in your Function Markup you need to check the Use Function AddIn option (1) and specify the AddIn (2) as well as the Function Name (3).
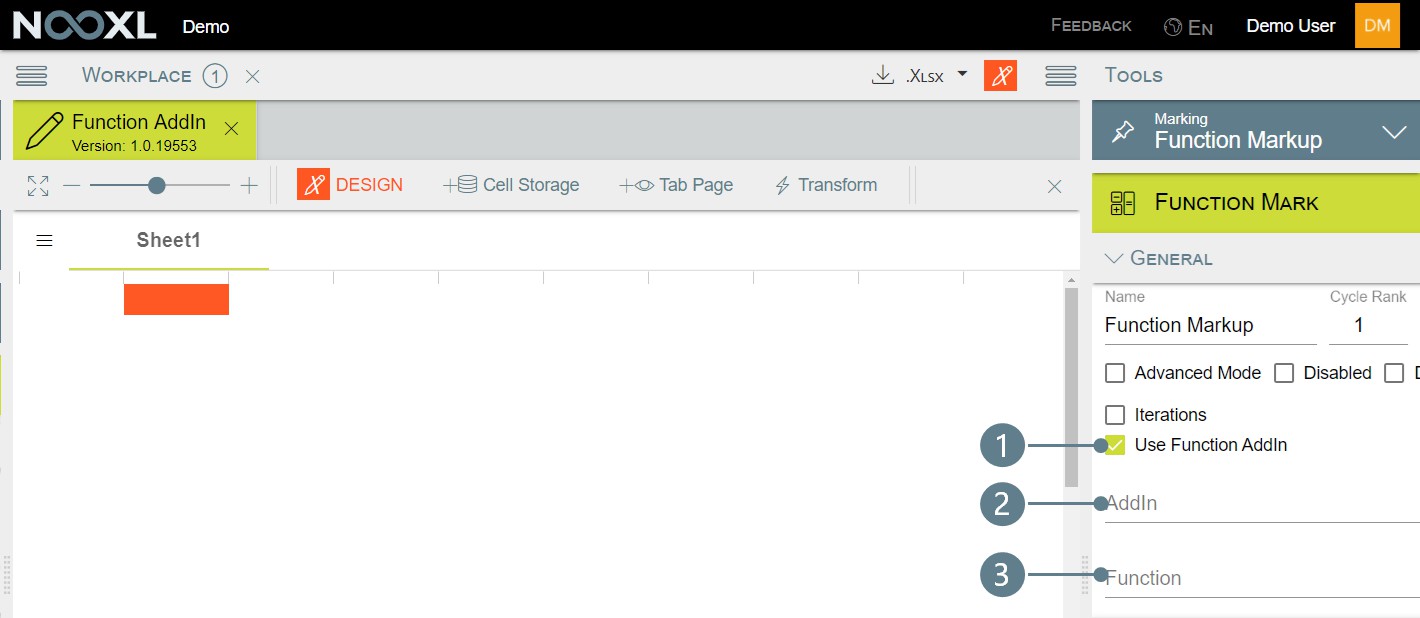
Then depending on the Function you chose you need to setup all necessary markups with their correct aliases.
Available Function AddIns
Information about the individual AddIns can be found on the following pages.
DistributionFunctions
DistributionFunctions
The AddIn
Verteilfunktion
contains the following functions:
The distribution function makes it possible to programmatically distribute a value over any number of periods. Each column represents a month.
DistributionFunctions
AddIn
Verteilfunktion
Function
Range Alias
Is Output
Description
Startdatum
Date represented in the first column of Ausgabebereich .
Ausgabebereich
/
Output range.
Gesamtwert
Value which should be distributed.
![]()
Output range.
Gesamtwert
Value which should be distributed.
| Range Alias | Is Output | Description |
|---|---|---|
| Startdatum | Date represented in the first column of Ausgabebereich . | |
| Ausgabebereich | Output range. | |
| Gesamtwert | Value which should be distributed. |
| Range Alias | Is Output | Description |
|---|---|---|
| PeriodeAb | Periods between the value is distributed. PeriodeAb will not get any values but PeriodeBis will. Both cells must contain an integer representing the columns in the output range where the distribution is to take place. | |
| PeriodeBis | ||
| PeriodeIst | Integer, which indicates up to which column "actual" numbers already exist. No values are distributed to the months marked in this way, but the function checks whether there are already values in them, which must be subtracted from the value to be distributed. | |
| Verteilung | The distribution type to be used, see section Distribution Types. |
All ranges must have the same number of rows for the AddIn to work correctly.
Distribution
Description
manuell
No value distribution through Nooxl, because all values in this row will be manual inputs.
linearmonatlich
Each column gets exactly the same value.
linearquartaerlich
The same value is distributed to each end of a quarter.
linearjaehrlich
The same value is distributed to each end of a year.
zumbeginn
Everything in the first column.
zumEnde
Everything in the last column.
skurve30
The whole timespan between PeriodeAb and PeriodeBis is separated into three phases spanning the same amount of
Distribution types
| Distribution | Description |
|---|---|
| skurve20 | months. If the amount of months is not divisible by three, then phase 1 and 3 are shorter than phase 2. 10%, 20% or 30% of the Gesamtwert are then distributed linear to the months of phase 1 and phase 3. The rest (80%, 60% or 40%) is distributed equally to the months of phase 2. |
| skurve10 |
Range Alias
Event
Description
PeriodeAb
Value changed
Trigger, if the timespan is changed.
PeriodeBis
Value changed
Gesamtwert
Value changed
Trigger, if the value which is distributed is changed.
Verteilung
Value changed
Trigger, if the distribution type is changed.
PeriodeIst
Value changed
Trigger, if the amount if actual periods is changed.
Trigger Events
Simulierfunktion
Simulierfunktion The
enables you define parameter sets ( SimInputParameter ) which are
applied one by one to a range ( SimInputCells ). You can therefore use the value from this range in your Excel Logik to applied your simulation parameters were applicable. You need a range with the results you want to save for each parameter set ( SimOutputResults ).
DistributionFunctions
AddIn
Simulierfunktion
Function
Input/Output Ranges
| Range Alias | Is Output | Description |
|---|---|---|
| SimCalculatedBy | Output field into which the user name is written, from which the simulation was started. | |
| SimCalculatedOn | Output field into which the time is written at which the simulation was started. | |
| SimInputCells | Column with the currently applied parameters. This is what you need to incorporate in your excel logic. | |
| SimInputParameter | Parameter-Sets for the Simulation. Each column of this range represents a different set of parameters, for example "normal risk", "extreme risk", "brexit scenario". The more columns the range has, the more parameter sets are processed. | |
| SimOutputResults | Range with the stressed values. This range is copied over to SimOutputStore after a parameter set is applied. | |
| SimOutputStore | Storage range for the parameter set results. This range must have the same amount of columns as the SimInputParameter . | |
| SimStart | Trigger cell to start the simulation. |
Trigger Events
| Range Alias | Event | Description |
|---|---|---|
| SimStart | Cell click | Trigger cell to start the simulation. |
Regions - Jump to another tab page in your template
The option Set Next Region in the Output ranges section of your Nooxl function allows you to direct the user to another tab page of the same template.
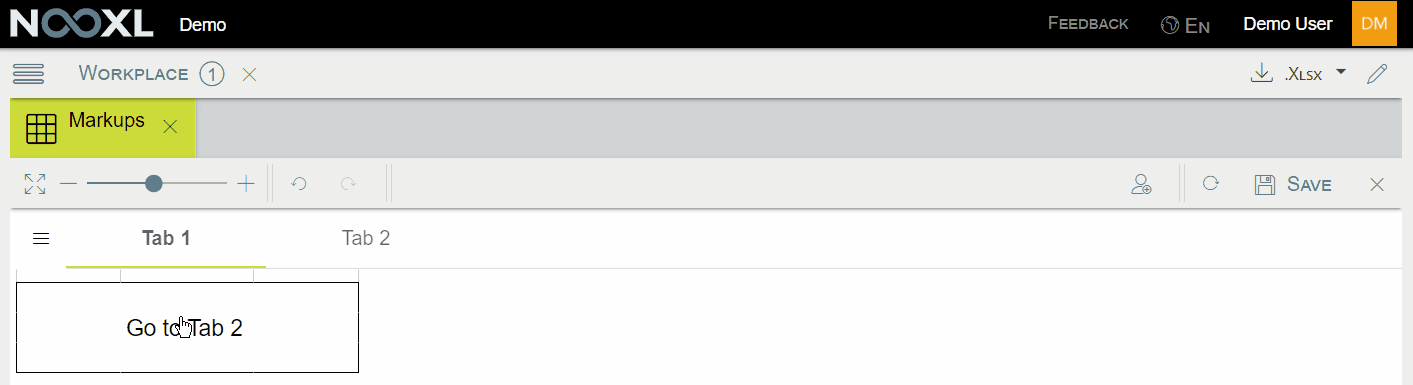
Usage
All you have to do is to activate the Set Next Region checkbox and to specify the name of the tab page you want to go to.
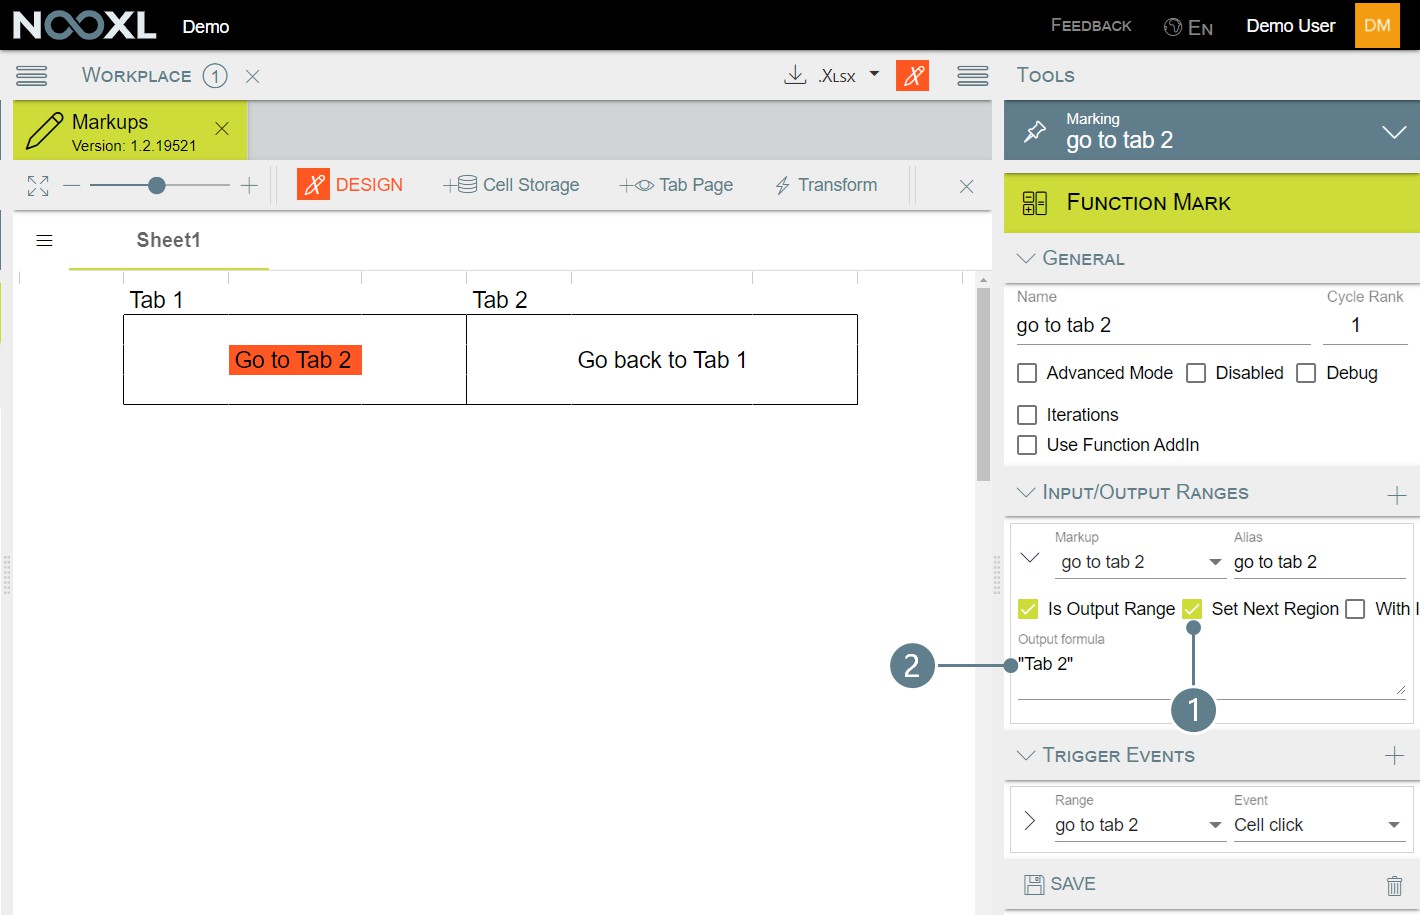
Please specify the name of the tab page (1) not the name of the markup containing your tab page (2).
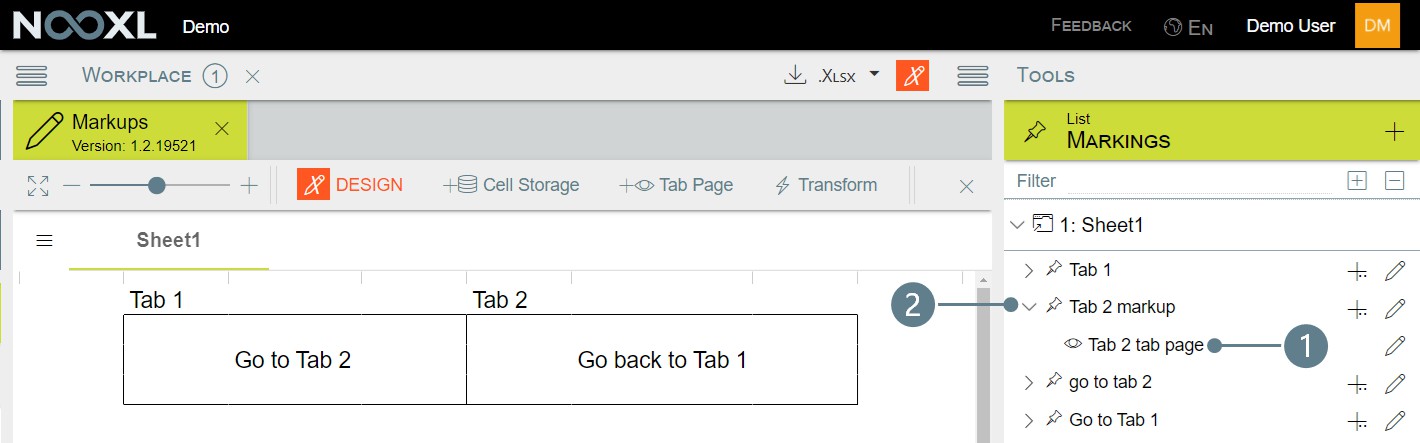
You could combine this with the Use Visibility Markup option of the tab pages to hide the inactive tabs from the users and to let them navigate your template only by region functions.
Show pictures
NOTE
The following content represents a current state of work. The information contained herein will be supplemented and adapted in the course of time.
JobRanges - Background processing of tasks
Nooxl offers you to automatically process various tasks in the background, to automate certain things. Currently we offer different job types in the categories Matrix-Jobs and Status-Jobs . Matrix-Jobs are tasks involving the templates in your App and Status-Jobs deal with activities of the users and are more of the type "housekeeping".
Columns in the JobRange
As soon as you created a JobRange in your template, you will see the following table like structure (there are more parameter columns to the right).

Here you insert all the information for your job. Each row represents a step and you can add rows as you like.
Please make sure, that the named range of the JobRange is extended as you insert new rows or else your new steps will be ignored.
| Column | Description | |
|---|---|---|
| 1 | Job-Name | A name for the jobs step. |
| 2 | Job-Type | One of the job types described below. |
| 3 | Run | |
| 4 | SuccessMsg | NOT YET IMPLEMENTED |
| 5 | ErrorMsg | NOT YET IMPLEMENTED |
| 6 | ||
| 7 | ||
| 8 | Done | NOT YET IMPLEMENTED |
| 9 | Result | NOT YET IMPLEMENTED |
| 10 | StartedBy | NOT YET IMPLEMENTED |
| 11 | StartedOn | NOT YET IMPLEMENTED |
| 12 | FinishedOn | NOT YET IMPLEMENTED |
| 13 | ||
| 14 | ||
| 15 | Parameter 1 | The Parameters of your job step. Please see below in the Job type description what you should put in here. |
| 16 | Parameter 2 | |
| 17 | Parameter N |
If you read elements from a catalog in your rows and set your markup to expand on the lines, your JobRange will automatically grow on run time.
Matrix-Job types
MatrixDataRecalc
MatrixDataRecalc
The
migration template.
type lets you recalculate datasets or import data with a
This can be used to automatically recalculate templates which depend on other templates or as part of an automated import process.
Parameters
| # | Pa ra me ter | Description | Example | ||||||
|---|---|---|---|---|---|---|---|---|---|
| 1 | Te m pla te Na me | The name of the template whichs datasets are recalculated or migration template is used. This is the name of the template in the left navigation. If you change the name of a template which is part a job, please be aware that you also need to update the MatrixName in the job. | Test Template | ||||||
| Source | Target | withOverwrit e = true | withOverwrit e = false | rite": "true", "onlyExist ingDataset s": "true" ) | |||||
| Position 1 | Hello | Text | Hello | Text | |||||
| # | Pa ra me ter | Description | Example | ||||||
|---|---|---|---|---|---|---|---|---|---|
| Source | Target | withOverwrit e = true | withOverwrit e = false | Example for an import ( "withOverw rite": "true", "onlyExist ingDataset s": "true", "migration Name": "ImportJOB ", "migration DocId": "32" ) | |||||
| Position 2 | World | World | World | ||||||
| Position 3 | 123 | in | 123 | in | |||||
| Position 4 | Example Text | target dataset. | Example Text | target dataset. | |||||
| onyExistingDatasets This option determines whether only existing datasets should be recalculated or data imported to. true → datasets are only calculated if they already exist (once saved by a user). false → All possible datasets are calculated, even if no user has saved them yet. The default is false . migrationName Name of the migration to be used when importing data from a file via MatrixDataRecalc . migrationDocId The document ID of the document to be used for import, if data is to be imported from a file via MatrixDataRecalc . The file must be stored in the template as a document for the job to access it. |
| # | Pa ra me ter | Description | Example |
|---|---|---|---|
| 3 - 8 | Sel ect ion s | In parameters 3 to 8 you specify a concrete selection to be set in the corresponding selection of the template. If you want to process not only a specific dataset but all available ones, use the command ##ALL## in the selection. | |
| The order of the selections is analogous to the visible order in the dataset selection of the template. Please note that this does not need to be the order specified in the selection options. | |||
| If your dataset selection contains hidden additional data, omit these selections in the parameters. This will lead Nooxl to use the latest setting used for each dataset. If the dataset has no setting in the additional data so far, the first entry is automatically used. |
MatrixDataCopy
MatrixDataCopy
The
type will copy data from dataset A to dataset B.
MatrixDataCopy
This is useful for exmaple if you periodically create new working datasets to preserve the old state for
auditing purposes. Here you can use to create a one to one copy of all the current
#
Pa ra me ter
Description
Example
1
Te m pl at e Na m e
The name of the template which's datasets ashould be copied. This is the name of the template in the left navigation.
If you change the name of a template which is part a job, please be aware that you also need to update the MatrixName in the job.
Test Template
2
Op tio ns
As the second parameter you pass in options as a JSON . All options are optional, the default values are described below.
withOverwrite
(
data to not start from scratch with your planning process. Parameters
| # | Pa ra me ter | Description | Example | ||||||
|---|---|---|---|---|---|---|---|---|---|
| If data contained in the target shall be overwritten by the data of the source ( withOverwrite = true ) or if only "gaps" in the target shall be filled with the data of the source ( withOverwrite = false ). The default is false . | "withOverw rite": "true", "onlyExist ingDataset s": "true" ) | ||||||||
| Source | Target | withOverwrit e = true | withOverwrit e = false | ||||||
| Position 1 | Hello | Text | Hello | Text | |||||
| Position 2 | World | World | World | ||||||
| Position 3 | 123 | in | 123 | in | |||||
| Position 4 | Example Text | target dataset. | Example Text | target dataset. | |||||
| onyExistingDatasets This option determines whether only existing datasets should be recalculated. true → datasets are only calculated if they already exist (once saved by a user). false → All possible datasets are calculated, even if no user has saved them yet. The default is false . | |||||||||
| 3 - 8 | Sel ect io ns | In parameters 3 to 8 you specify a concrete selection to be set in the corresponding selection of the template. If you want to process not only a specific dataset but all available ones, use the command ##ALL## in the selection. |
| # | Pa ra me ter | Description | Example |
|---|---|---|---|
| The order of the selections is analogous to the visible order in the dataset selection of the template. Please note that this does not need to be the order specified in the selection options. If your dataset selection contains hidden additional data, omit these selections in the parameters. This will lead Nooxl to use the latest setting used for each dataset. If the dataset has no setting in the additional data so far, the first entry is automatically used. |
Status-Job types
StateClose
Closes the status of open spreadsheets after a specified time of inactivity by the user. This only affects spreadsheets without unsaved user input. This reduces the number of warnings about parallel processing by other users if these spreadsheets have not closed properly in Nooxl.
Parameters
| # | Parameter | Description | Example |
|---|---|---|---|
| 1 | Template name | If you want to close open spreadsheets of a specific template, then you need to put the template name here. The alternative is to close all inactive spreadsheets ( ##ALL## ). | ##ALL## |
| 2 | Info Parameter | NOT YET IMPLEMENTED | - |
| 3 | Time Minute | Close workbook s with 2 hours idle time. 120 |

StateDeleteInactive
Deletes status datasets from the history of activities after a specified time to clean up the history.
Parameters
| # | Parameter | Description | Example |
|---|---|---|---|
| 1 | Template name | If you want to delete the datasets of a specific template, then you need to put the template name here. The alternative is to delete the datasets of all templates ( ##ALL## ). | ##ALL## |
| 2 | Info Parameter | NOT YET IMPLEMENTED | - |
| 3 | Time Minute | Delete the whole history 0 |

Currently job ranges can not be created in the web application. You need to:
insert the job table layout manually into your template
create a markup for the layout via the web interface
add the necessary entries in the database tables u1.MarkupJob and
u1.MarkupJobTrigger
Create a JobRange
| Trigger type | ID |
|---|---|
| Value changed | 2 |
| Cell click | 11 |
| File, before data load | 20 |
| Trigger type | ID |
|---|---|
| File, after data load | 21 |
| File, before save | 22 |
| File, after saved | 23 |
When is the job executed
You can have the job be triggered as a reaction to a user interaction (same as for Function Markups ) or based on an automated schedule .
Regularly start jobs (CRON)
Set up your template with the JobRange as you would do normally. After that you need to add a CRON-
Job6 to your template, which is currently only possible in the database table .
CRON entry to start everyday a 00:01 am
0 1 * * * *
After that you control the CRON-Jobs directly in the Cell Store in the design mode. All
![]() templates with a CRON-Job entry in will be displayed with a icon. Click on this to start
templates with a CRON-Job entry in will be displayed with a icon. Click on this to start
and stop the CRON-Job or to run the Job besides the schedule right now.
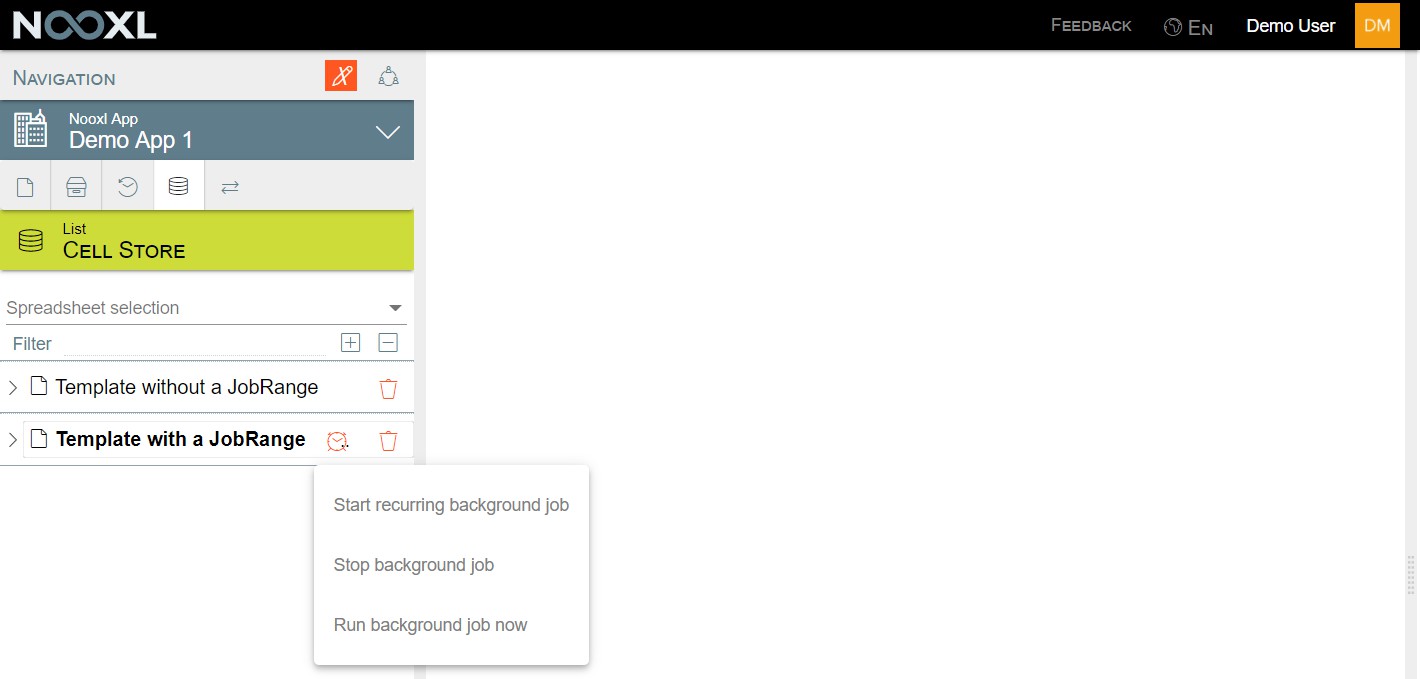
Create and edit catalog elements using a modification markup
The normal ways to create new elements in your apps catalogs is to go to the section catalogs and elements or to allow your users to create new elements in the dataset selection .
If those options doesn't suit your needs, because you do not want to allow normal users to access the catalogs and elements section, or because you maybe need to make sure certain naming patters for the elements are followed, you can also create elements from specially crafted templates.
Those templates include a so called modifications markup. The first benefit of those is that you can surround the markup with excel logic, so you can really own the process of creating new elements (naming patterns, including names of elements from other catalogs, save additional data for the elements, start a background job for the new element etc. pp.). The second big pro is, that you can allow your users to create multiple elements at once! This can be helpful in case you have an import from another system and need to create new elements based on that data.
Currently it is not possible to create a modification markup via the web interface. You need to create a normal empty markup and then go to the database table [u1]. [MarkupModification] to set up your modification markup.
Create a modification markup
| Column | Description | Example |
|---|---|---|
| Id | The primary key of the table. This is set automatically. | 1 |
| UniverseId | The Id of your app. It references to [ctr]. [Universe]. | 10 |
| LogicReleaseId | This Id references to the template your modification markup is located in. You get this Id together with the MarkupId from the table [u1].[Markup] . | 123 |
| Code | The name of your markup which will show up in the web interface. | My modification markup |
| Rank | If you have multiple markups in your template, you can use the rank to define an order in which the elements are created. If you do not provide a rank the markups will be processed by their alphabetical order. | 0 |
| Column | Description | Example |
|---|---|---|
| MarkupId | The Id of the markup. It can be found in the table [u1].[Markup] . If you just created the markup you can use the follow SQL to obtain the Id. SELECT TOP 1 * FROM [u1].[Markup] ORDER BY 1 DESC; | 345 |
| ConditionId | You element will be created as part of a catalog. To determine which catalog you need to provide the Id of a selection of this catalog. The element will automatically be part of this selection. You find the Ids of catalogs in the table from the table [u1]. [Catalogs] . | 678 |
| IsDisabled | A bit. Set this to 1 if you want to disable the modification markup. Disabled markups are not processed. | 0 |
| IsAdvanced | False | |
| ModificationEnum | 0 | |
| VectorDirection | 0 | |
| PropertyIndexId | 0 | |
| PropertyIndexName | 0 | |
| PropertyIndexDescr iption | 0 | |
| PropertyIndexTags | 0 | |
| WithReloadConditio ns | 0 |
Workflows
Every permission granted in the Collaboration section of your Account is static as long as nobody changes it. This can be enough, but if you need to implement a workflow which grants different permissions to different user groups based on the current workflow status you need to extend beyond the normal permissions.
Here workflow based user rights come into play. which can be granted to different objects in your App:
| Authorization level | Description |
|---|---|
| Matrix | Changes permissions for a specific template. |
| State | Change permissions for a particular dataset of a template. |
| Condition | Change permissions for elements of a catalog. These permissions are transferred into all templates where the elements are either used for the dataset selection or as selections in dimensions. |
| Selection | TBD. |
The following permissions are distinguished:
| Permission | Description |
|---|---|
| PriorityAccess | Can the element be seen This translates to dataset selections as well as the usage of selections in templates. If a user has no access for the elements it can not be seen. |
| PrioritySave | Can the elements data be changed/ saved |
| PriorityDelete | Can the element be deleted |
| PriorityAssign | Can the element be assigned to a user/ group |
| AssignText | If the element is assigned to someone, what should the assignments text be This is used to pass messages through the workflow, for example to give hints to another department. The messages will show up in the list of existing datasets . |
Create a new workflow
Currently, workflow markups cannot be created via the web interface. To create a new workflow you need to create a new markup in your template. After that you need to set up the workflow markup in the database table [u1].[MarkupWorkflow] .
| Column | Description | Example |
|---|---|---|
| Id | 22 | |
| UniverseId | Id of the account (table [ctr]. [Universe] ). | 1057 |
| MarkupId | Id of the markup you created (table [u1].[Markup] ). | 37859 |
| LogicReleaseId | This Id references an entry in the table table [u1].[LogicRelease] which in the end points to your template. You can find this Id already in the table [u1].[Markup] from the previous column. | 14580 |
| Name | A name for the workflow markup. This can be the same as the markup itself, but can also be something different. | WorkflowData |
| IsDisabled | A Boolean. If it is TRUE the workflow is disabled. | FALSE |
| IsFromSummary | A Boolean. If your workflow is granting permissions to states , you can have an additional summary row on top of your table structure. For this set this column to TRUE .  | TRUE |
| IsFromSelection | A Boolean. If your workflow is granting permissions to selections , set this column to TRUE . | FALSE |
| Column | Description | Example | ||
|---|---|---|---|---|
| IsFromMatrix | A Boolean. If your workflow is granting permissions to t emplates , set this column to TRUE . | FALSE | ||
| IsFromState | A Boolean. If your workflow is granting permissions to states , set this column to TRUE . | TRUE | ||
| IsFromCondition | A Boolean. If your workflow is granting permissions to elements of a condition , set this column to TRUE . | FALSE | ||
| FromConditionId | If IsFromCondition = TRUE you must supply the conditions Id (table [u1]. [Condition]) you want to work with. | NULL | ||
| FromMatrixId | If IsFromMatrix = TRUE you must supply the template Id (table [u1]. [Matrix]) you want to work with. | NULL | ||
| IsStorageRead | A Boolean. If your elements you want to grant access to are static, you can have them as static content in the template and set this field to FALSE . If you want to read all elements on runtime, because they can change, set this to TRUE . | TRUE | ||
| IsStorageWrite | A Boolean. If your logic is changing the workflows settings you need to set this field to TRUE . If you are only reading the current settings of a workflow you can leave this field as FALSE . | TRUE | ||
| IsAccessGroups | A Boolean. Is access granted on group level | TRUE |
| Column | Description | Example |
|---|---|---|
| IsAccessUsers | TRUE | |
| IsContentClear | A Boolean. Should values in the template be overwritten in the markup area | TRUE |
| IsContentOverwriteFormulas | A Boolean. If there are Excel formulas in the Markup area, should they be overwritten ( TRUE ) or retained ( FALSE ) | FALSE |
| IsStyleAuto | A Boolean. Should Nooxl automatically adjust the cell style for the markup Set this to TRUE is you want this, or FALSE if you want to retain the style set in the template. | TRUE |
| ExpanseTypeRows | Should the area of the markup be enlarged, depending on the amount of elements read | 2 |
| CopyTypeRows | If ExpanseTypeRows is TRUE , should the original content be copied over to the inserted rows | 1 |
The number of inserted rows corresponds to the number of authorization groups from the Collaboration area, multiplied by the number of elements to be authorized in the selected catalog.
Accordingly, out of consideration for the usability of the system, but also from a performance point of view, you should try to authorize the smallest possible catalogs.
Workflow table properties
After you created a new workflow in a template, you find a similar structure to this.
![]()
Depending on your settings you made for the workflow we will see less columns or some not visible in the screenshot above. All columns you can see are described below.
| Block | Column | Description |
|---|---|---|
| Source | Id | An internal Id for the specific workflows setting.  For all rows without any change in the permission, this is enumerated with signed integers and for all rows with changed with unsigned integers. So please be ware that this is not a static Id. For all rows without any change in the permission, this is enumerated with signed integers and for all rows with changed with unsigned integers. So please be ware that this is not a static Id. |
| Source | Essentially the workflows type: Element (→ Condition), State, Template (→ Matrix) | |
| Element | ElementId | The Id of the catalog element. Only visible for Condition. |
| Element | The name of the catalog element. Only visible for Condition. | |
| Group/ User | GroupId | The groups or users internal Id. This is static and can be used to identify users even if the display name is changed. |
| GroupUser | The display name of the group or user. | |
| IsUser | Contains an "x" if the entry is a user and not a group. Only visible if the permissions are granted for users or groups and users. | |
| IsMember | Contains an "x" if it is the current user (then IsUser is also "x") or if the current user is part of the group. Only visible if the permissions are granted for users or groups and users. |
| Block | Column | Description |
|---|---|---|
| Permissions | PriorityAccess | Can the element be seen This translates to dataset selections as well as the usage of selections in templates. If a user has no access for the elements it can not be seen. |
| PrioritySave | Can the elements data be changed/ saved | |
| PriorityDelete | Can the element be deleted | |
| PriorityAssign | Can the element be assigned to a user/ group | |
| AssignText | If the element is assigned to someone, what should the assignments text be This is used to pass messages through the workflow, for example to give hints to another department. The messages will show up in the list of existing datasets . |
How are permissions evaluated
As soon as you created a workflow markup and reload the template you will see an auto generated table structure, similar to this.
![]()
No matter which columns you have, on the right hand side you always find the four permissions you can grant or deny. A user or group is granted a permission as soon as the value in the permissions column is equal or greater than 0 ( >=0 ). So in the example above the group Asset Manangement can not save data for the element Ankauf, but can access it.
If you authorize on a user and group level at the same time, please note that the rights are summed up.
So if you have some users in a group and that group has -1 for priorityAccess on an element, no user can see it. But if you then give one of the groups users a +1
for priorityAccess he has a 0 in total, meaning that he can see the element, despite nobody else from his group can.
![]()
Authorization levels
The following section describes the individual authorization levels in Nooxl workflows and how to use them. Please note that not all permissions are usable within every authorization level. Which you can use is described in each section.
Matrix
Matrix workflow permissions can be set up in their own templates, but also if you want in the template itself. Therefore you can decide were to put your workflow. If have need to change permissions to a template based on what happens inside this template, you would like to put the workflow right inside this template. If it depends on actions done somewhere else in your Application, put it there.
priorityAccess
priorityAccess
Without to a template the user is still able to see the template in the navigation and
also to view whatever selections are available, but the View button is never enabled.
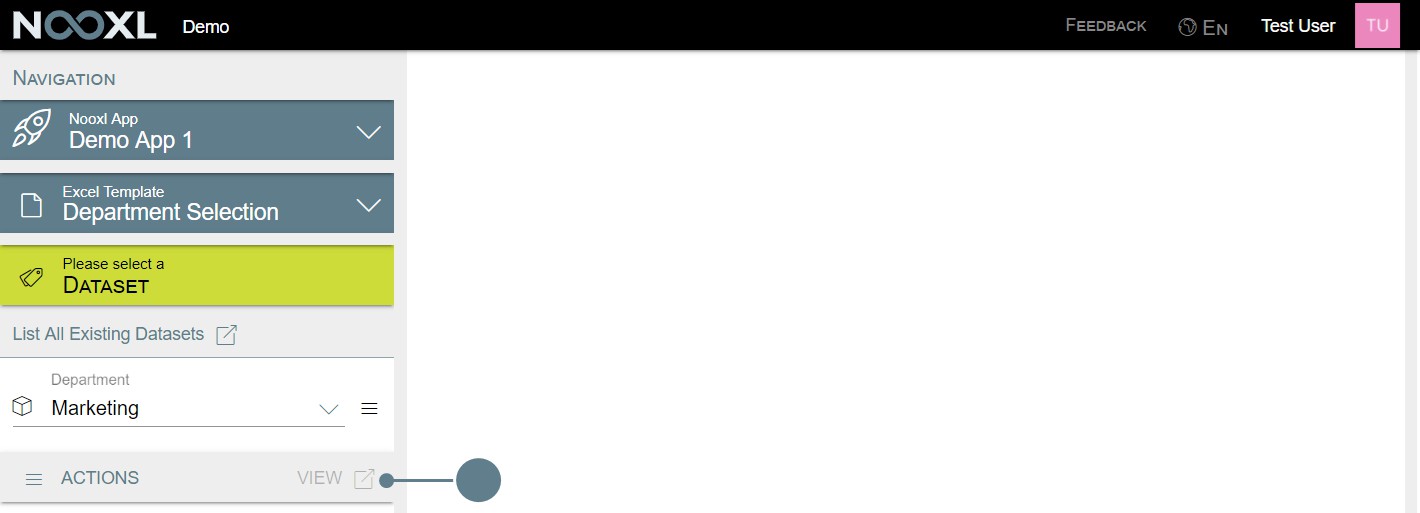
prioritySave
prioritySave Without
the user will not be able to save any changes made to any dataset of the
template, as well as not be able to use the copy and recalculate features for this template.
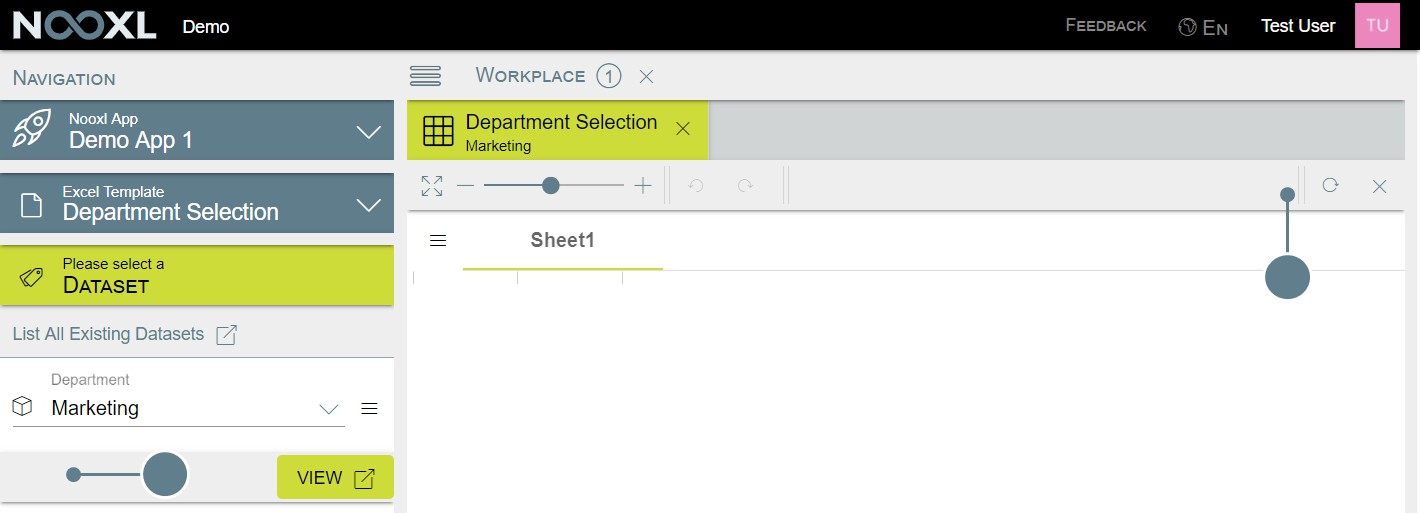
State
State workflow permissions are set up directly in the template they should affect.
Each time you save the dataset you can specify who can do what to the specific dataset in this template after you saved.
In order to use a state workflow, your template must at least use one selection for the datasets.
priorityAccess
priorityAccess Without
button is never enabled.
prioritySave
prioritySave If you restrict button.
to a state the user is still able to see the dataset in selections, but the View
, it will prevent the user from saving any changes, by withholding the save

Condition
Condition workflow permissions are set up in their own templates, because they influence all templates of an App. By doing so, per default condition permissions are somewhat static and need manual interaction by a user, or need to be included as a step in a job .
Rights set up on conditions, influence your app in two places: dataset selections and selections used in advanced mode inside your template.
Even if the permission object is called condition and you use a condition to set the rights,
everything is applied to the underlying catalog!
priorityAccess
priorityAccess
The revocation of the
permission has two effects. First of all the affected users will no
longer see the elements in dataset selection. The screenshot below show the selection items for a "normal" user without restrictions.
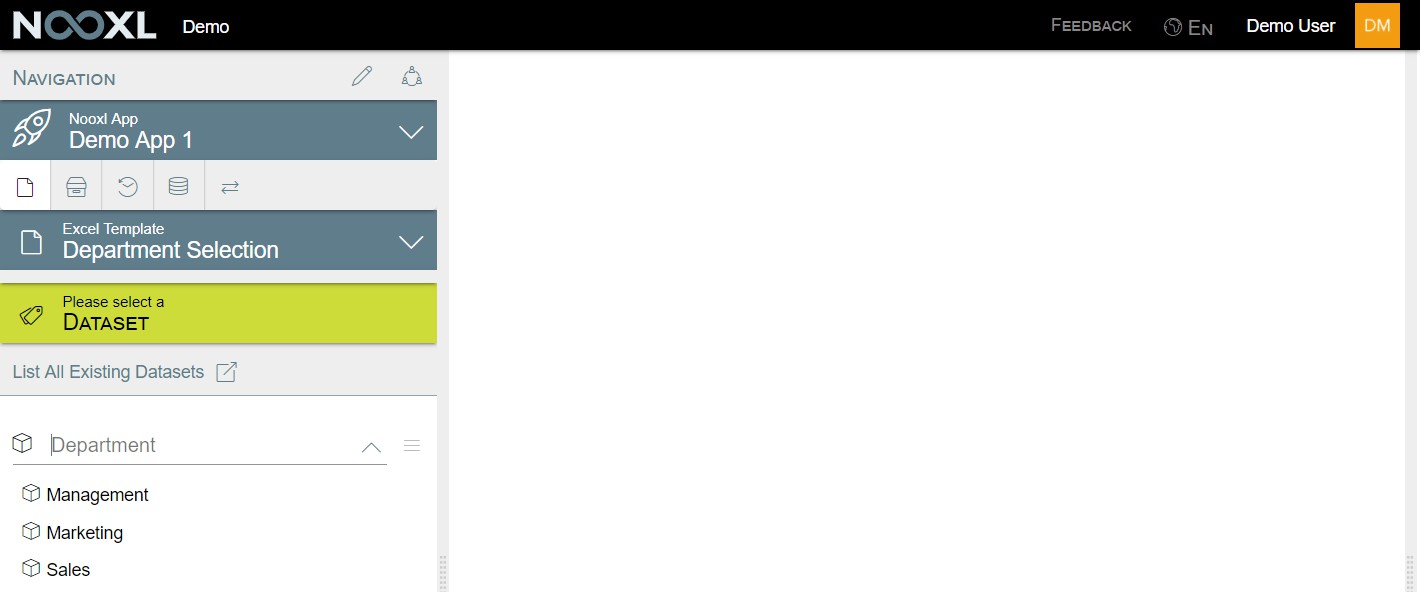
priorityAccess
The next screenshot shows what Test User can see. He is not granted the permission
priorityAccess
for the element Management. Therefore this element is not available to him in the dataset selection.
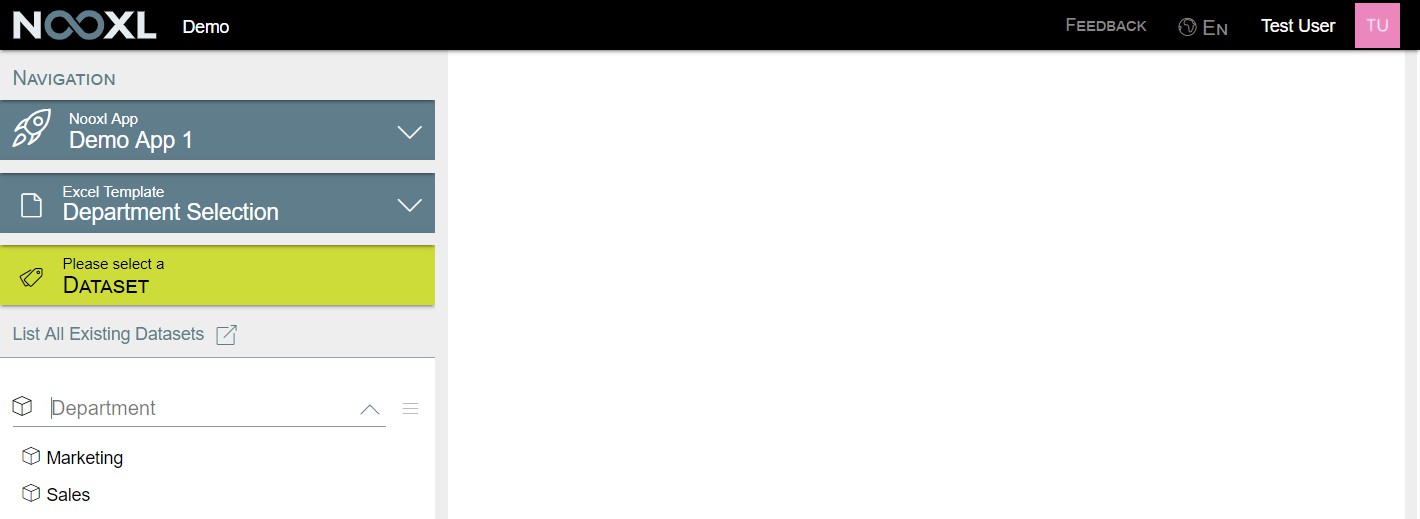
The second place were your users will feel the restrictions is inside your templates. If you use a selection
in your template as a dimension of a cell storage, the will restrict which elements the
user can see. Below the user without restrictions can see all three departments in the rows.
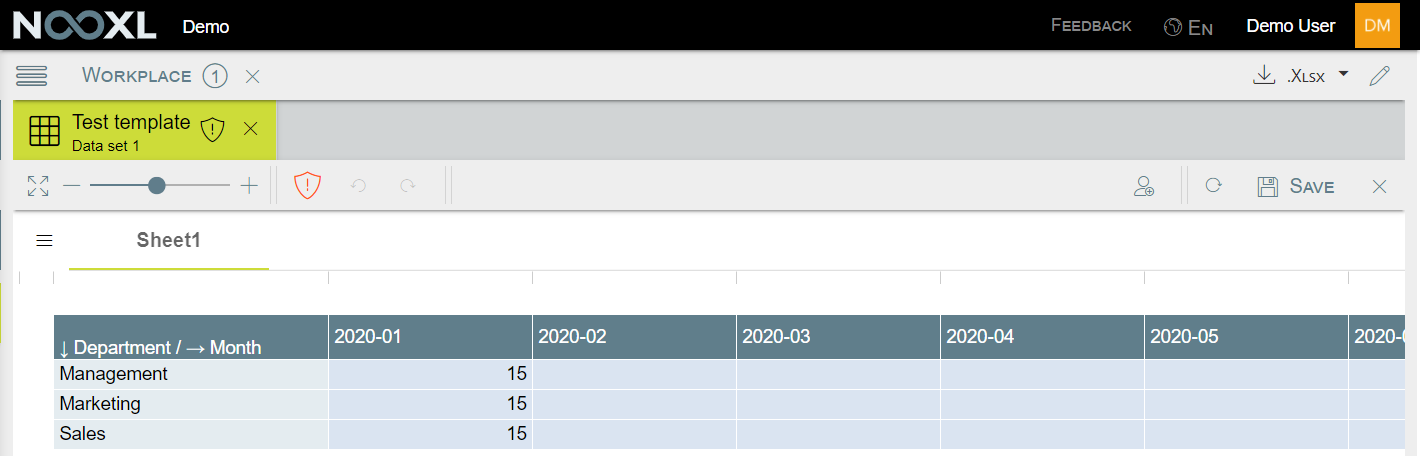
Test User will not see the element Management.
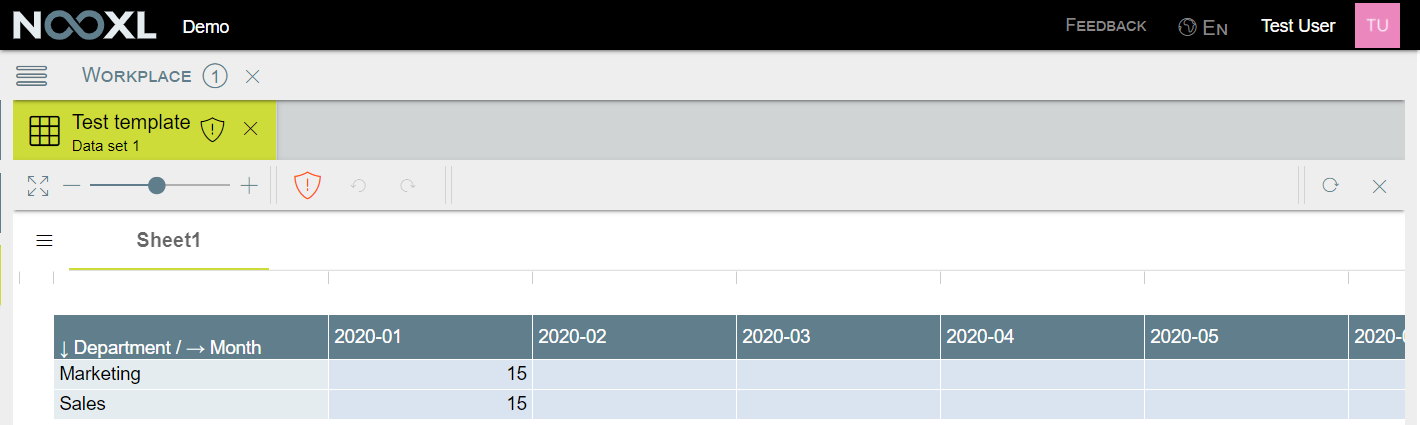
prioritySave If you restrict
prioritySave
prioritySave
, it will prevent the user from saving any changes, by withholding the save
button. Test User is not granted shows up.
for the Management element, therefore no save button
For Marketing he does have the permission and so the Save button will show up for him in this dataset.

If your dataset uses more than one selection, Nooxl will add up the prioritySave
permissions for all elements involved. If it is >=0 then the user can save the dataset. Is the sum
<0 he can not.
![]()
Selection
Version management and file versions
All templates in your Nooxl App are subject to a strict version management. When you upload an excel file to Nooxl , it will be versioned automatically. The current version of your template is shown here (1). By default, a new minor release is always created and the main version is not changed (2).
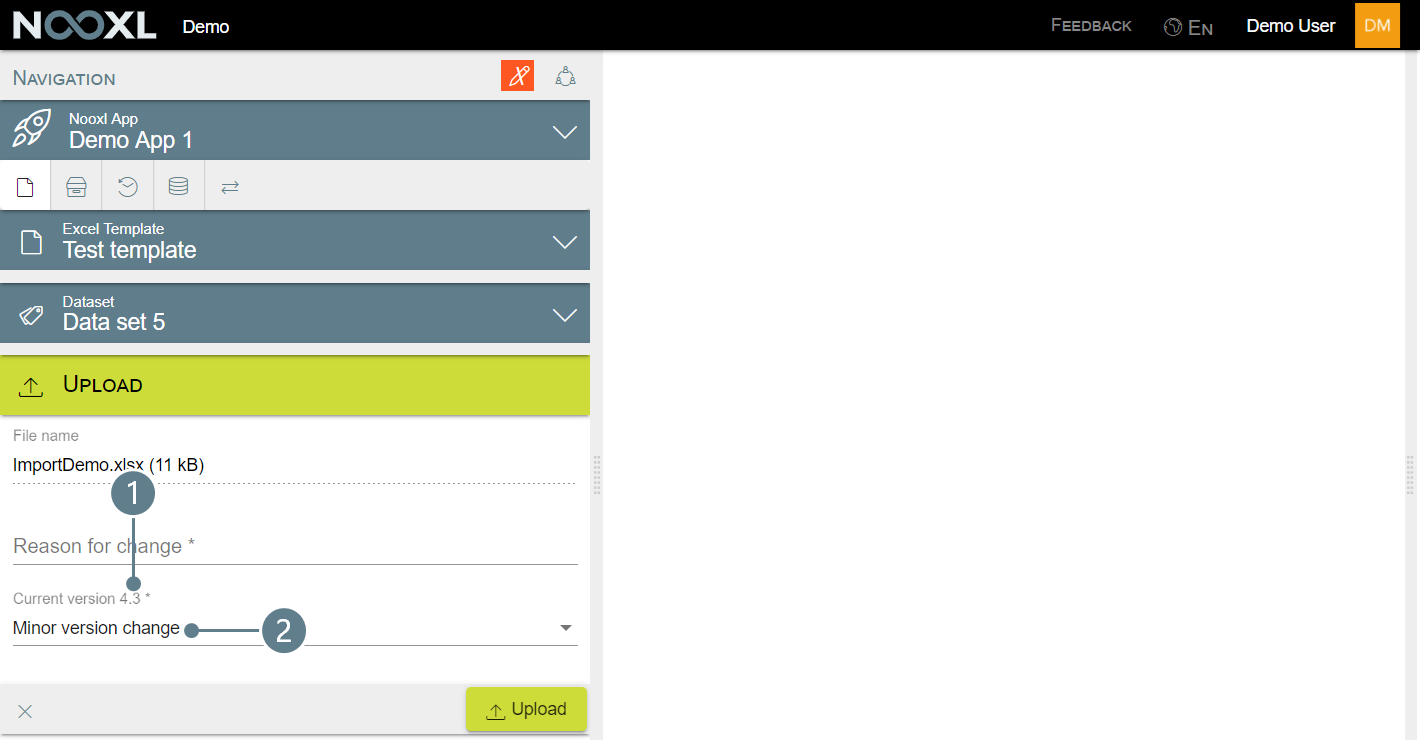
When clicking on Minor version change, a context menu opens where you can choose between the following options:

- No version change
- Minor version change (create a new minor release inside the current major release)
- Major version change (create a new major release)
File versions and datasets
When you save a dataset (defined from the settings of all selections), this also stores which file version was used.
You can view this information for all datasets in the list view by adding the column "File version" via the button to edit the columns (1). This is then displayed in the list view (2):
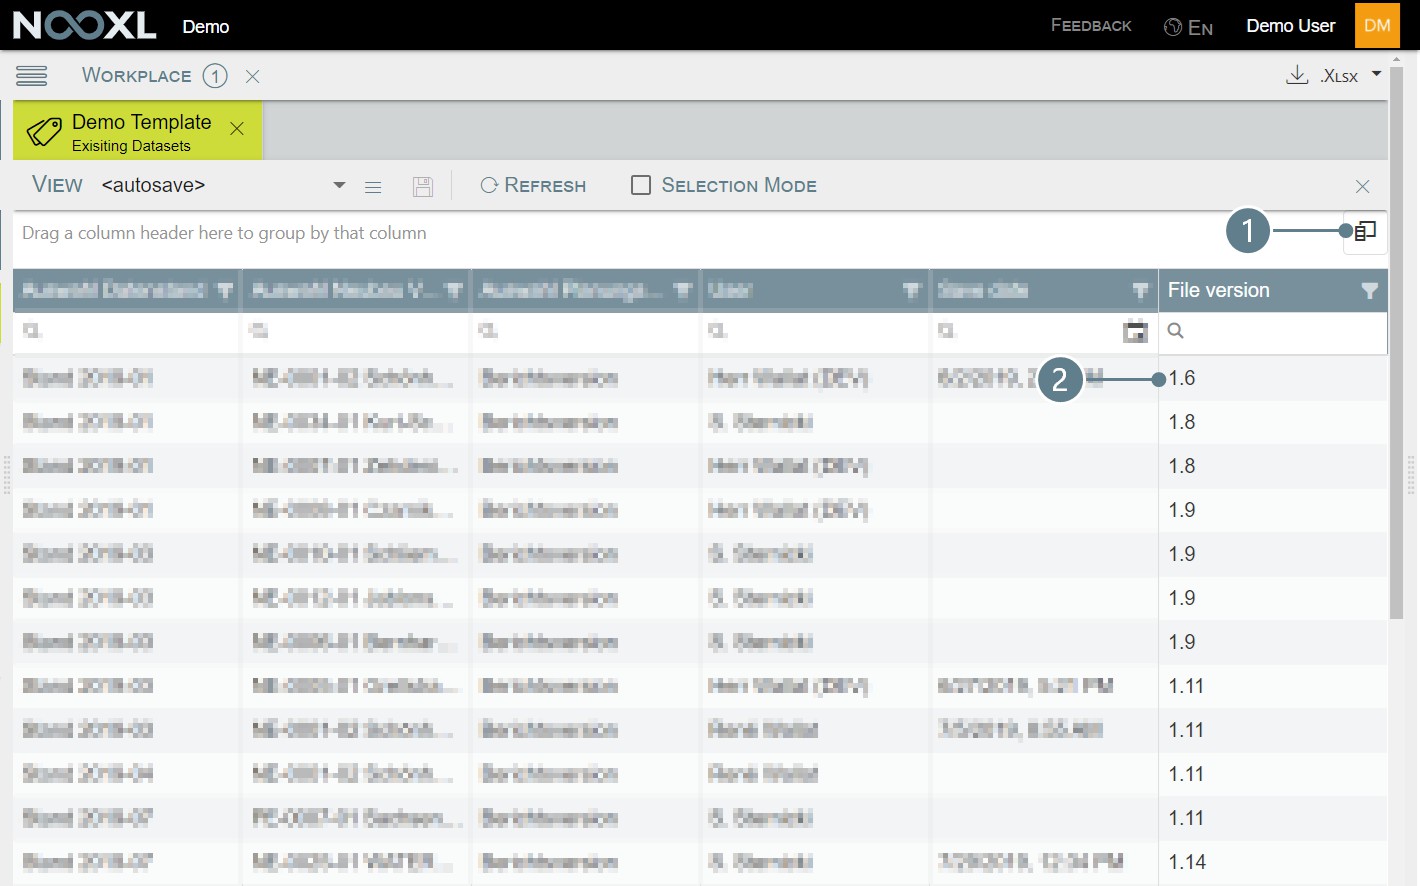
Automatic use of the latest file version when displayed
Nooxl will always automatically select the latest available file version within a major release to display a dataset.
For a better understanding, let us imagine the following version history with a total of 9 versions, unevenly distributed over three major releases:
![]()
Additionally the following five datasets:
| dataset | Save date | File version |
|---|---|---|
| dataset 1 | 2019-07-31 08:21 PM | Version 4.3 |
| dataset 2 | 2019-07-31 07:10 PM | Version 4.1 |
| dataset 3 | 2019-07-31 03:46 PM | Version 3.1 |
| dataset 4 | ||
| dataset 5 | 2019-07-31 10:13 PM | Version 2.1 |
If the user now selects dataset 1, Nooxl will display below the selection File version: 4.3. This means that no newer template is used.

For dataset 2, the user will get the following hint: File version: 4.1 → 4.3 (Update). This means that the dataset was last saved with the file version 4.1 and would now be opened with the newest version within the major release 4, which is file version 4.3.
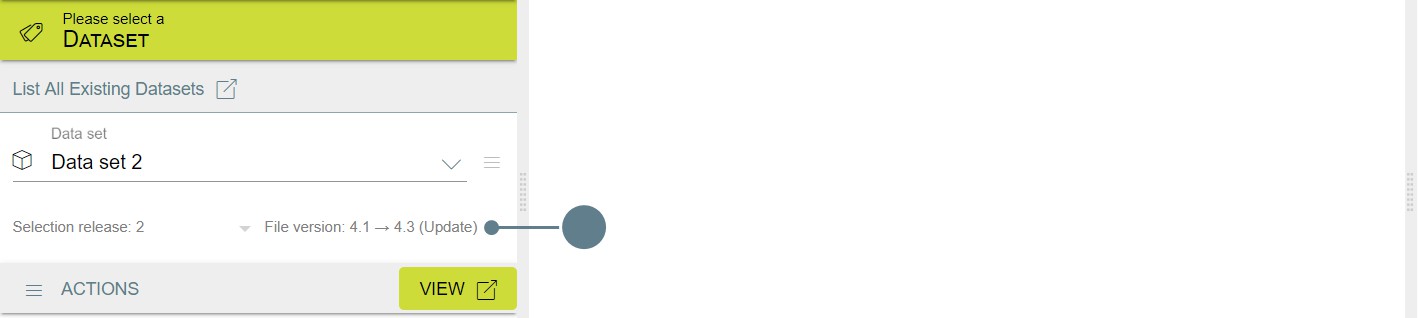
For dataset 3, the following would be displayed: File version: 3.1 (current: 4.3!). This is the information that the dataset uses a version of major release 3 and therefore no "upgrade" takes place when opening it. Additionally, Nooxl will warn you that there is a new major release 4 with the latest file version 4.3, which can be selected manually by the user.
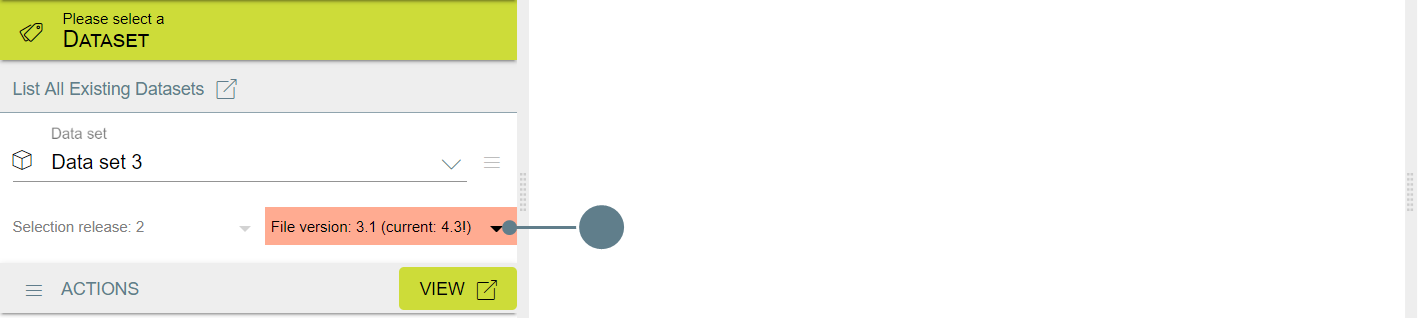
When you open this dataset, you will notice that the template name will not have a green background as usual, but a red background.

Since dataset 4 has not been saved yet, File version: 4.3 is displayed for this dataset, and thus the latest file version of the template is automatically used.

dataset 5 shows File version: 2.1 → 2.2 (current: 4.3!). This means that Nooxl will upgrade to the latest file version 2.2 within major release 2, but the latest version of the template is 4.3.
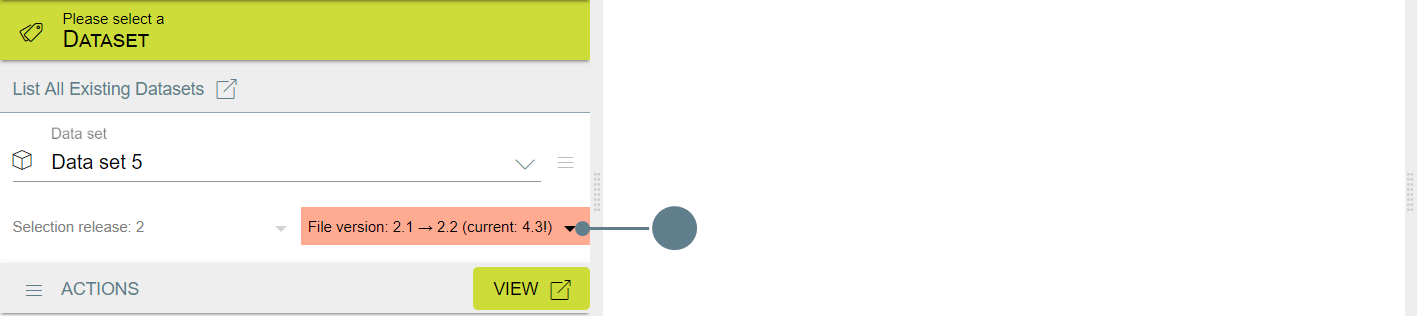
New markups or changes to existing markups in the design mode will not automatically lead to a new version of the template. If you want to create a new version of the template, you have to download it and upload it again in Nooxl.
Selection release
Similar to the templates, the created selections are versioned in Nooxl. In design mode you can create new versions of selections and delete them.
When you create a new selection release, Nooxl will automatically create a new major release of the template. Also a new selection release is automatically created when you add or remove selections.
Show charts and pictures from templates in your app
Nooxl will automatically scan your templates for Excel charts and pictures to show inside the app. This means that as long as the charts and pictures are located in cells included in a tab page , they will show in your app.
Supported file types for pictures
Nooxl supports the following file types:
- JPG
- PNG
- BMP
- SVG
Transparencies in SVG and PNG files are not supported! Transparent areas will show up black in Nooxl.
Supported chart types
Nooxl does not support all chart types that Excel knows. Please refer to the following list to see which ones are displayed correctly and which ones are not:
| Category | Chart Typ | Supported |
|---|---|---|
| Column | 2-D Column | |
| 2-D Stacked Column | ||
| 2-D 100% Stacked Column | ||
| 3-D Clustered Column | ||
| 3-D Stacked Column | ||
| 3-D 100% Stacked Column | ||
| 3-D Column | ||
| Line | Line | |
| Stacked Line | ||
| 100% Stacked Line | ||
| Line with markers | ||
| Stacked Line with markers | ||
| 100% Stacked Line with markers |
| Category | Chart Typ | Supported |
|---|---|---|
| 3-D Line | ||
| Pie | Pie | |
| 3D Pie | ||
| Pie of Pie | ||
| Bar of Pie | ||
| Doughnut | ||
| Bar | Clustered Bar | |
| Stacked Bar | ||
| 100% Stacked Bar | ||
| 3-D Clustered Bar | ||
| 3-D Stacked Bar | ||
| 3-D 100% Stacked Bar | ||
| Area | Area | |
| Stacked Area | ||
| 100% Stacked Area | ||
| 3-D Area | ||
| 3-D Stacked Area | ||
| 3-D 100% Stacked Area |
| Category | Chart Typ | Supported |
|---|---|---|
| X Y (Scatter) | Scatter | |
| Scatter with smooth lines and markers | ||
| Scatter with smooth lines | ||
| Scatter with straight lines | ||
| Scatter with straight lines and markers | ||
| Bubble | ||
| 3-D Bubble | ||
| Map | Filled Map | |
| Stock | High-Low-Close | |
| Open-High-Low-Close | ||
| Volume-High-Low-Close | ||
| Volume-Open-High-Low- Close | ||
| Surface | 3-D Surface | |
| Wireframe 3-D Surface | ||
| Contour |
| Category | Chart Typ | Supported |
|---|---|---|
| Wireframe Contour | ||
| Radar | Radar | |
| Radar with Markers | ||
| Filled Radar | ||
| Treemap | Treemap | |
| Sunburst | Sunburst | |
| Histogram | Histogram | |
| Pareto | ||
| Box & Whiskers | Box & Whiskers | |
| Waterfall | Waterfall | |
| Funnel | Funnel |
Tips for working with charts in Nooxl
If you want to include charts in Nooxl , there are a few points you should consider.
Excel chart type support
Not all chart types are supported by Nooxl. A complete list can be found here: Excel Chart Types
Blurry charts in Nooxl
Even if you did not align the chart in your excel template with the cells, Nooxl will always do so.
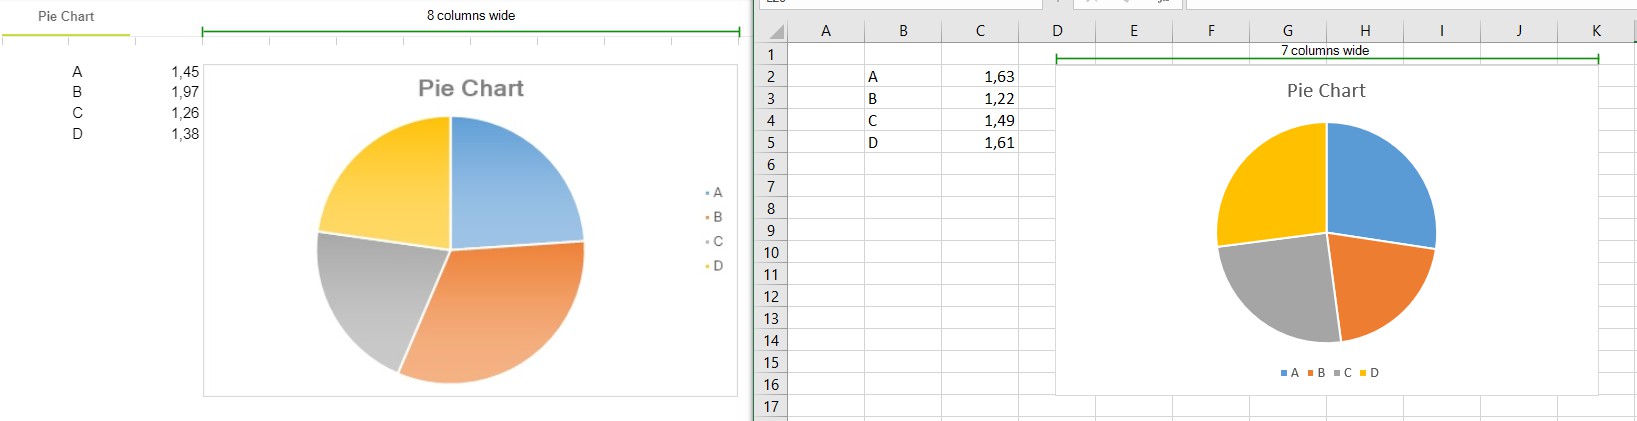
In the example above the pie chart in Excel spans 7 columns (middle of column D to the middle of column K). In Nooxl however the chart spans over 8 columns (from D to K).
Since Nooxl renders the chart in the original size from the excel template, it is maybe stretched in the web and therefore blurry.
Charts from Excel are not displayed in Nooxl in design mode
This problem is also related to the aforementioned cell-precise alignment of charts.
If two charts share a column (or row) as in the following picture, the second chart will not be displayed in Nooxl.
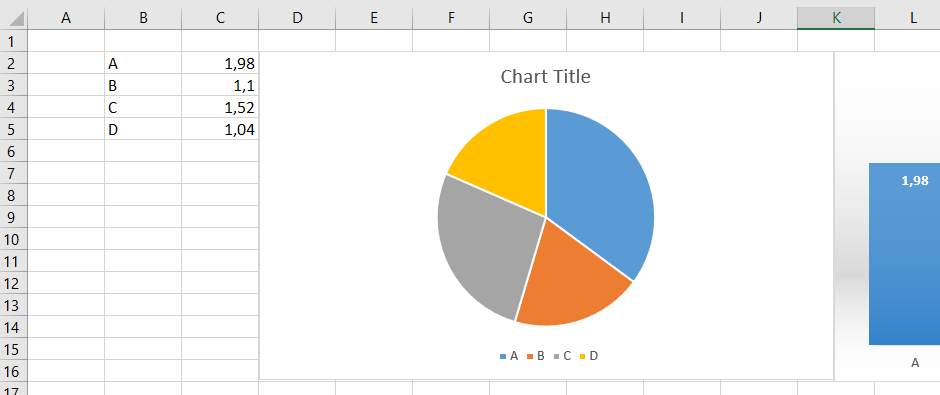
The reason is that the first chart in this example takes up the columns D to K completely. However, the second chart would also have to start in column K and since a double occupancy of cells is not possible, the second chart is ignored.
So if you miss a chart, check if it shares a cell with another chart on the sheet in Excel.
Another possible reason is that the chart object ends in a hidden column. In this case Excel automatically reduces the chart to the visible columns and in Nooxl the chart is not displayed.
Cell accurate alignment of charts in Excel
Since Nooxl displays the charts as cell contents, these must be "correctly" aligned in the Excel template to avoid missing or blurry charts.
To position the charts exactly, proceed as follows:
Step 1
Activate the Snap to Grid option in the Format tab.
see the Format tab, you must have selected a chart.
Step 2
Change the size of the chart so that it ends with cells.

Step 3
Reduce the height and width by 0.01 cm

Compare datasets
When you have multiple datasets opened in your workplace, you will see a button Compare Current
spreadsheet with ... ![]()
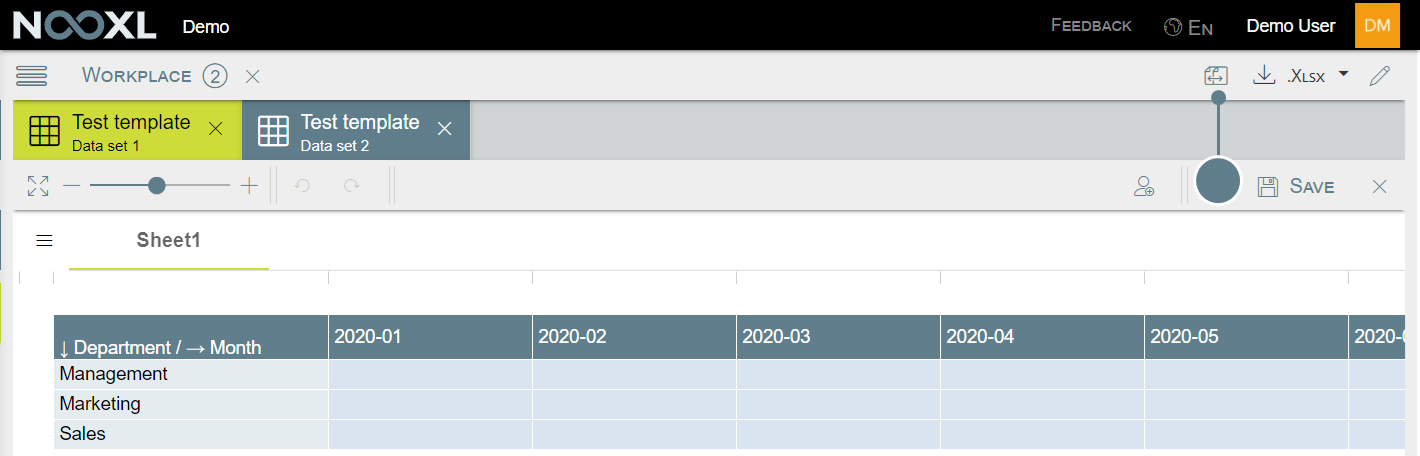
When you click on the button you will get a list of all (other) currently opened template (1) datasets (2)
combinations.

When you have chosen another dataset, Nooxl will compare both and give you a list with all cells with different cell values in a new tab. You can filter (1) and search (2) the list directly in Nooxl or export the result to excel (3).
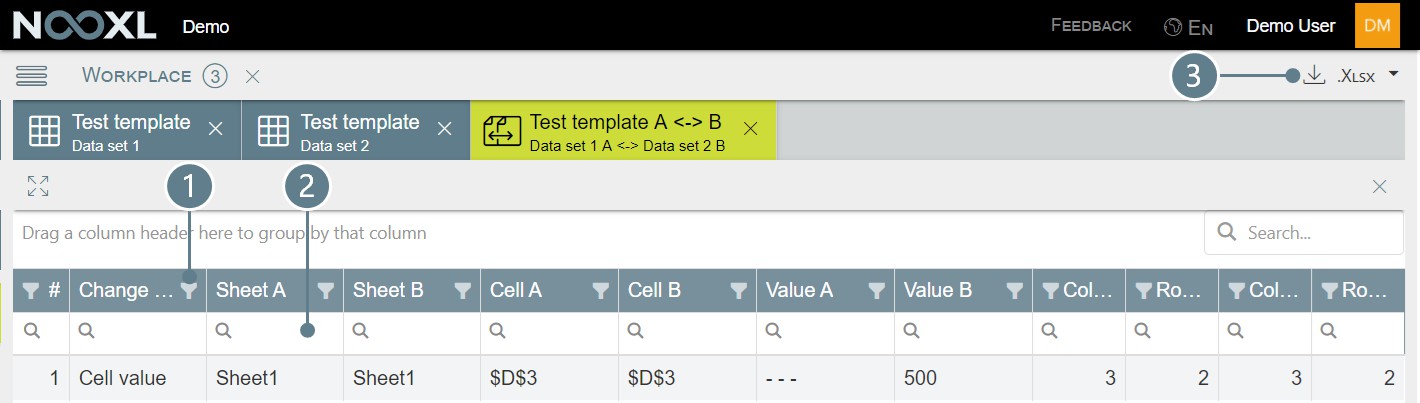
Mass export of datasets
Nooxl gives you the ability to export multiple datasets of a template at once if you need to. This could for example be useful for auditing purposes, were you are required to hand over all calculations to an auditor.
Step 1: Navigate to the dataset selection of the template
First you need to go to the dataset selection of your template.
Step 2: Choose any dataset
Next you need to select any dataset (1), in order to activate the ACTIONS menu (2).
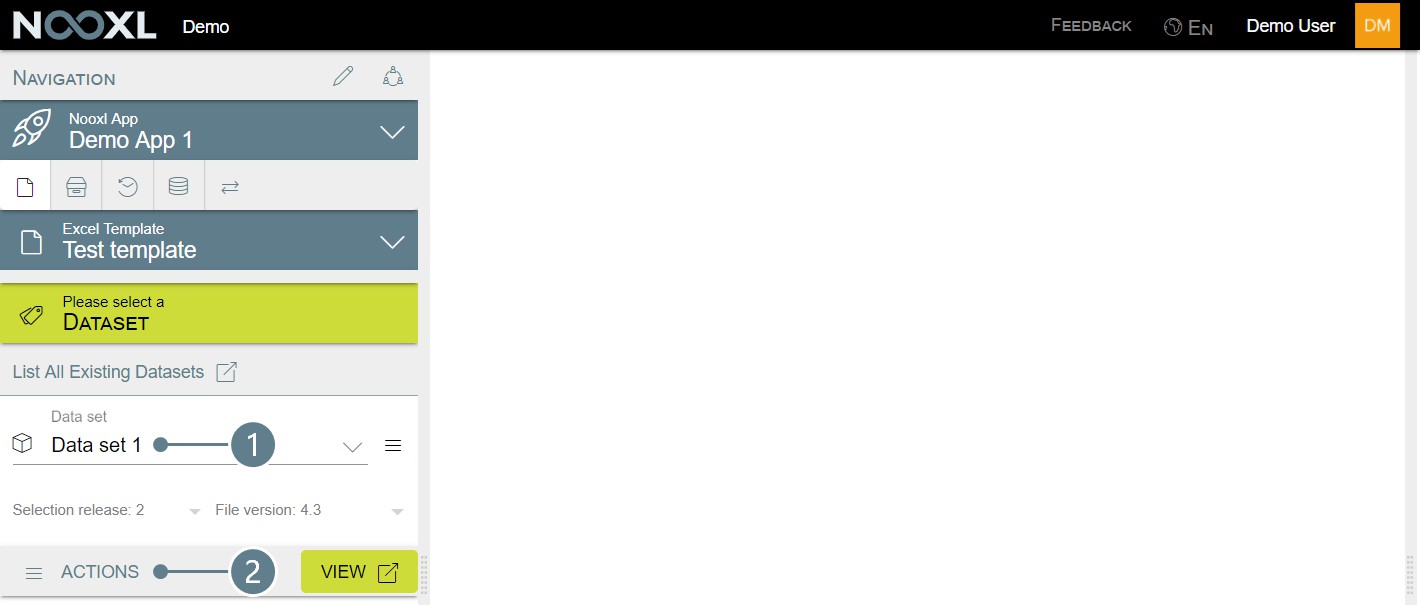
Step 3: Choose the export format
Click on ACTIONS → Download exports and choose one of the formats.
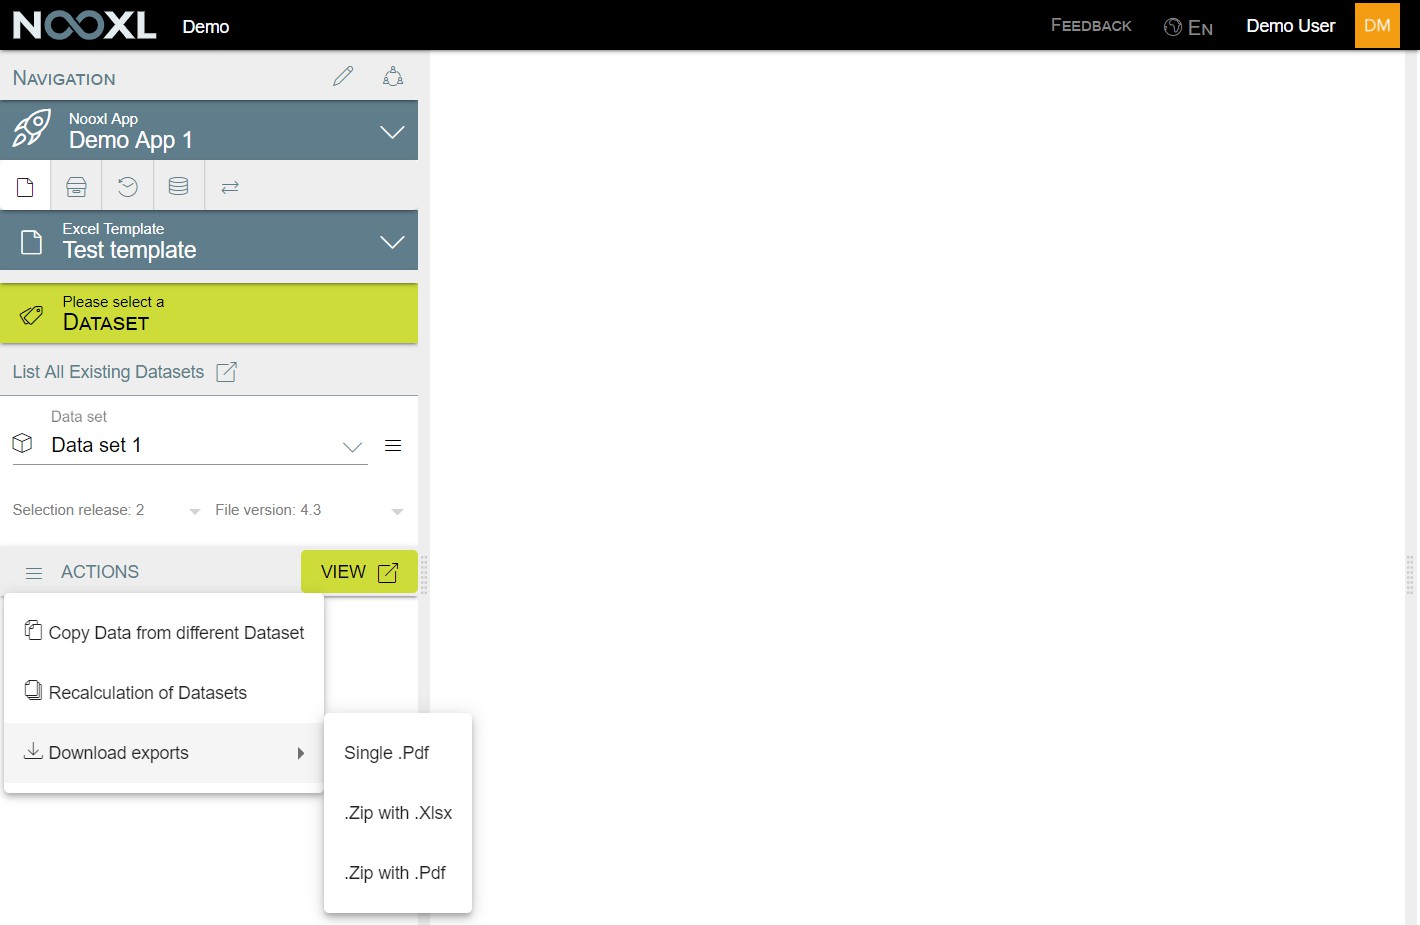
Step 4: Configure the export and export the datasets
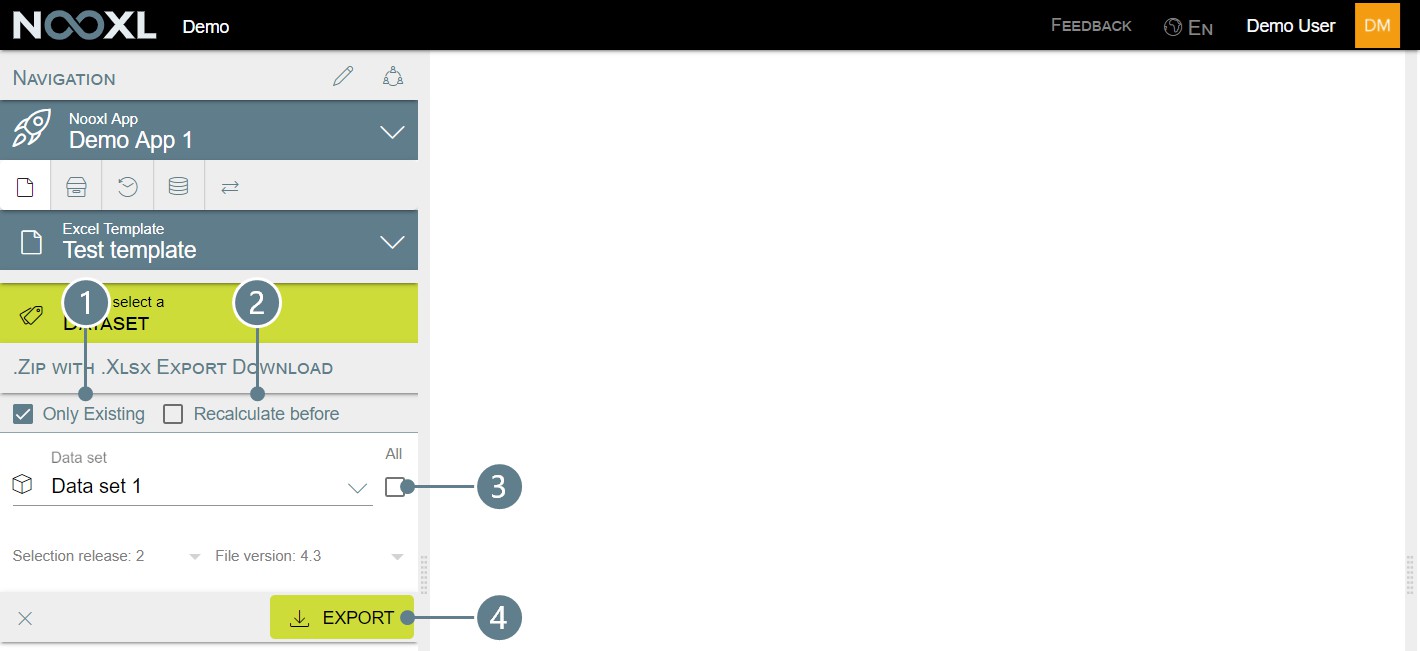
Only existing
In the export configuration you will see that Nooxl will only export existing datasets per default (1).
Recalculate before
Next you need to decide whether you want the latest viewed dataset or if you want Nooxl to update all
values in the dataset prior to exporting them (2).
This could be useful if your template (template A) reads data from another template (template B) and you are not sure if every dataset was last viewed with the latest data from template B. Please note that recalculating the datasets before the export will increase the wait time for the download significantly.
Select the datasets
Please use the selections to select the datasets you want to export (3). Depending on the selection properties you can choose All for them or not.
Export
When everything is set up you can export the datasets (4).
Limitations of Nooxl
Nooxl is not Excel, but simulates Excel functionalities as good as possible. The capabilities of Nooxl and Excel are in constant change due to further development, which is why the deviations are also subject to change.
The following pages try to inform about the current limitations.
If you discover unsupported functionality, please let us know7 so we can share the information here with other users.
List of unsupported excel formulas
Nooxl supports almost all existing Excel formulas up to Excel 2016. The (known) exceptions can be found in the following list. If you discover formulas that are also not supported, please contact us8so that we can extend the list accordingly.
Unsupported formulas are neither supported as part of the calculation logic in templates nor in those of Function Marks!
Unsupported Functions
| Formula | Comment |
|---|---|
| FORMULATEXT() | NO WORKAROUND AVAILABLE |
- mailto:info@nooxl.com
- mailto:info@nooxl.com
Related links
New Excel Function 20199 which are not supported. New Excel Functions 36510 which are not supported.
Support for excels conditional formatting
The following table shows which parts of the conditional formattings stored in Excel are interpreted and which are not.
| Format | Feature | Supported |
|---|---|---|
| Number | Everything | |
| Font | Font | |
| Font | Font style | |
| Font | Size | |
| Font | Underline | |
| Font | Color | |
| Font | Effects | |
| Border | Style | |
| Border | Color | |
| Fill | Color |
- https://bettersolutions.com/excel/functions/updates-2019-new-functions.htm
- https://bettersolutions.com/excel/functions/updates-365-new-functions.htm
| Format | Feature | Supported |
|---|---|---|
| Fill | Pattern Color | |
| Fill | Pattern Style |
Example in Nooxl

Excel table and referencing them in your excel logic
In Excel you can create tables (go to Insert → Table) (1) which will convert normal cells (2) to a table like structure (3) providing some advanced functionality like sorting and filtering.
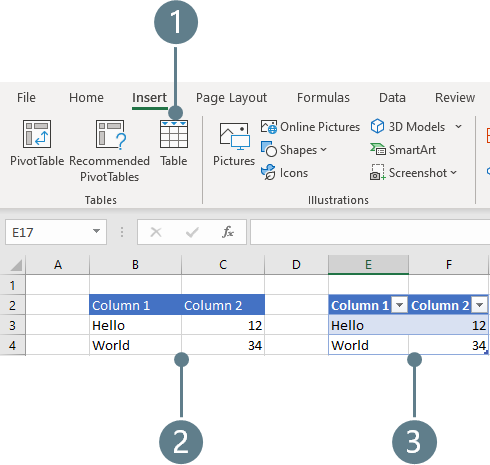
If those tables were used in an Excel template, they will be displayed in Nooxl as normal cells. All advanced functionalities do not work in Nooxl.
Also, formulas which reference the contents of the table (see example below) and do not use the cell
address for this, will result in errors.

Excel chart types
Nooxl does not support all chart types that Excel knows. Please refer to the following list to see which ones are displayed correctly and which ones are not:
| Category | Chart Typ | Supported |
|---|---|---|
| Column | 2-D Column | |
| 2-D Stacked Column | ||
| 2-D 100% Stacked Column | ||
| 3-D Clustered Column | ||
| 3-D Stacked Column | ||
| 3-D 100% Stacked Column | ||
| 3-D Column | ||
| Line | Line | |
| Stacked Line | ||
| 100% Stacked Line | ||
| Line with markers | ||
| Stacked Line with markers |
| Category | Chart Typ | Supported |
|---|---|---|
| 100% Stacked Line with markers | ||
| 3-D Line | ||
| Pie | Pie | |
| 3D Pie | ||
| Pie of Pie | ||
| Bar of Pie | ||
| Doughnut | ||
| Bar | Clustered Bar | |
| Stacked Bar | ||
| 100% Stacked Bar | ||
| 3-D Clustered Bar | ||
| 3-D Stacked Bar | ||
| 3-D 100% Stacked Bar | ||
| Area | Area | |
| Stacked Area | ||
| 100% Stacked Area | ||
| 3-D Area | ||
| 3-D Stacked Area |
| Category | Chart Typ | Supported |
|---|---|---|
| 3-D 100% Stacked Area | ||
| X Y (Scatter) | Scatter | |
| Scatter with smooth lines and markers | ||
| Scatter with smooth lines | ||
| Scatter with straight lines | ||
| Scatter with straight lines and markers | ||
| Bubble | ||
| 3-D Bubble | ||
| Map | Filled Map | |
| Stock | High-Low-Close | |
| Open-High-Low-Close | ||
| Volume-High-Low-Close | ||
| Volume-Open-High-Low- Close | ||
| Surface | 3-D Surface | |
| Wireframe 3-D Surface |
| Category | Chart Typ | Supported |
|---|---|---|
| Contour | ||
| Wireframe Contour | ||
| Radar | Radar | |
| Radar with Markers | ||
| Filled Radar | ||
| Treemap | Treemap | |
| Sunburst | Sunburst | |
| Histogram | Histogram | |
| Pareto | ||
| Box & Whiskers | Box & Whiskers | |
| Waterfall | Waterfall | |
| Funnel | Funnel |
Catalogs, elements and selections
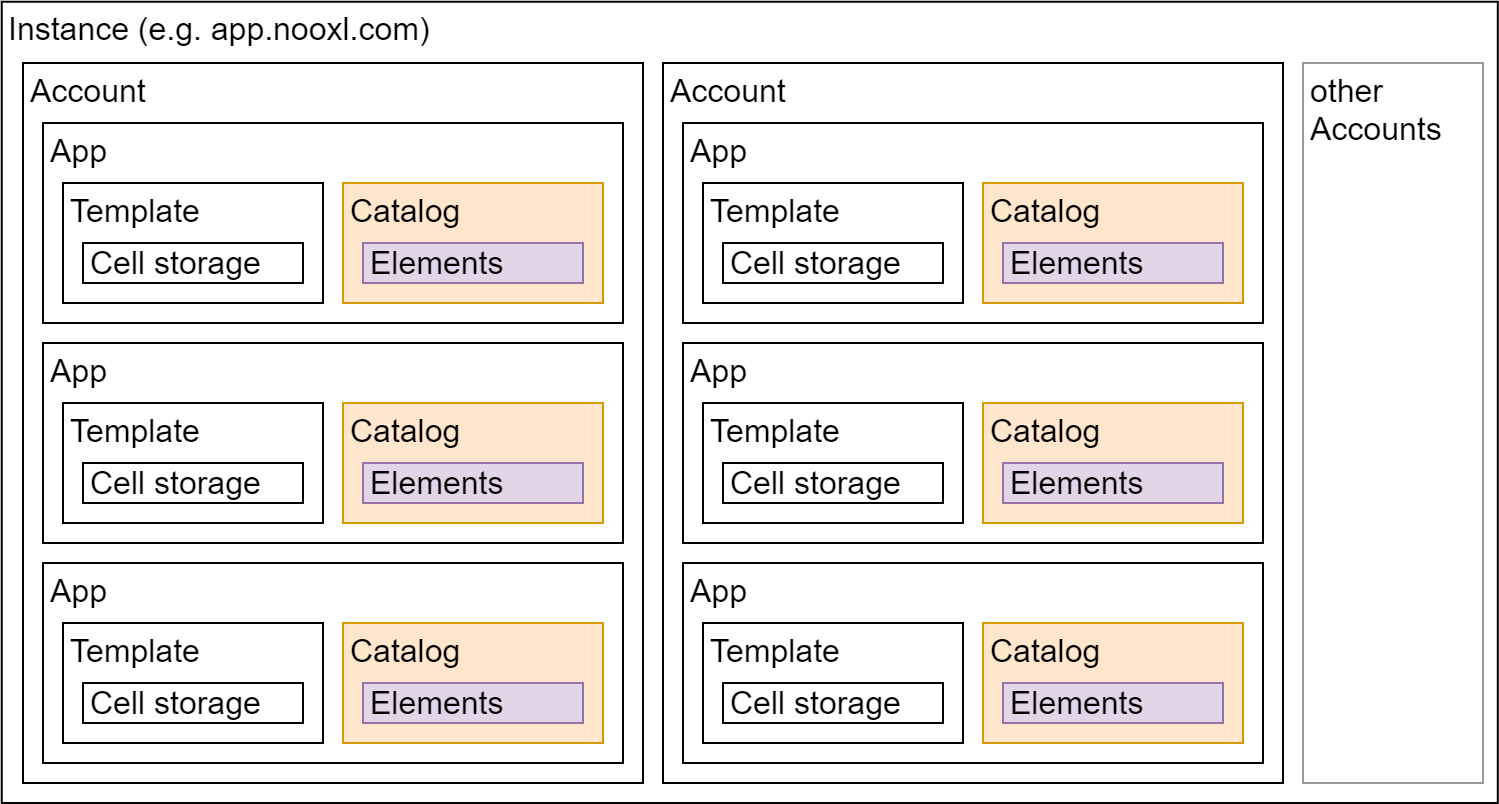
Using the left hand navigation you can access you Apps Catalogs, Elements and Selections.
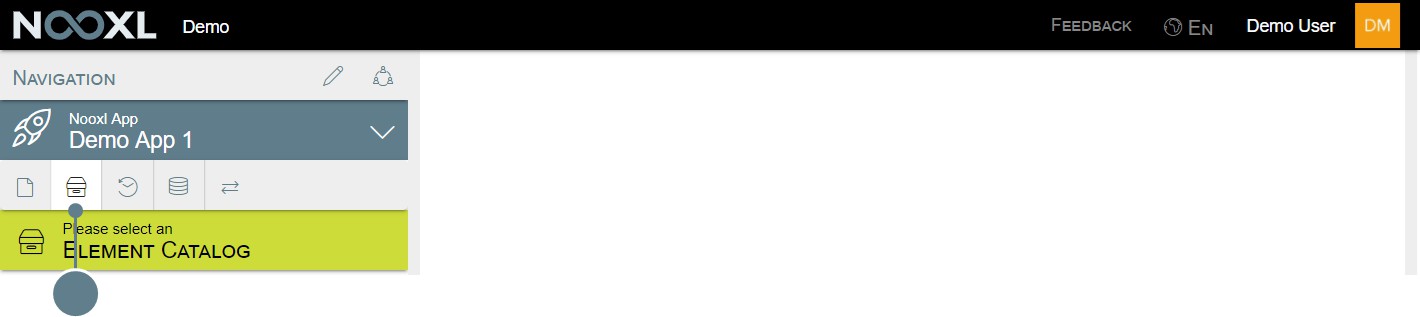
Catalogs are collections of elements . Selections are subsets of those elements. Each element is part of exactly one catalog but can be in any number of selections.
Selections can only contain elements of the same catalog.
The table below tries to illustrate this: we have Catalog 1, which contain four elements. For this catalog we have also two selections:
- Selection 1 contains Element 1 and Element 2.
- Selection 2 contains also Element 2 but also Element 4.
| Catalog | Elements | Selection 1 | Selection 2 |
|---|---|---|---|
| Catalog 1 | Element 1 | Element 1 | |
| Element 2 | Element 2 | Element 2 |
| Catalog | Elements | Selection 1 | Selection 2 |
|---|---|---|---|
| Element 3 | |||
| Element 4 | Element 4 |
Note that Element 3 is neither part of Selection 1 or Selection 2.
Catalogs
Catalogs in Nooxl are collections of elements. You can create as many catalogs for your application as you want. Within a catalog you create elements . Each element is part of exactly one catalog.
The elements of catalogs are used for dataset selections and to "describe" the content of cell storages .
Create a new catalog
In the left hand navigation click on Catalog and Elements.
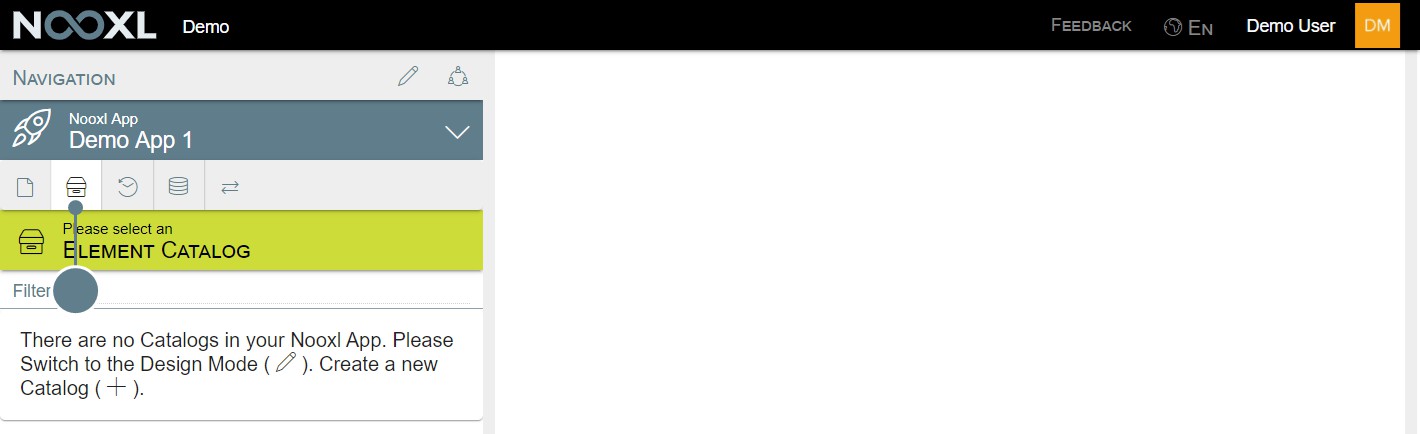
Next enter the design mode ( ![]() ). After this click on the red + to enter the create catalog dialog.
). After this click on the red + to enter the create catalog dialog.

At least give your catalog a name (1) and click on save (2) to create the catalog.
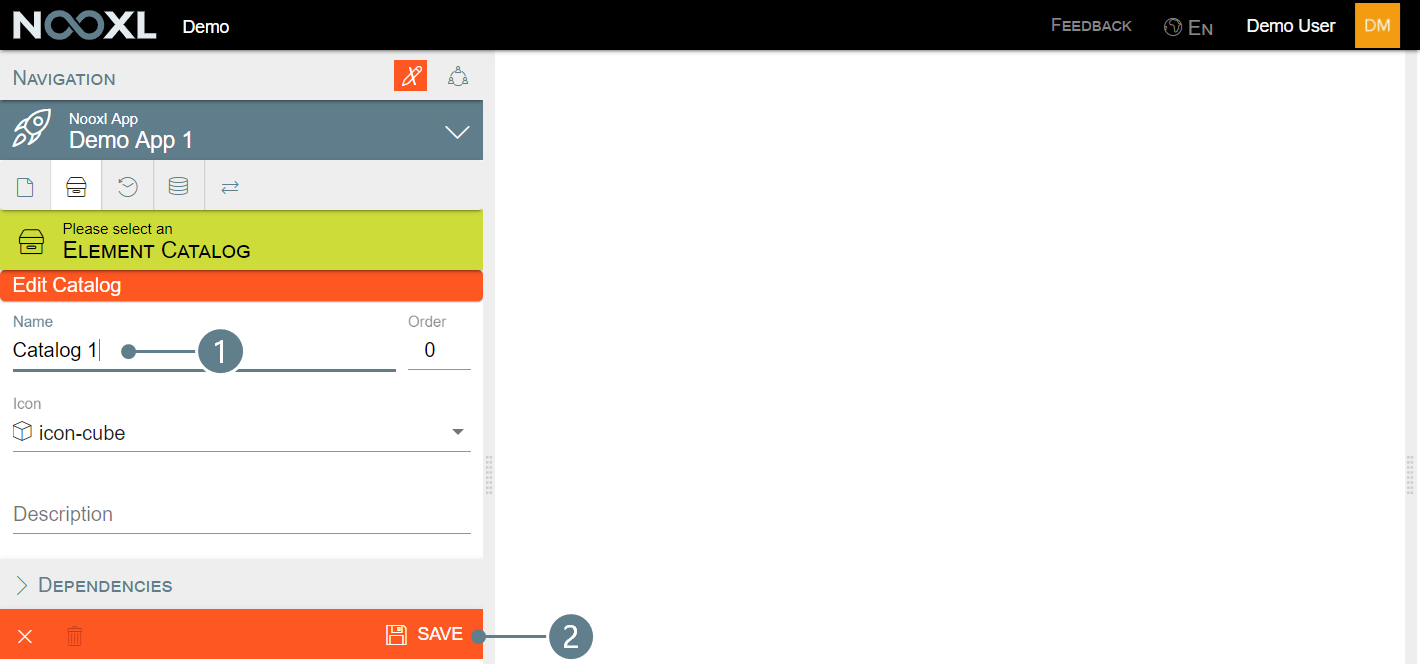
For more detailed information about the meaning of the different fields, please see the section catalog properties .
Edit an existing catalog
In the left hand navigation click on Catalog and Elements.
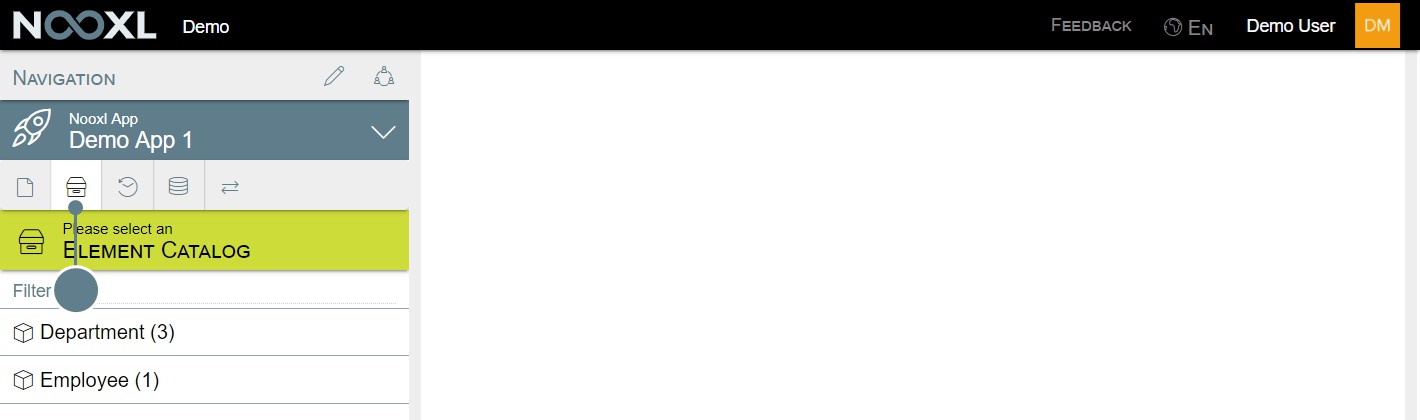
Next enter the design mode ( ![]() ) and click on the Edit Catalog button next to your catalog.
) and click on the Edit Catalog button next to your catalog.
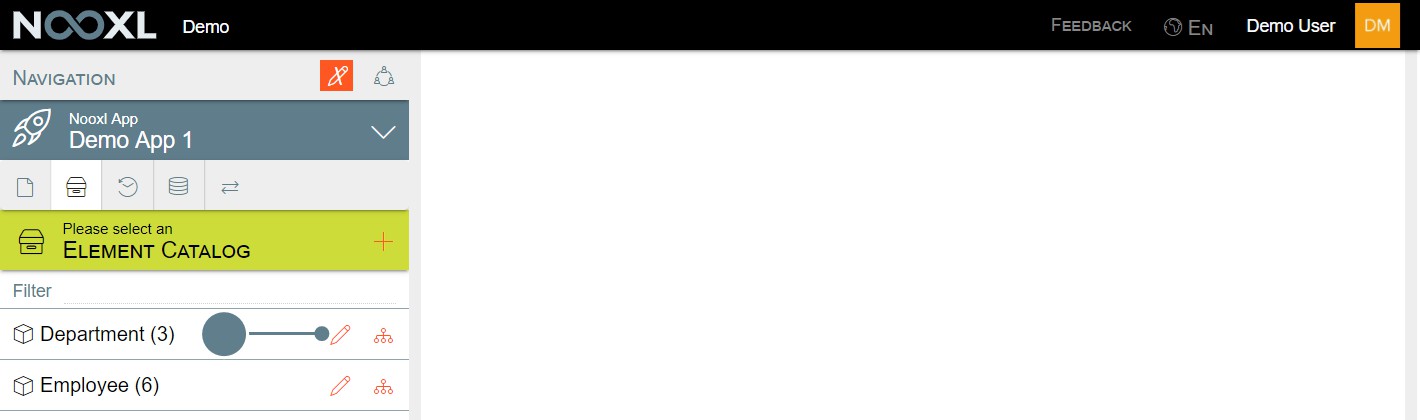
After this you find the same mask with the catalog properties as when you create a new catalog.
Delete a catalog
In the left hand navigation click on Catalog and Elements.
Next enter the design mode ( ![]() ) and click on the Edit Catalog button next to the catalog you want to delete.
) and click on the Edit Catalog button next to the catalog you want to delete.
After this click on the trash can icon in the catalog properties to delete the catalog.
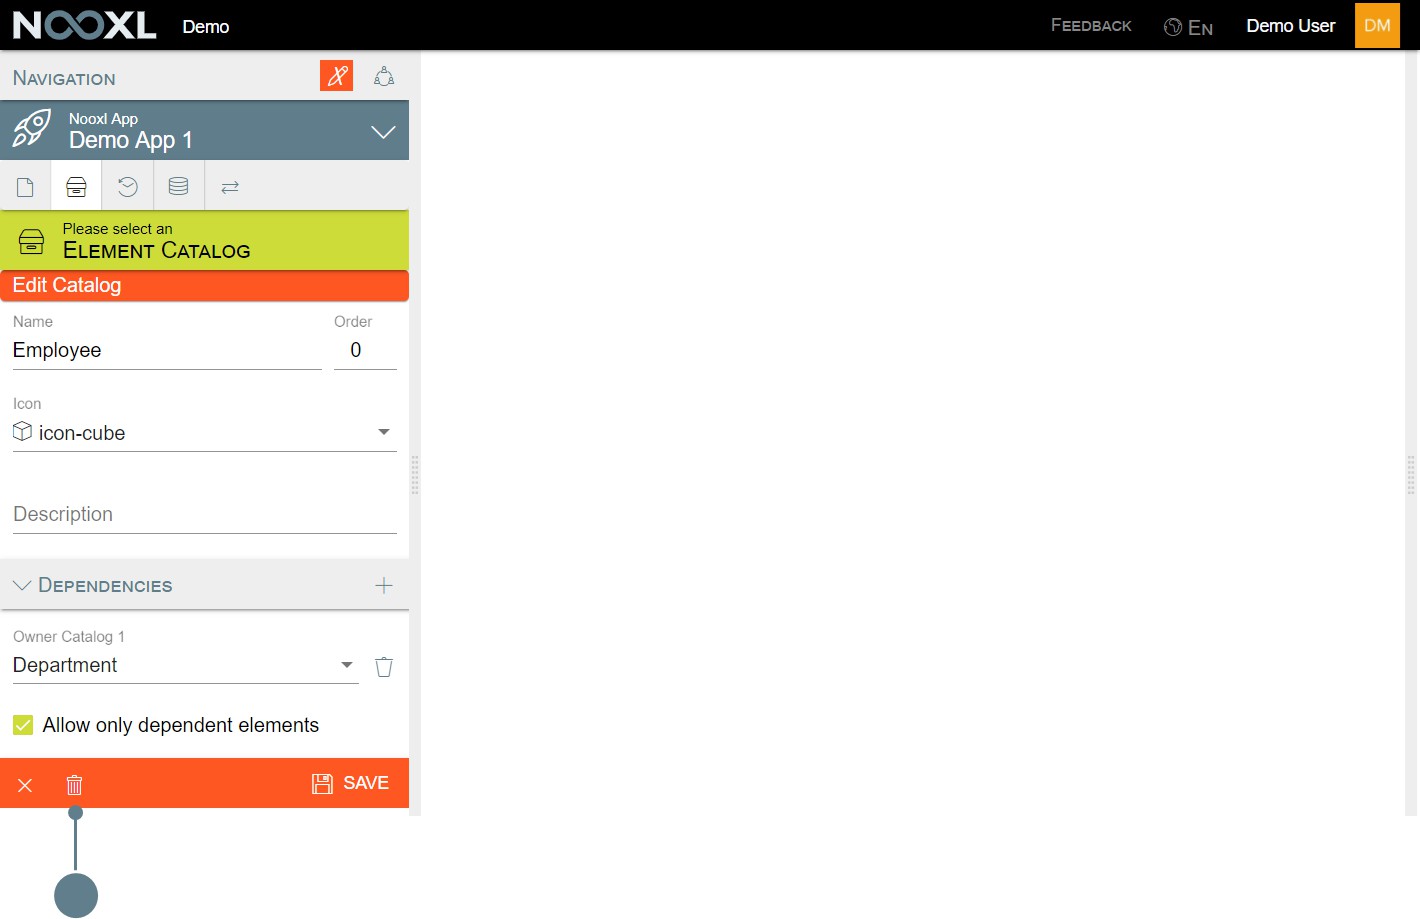
Please acknowledge that you are aware that all data save using the catalogs items will also be deleted.
Depending on how much data is already stored using the catalog, the process to delete the catalog and elements may take a while.
Catalog Properties
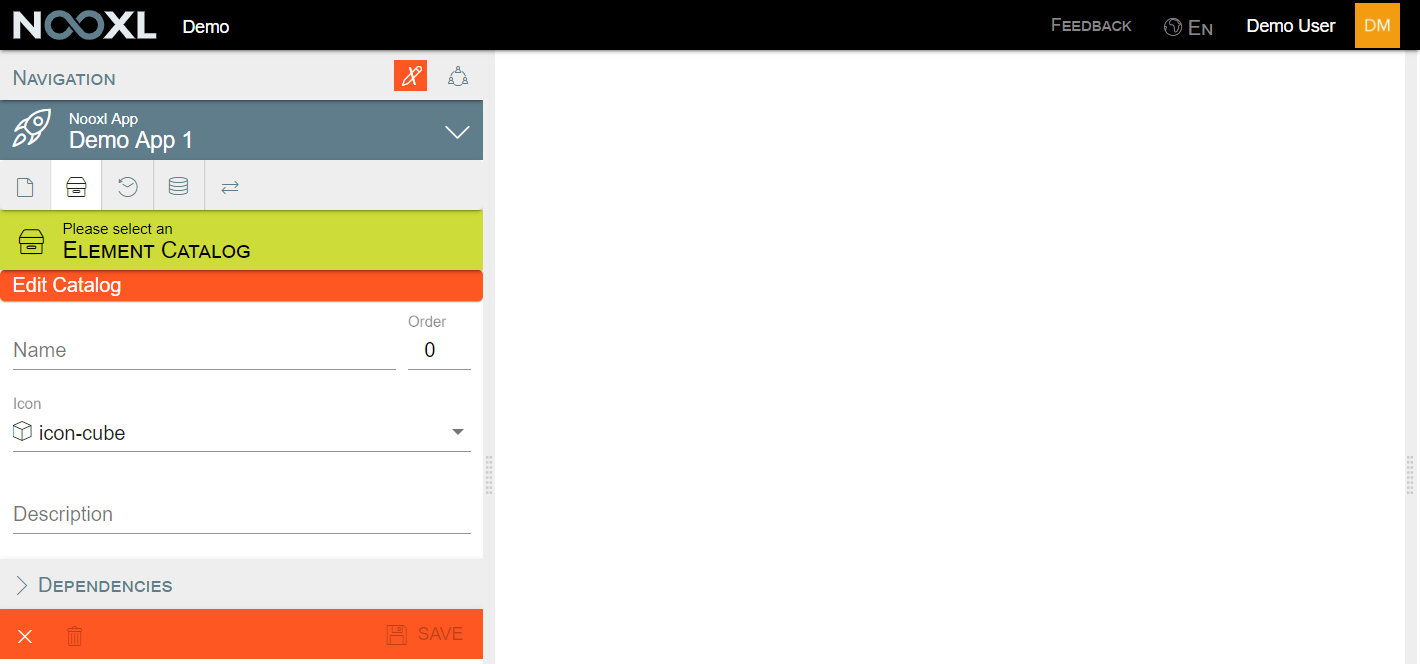
The edit and create dialog for catalogs contains the following fields:
Name
The name of the catalog. This should give everyone an idea what type of elements to expect within. It is displayed along side with the icon throughout your app. This includes for example the selections of your templates were a selection of the catalog is used.
Icon
An icon from the icon collection . The icon will be displayed along with the catalogs
name throughout your app. This includes for example the selections of your templates were a selection
of the catalog is used.
Order
Changes the position of the catalog in the Catalog and Elements view of the app. If more than one catalog has the same order assigned, these will be ordered alphabetically.
Description
A free text description of the catalog and elements within.
Dependencies
Per default elements of catalogs are "independent". This means the catalog can be used stand alone for dataset selections and to store data in templates. This is fine for most use cases. However sometimes you want to show certain elements of a catalog only together with a specific element of another catalog. This is where dependencies can be used.
To create a dependency open the dependencies section (1) and click on the + (2).
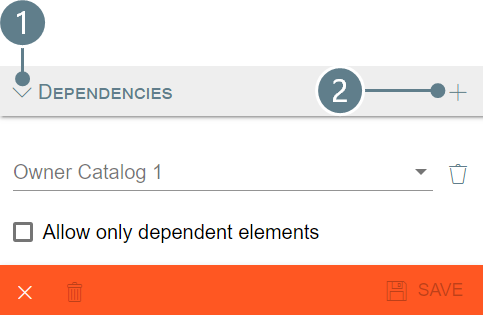
Next you can select any other catalog as the owner catalog (1). If you save now (3) Nooxl will let you and your users create both kinds of elements in your catalog: dependent elements and independent. If you restrict the elements to only be dependent please make sure to check the box at Allow only dependent elements (2).

In the element section you can find an dependent elements example .
Dependent elements will be marked with a 1 appended to its original name.
Elements of a catalog can depend on more than one other catalog.
Elements
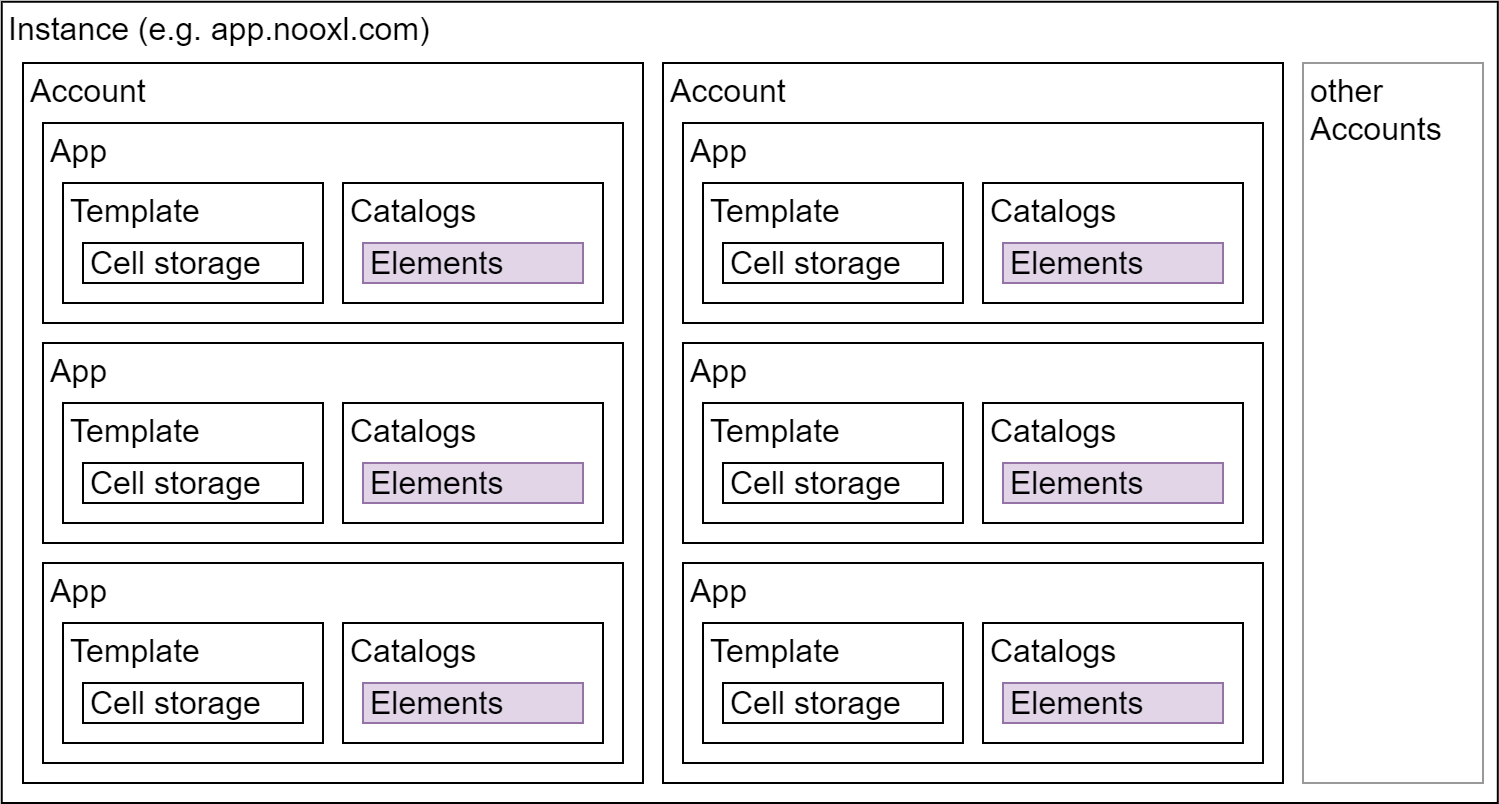
Elements are part of a catalog . You can build selections of elements of one catalog and use those selections in your app to determine a dataset or to further "describe" data in a cell storage. Each element can be part of as many selections as you want.
Create new elements
In the left hand navigation click on Catalog and Elements.
Click on the catalog you want to create a new element for. In the Element view click on the + to open the create Element dialog.
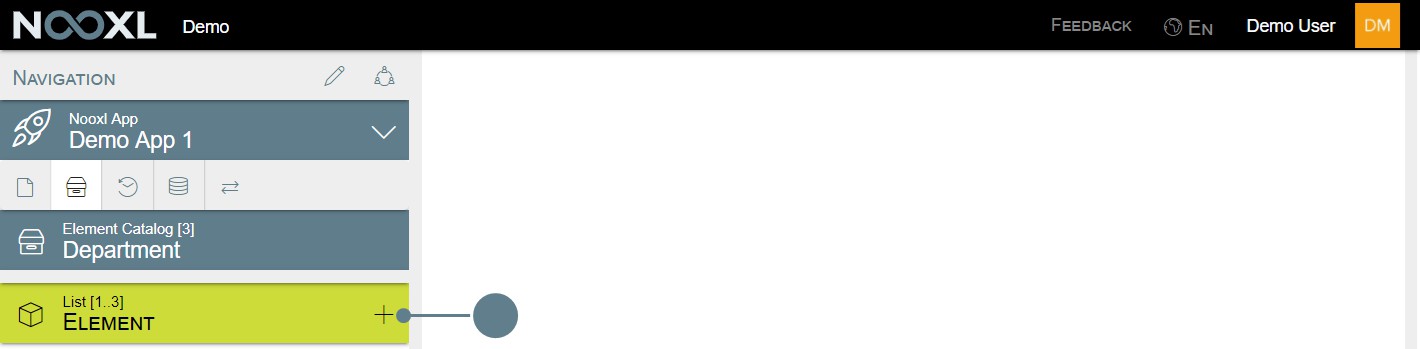
Give your element at least a name (1) and save to create it (2).
For more detailed information about the meaning of the different fields, please see the section element properties .
You can also utilize modifications to create new elements .
Edit elements
In the left hand navigation click on Catalog and Elements.
Click on the elements catalog you want to edit. In the Element view click on the ![]() to open the edit Element dialog.
to open the edit Element dialog.
After this you find the same mask with the element properties as when you create a new element.
Delete elements
In the left hand navigation click on Catalog and Elements.
Click on the elements catalog you want to edit. In the Element view click on the ![]() to open the edit Element dialog.
to open the edit Element dialog.
After this click on the trash can icon in the element properties to delete the element.
Please acknowledge that you are aware that all data save using the element will also be deleted.
Depending on how much data is already stored using the element, the process to delete the element may take a while.
Element Properties
The edit and create dialog for elements contains the following fields:
Element Name
The name of the element.
Description
An optional description of the element.
Order
Changes the position of the element within the catalog in the Catalog and Elements view of the app, as well as in selections. If more than one element has the same order assigned, these will be ordered alphabetically.
Tags
You can tag your elements and use those tags in templates.
Tags can not contain spaces. If you need to separate words, use underscores or camel casing.
Dependent elements example
Let us look at company departments and employees for example. Every employee is part of one department:
| Department | Employee |
|---|---|
| Sales | Susi |
| Stella | |
| Marketing | Bob |
| Anthony | |
| Phillis | |
| Management | Bill Boss |
Create the catalogs
The first catalog Department will be create by just stating the name. The second catalog Employee will be setup like this:
Note that we set Department as the Owner Catalog 1 and choose to only allow dependent elements.
Create the department elements
Go ahead and create the three departments of our example as elements in the department catalog.
Create the employee elements
To create a new dependent element in the employee catalog, we will need a template with our two catalogs as dataset selections.
The Employee selection needs to have the option Dependent elements can be created (with owner) turned on.
Then you can leave the design mode and select the Management department (1). With the department selected click on the burger icon of the employee selection (2) to open up the context menu. Here please click on Create New Element (3).
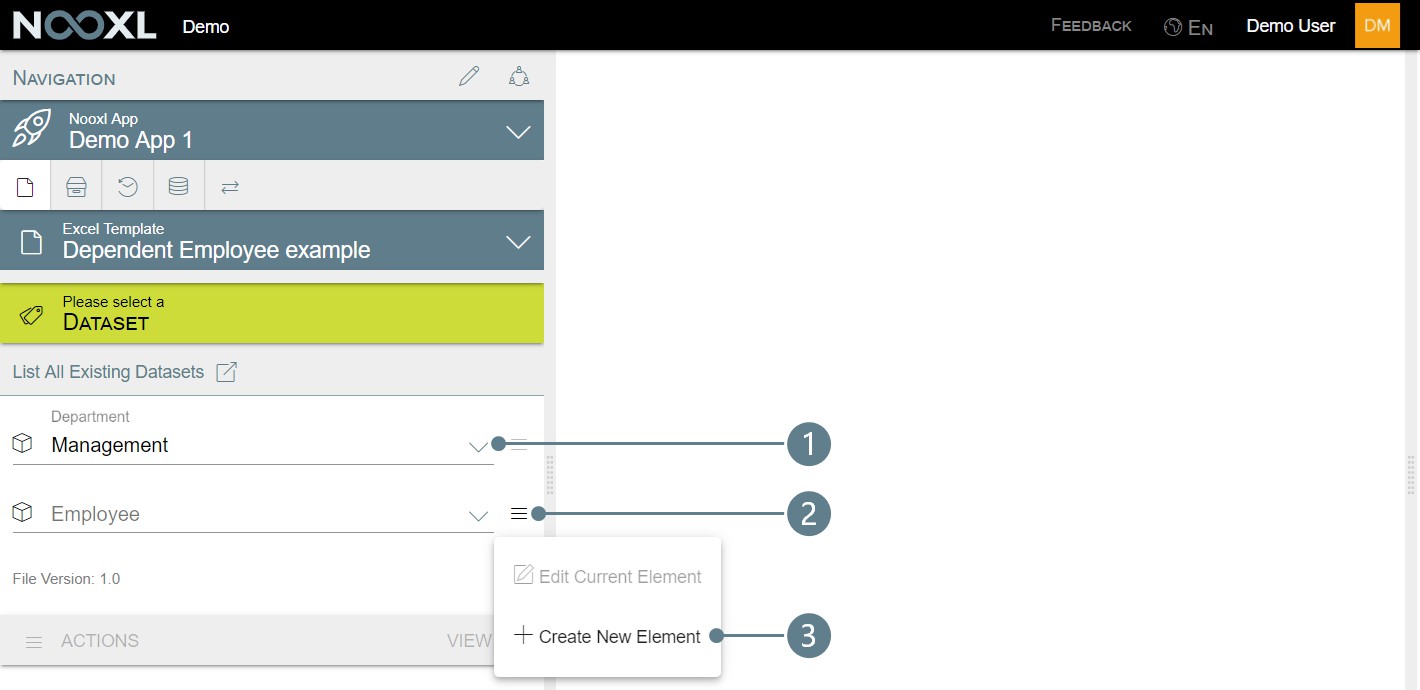
Give the element the name Bill Boss (1). Note that it will only be visible with the Management selection
(2). Click save (3) to create the element.

Our Bill Boss will now be an option to choose from when the Management Department is selected (left side). When you select any other department, Bill will no longer show up (right).
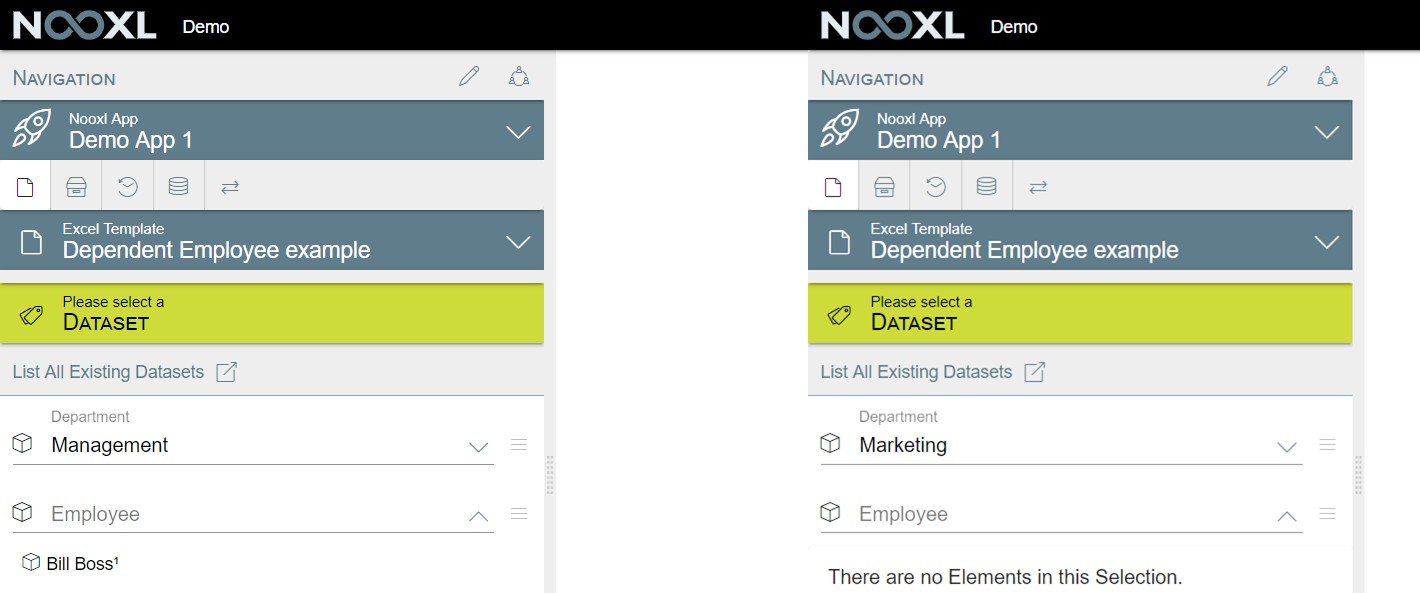
Result
When you created all elements, you can switch through the different departments and see the respective employees.
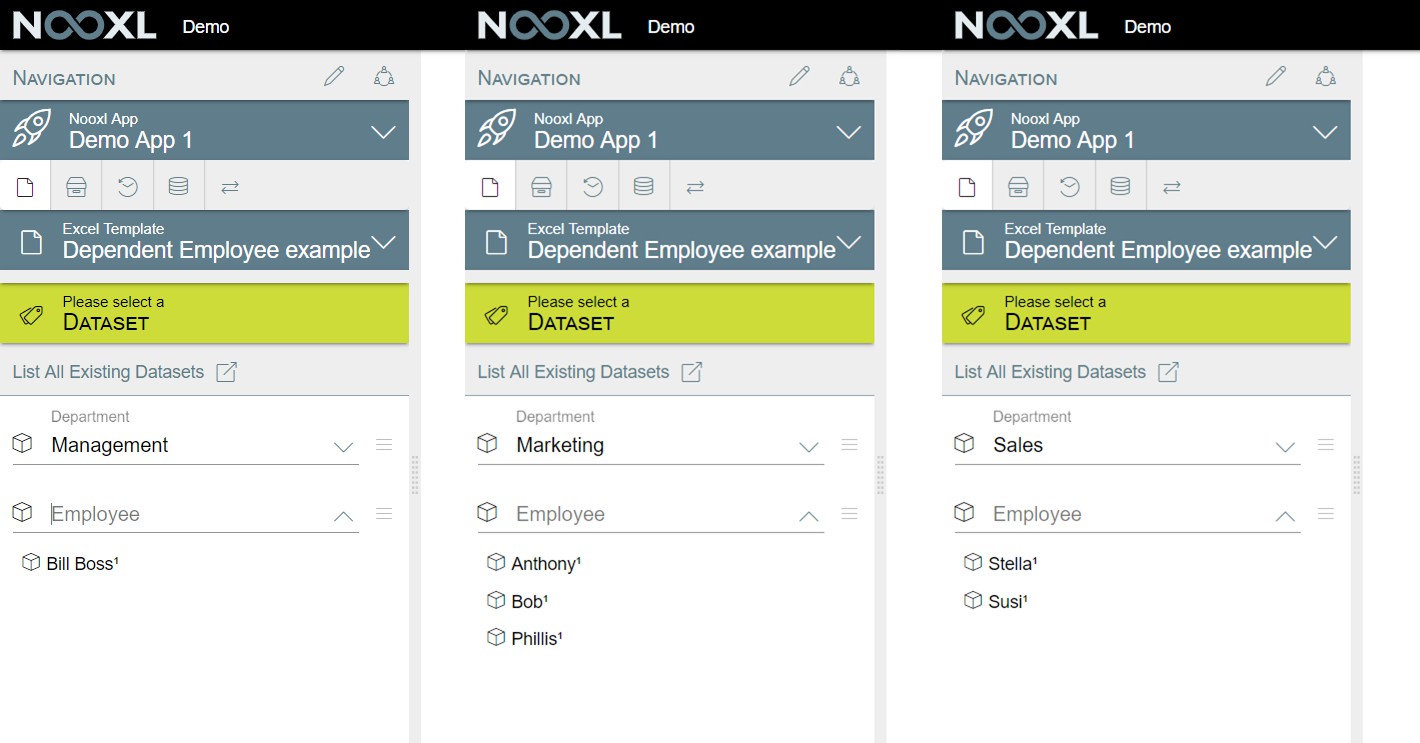
Selections
As you already know, Selections in Nooxl are subsets of catalogs . They can contain, all catalog elements , a few or only one.
The terms selection and condition are used synonymous in Nooxl.
Where are Selections used
Selections serve two purposes in your Nooxl App:
!](../media/4236b34b240b2597377d2687c03ad701.jpeg)To [determine datasets .
!](../media/13679db402f424013876af8c770b3830.jpeg)To determine the catalog elements used to store data in [advanced cell storages .
When you use a selection to store cell data the size of the markup is irrelevant.
Create a selection
To create a new selection, turn on the design mode of you App and go to Catalogs and Elements.

Next to each catalog you see the selections icon ![]() . Click on it for the catalog you need to create a selections for. Then Nooxl will show you a list of all selections for this catalog. To create a new selection click on the red plus.
. Click on it for the catalog you need to create a selections for. Then Nooxl will show you a list of all selections for this catalog. To create a new selection click on the red plus.

Next you need to select the catalog (1) you want to create a selection for. Nooxl will automatically use the catalogs name as the Name of this Selection (2). Feel free to use this name or to specify another. Next you can save your new selection (3).
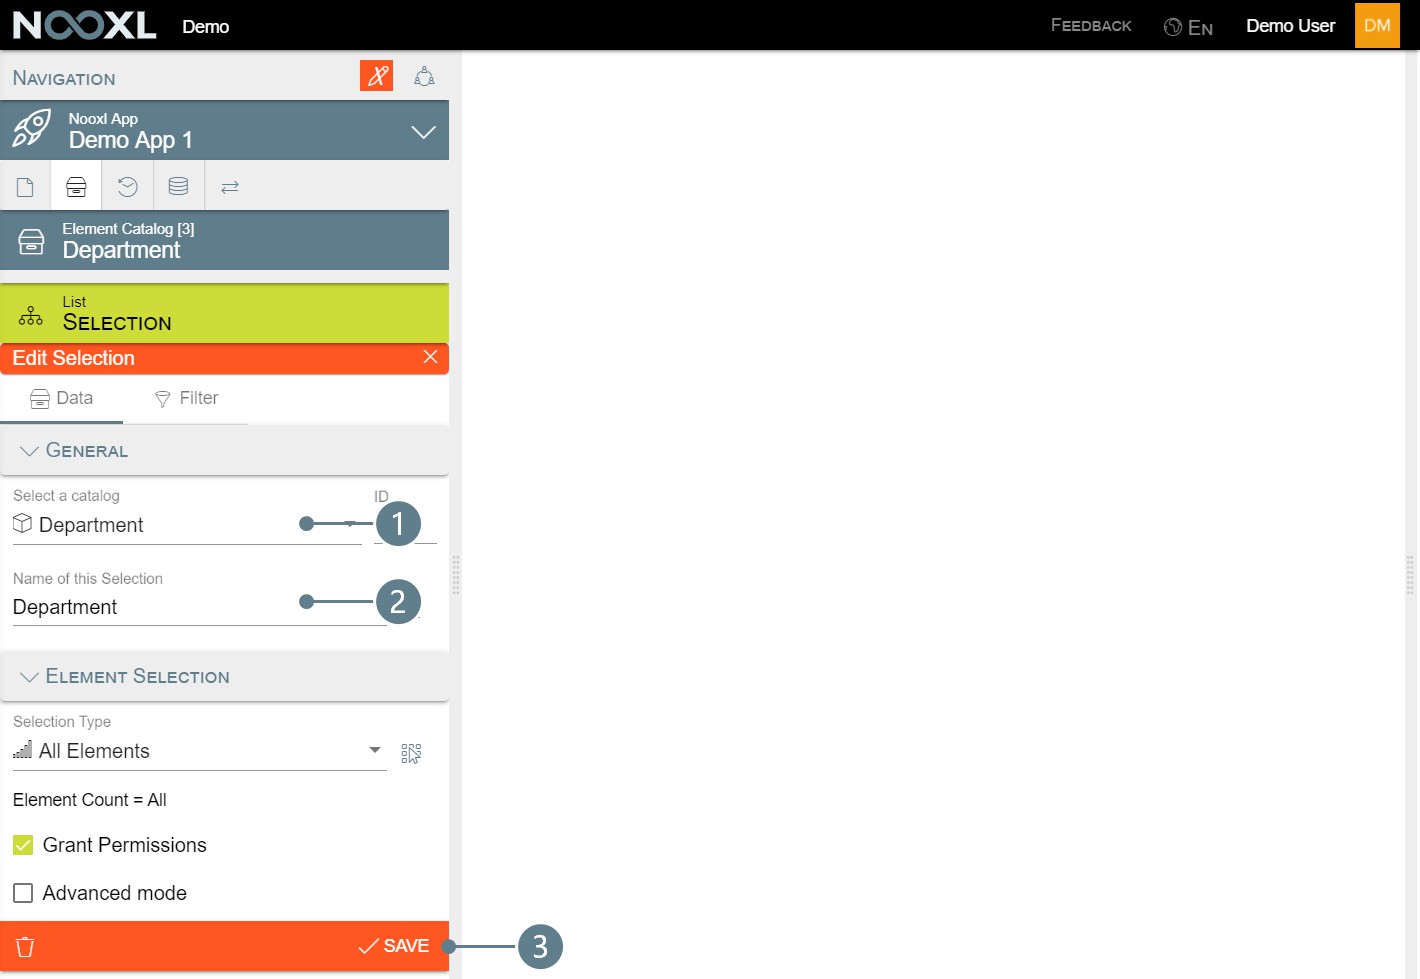
For more detailed information about the meaning of the different fields, please see the section selection properties .
Edit a selection
To edit a selection, turn on the design mode of you App and go to Catalogs and Elements.
Next to each catalog you see the selections icon !](../media/3bbe61b1066cf4b1acfd1f88edc68d44.png) . Click on it for the catalog you need to edit a selection. Then Nooxl will show you a list of all selections for this catalog. To change a selection click on the 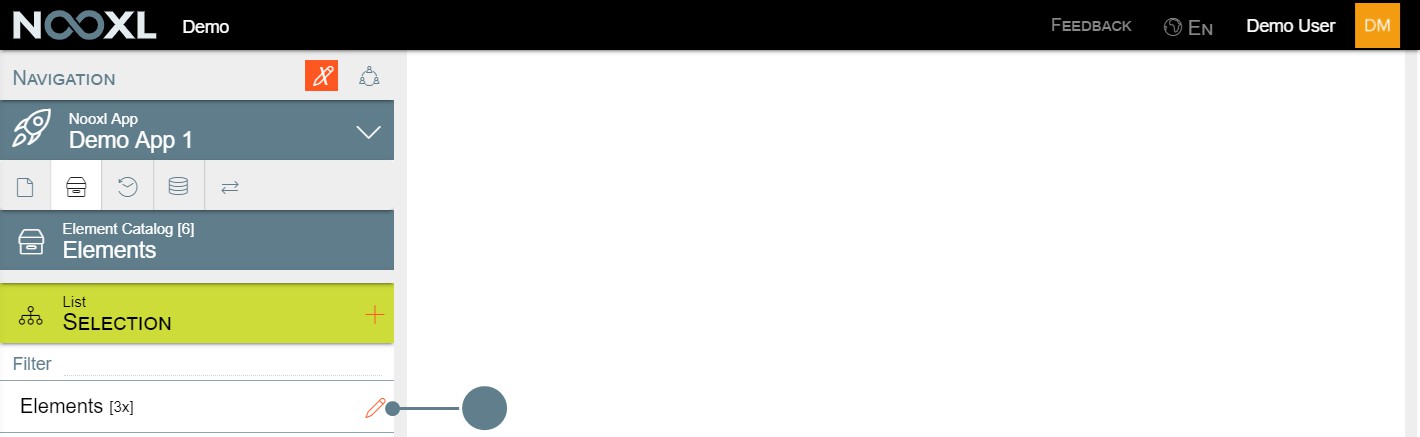
After this you find the same mask with the selection properties as when you create a new selection.
Delete a selection
To delete a selection, turn on the design mode of you App and go to Catalogs and Elements.
Next to each catalog you see the selections icon !](../media/3bbe61b1066cf4b1acfd1f88edc68d44.png) . Click on it for the catalog you want to delete a selection. Then Nooxl will show you a list of all selections for this catalog. To delete a selection click on the 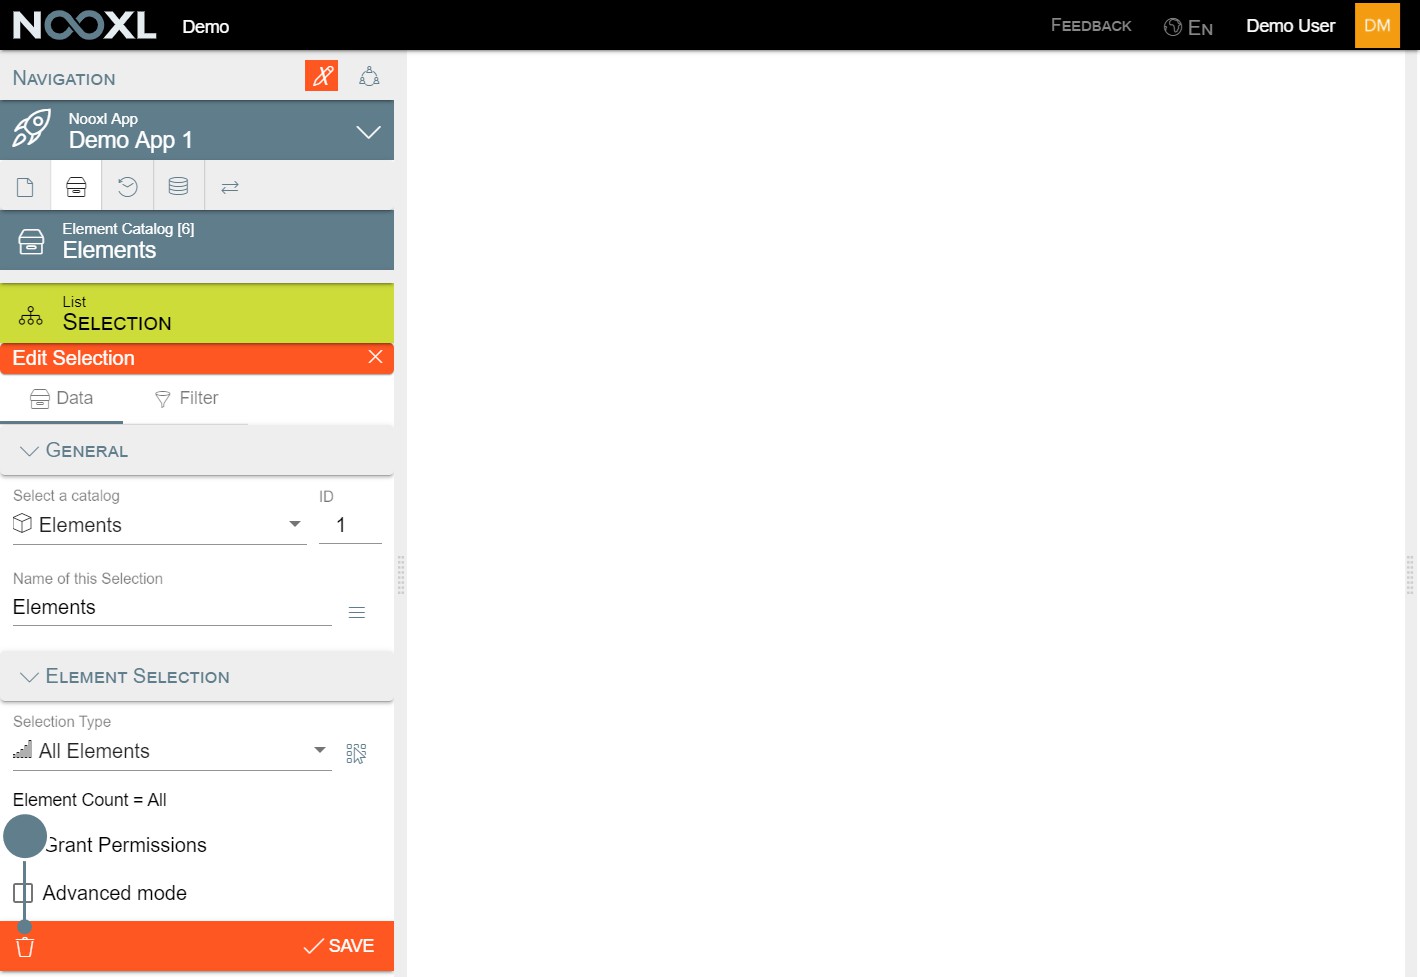
Selection properties
In the properties of your selections you find two tabs. The data tab (1) which is where you will work most of the time and the filter tab (2). Here you can create dynamic selections using spreadsheet filters . Additionally there is an Options tab, when you use your selection in a dataset selection.
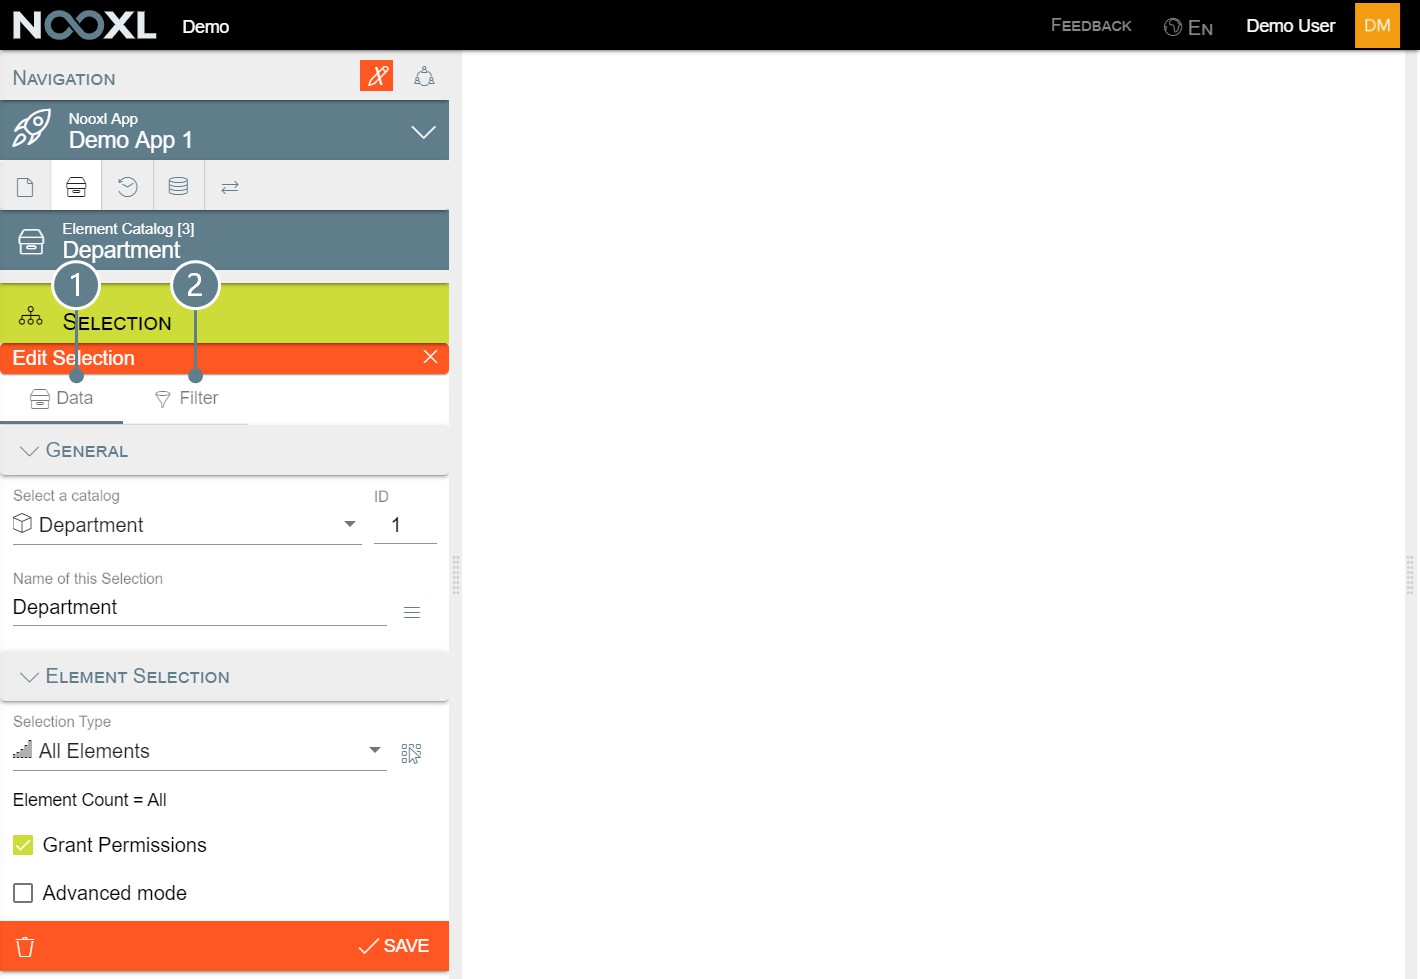
Data
Select a catalog
A dropdown where you need to specify for which catalog you want to create a selection for.
ID
The ID field is necessary when you use multiple selections of the same catalog for your dataset selection. Then you need to make sure that each of the selections have a unique ID which can be used to identify the datasets.
Name of this Selection
A free text name of your selection. This name is used throughout your App to display your selection.
Selection Type
There are three types of selections:
- All Elements: this type will ensure that always all catalog elements are part of the selection. This includes elements which will be created in the future.
- One Element: lets you select exactly one element of the catalog. Nooxl will rename your selection automatically to whatever element you chose.
- Selected Elements: lets you select multiple elements from the catalog. Per default Nooxl will sort the elements by their order (rank). However you can choose between different sorting methods for the elements.
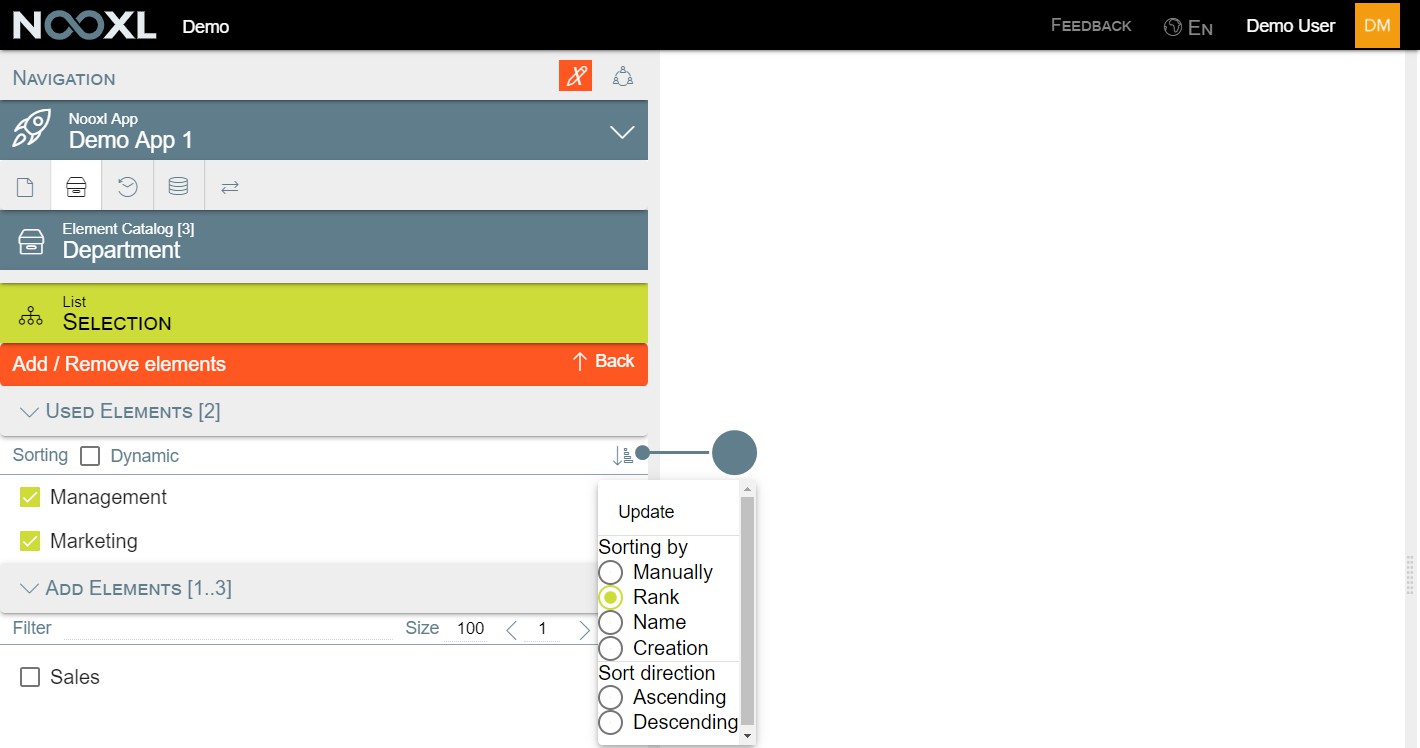
Grant Permissions
If this box is checked, users who can view the template where you use the selection are also allowed automatically to access all included elements. If you do not check this box, you will need to explicitly grant access to the elements for your user groups in the collaboration section of the system.
Advanced mode
this was used to toggle the GraphQL tab.
Options
This tab is only visible when you use the Selection as a dataset selection.
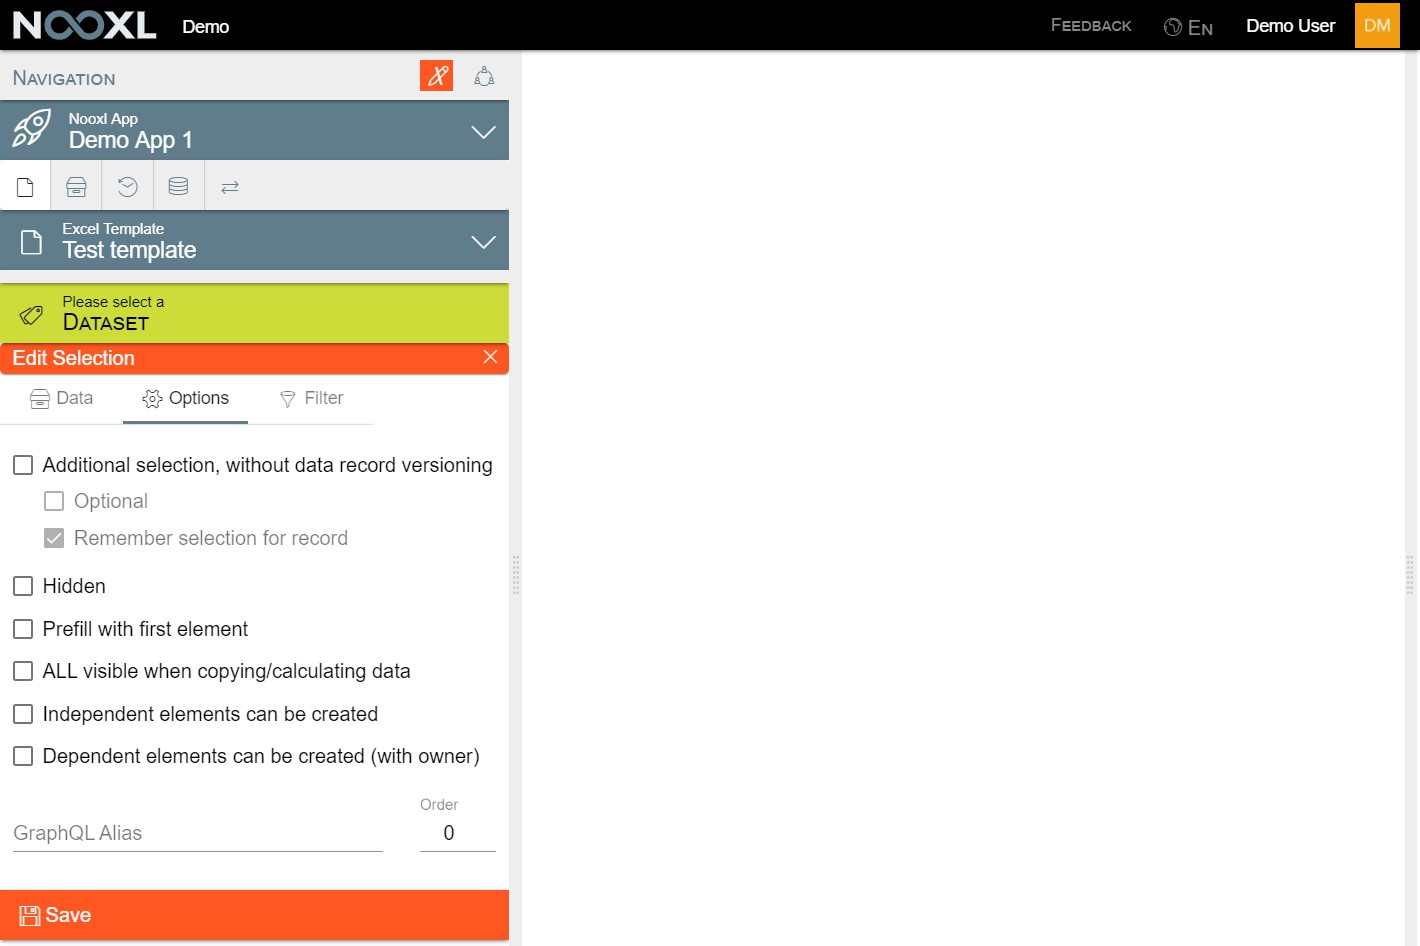
Additional selection, without dataset versioning
If this box is checked the selection will not be used to determine the datasets.
For example if you have two selections with two, respectively three elements for your template, you have six different datasets:
| Selection 1 | Selection 2 | datasets |
|---|---|---|
| Element 1 | Element A | Element 1 & Element A |
| Element 2 | Element B | Element 1 & Element B |
| Element C | Element 1 & Element C | |
| Element 2 & Element A | ||
| Element 2 & Element B | ||
| Element 2 & Element C |
Now when Selection 2 is set to be an additional selection, will end up with only two datasets:
- Element 1
- Element 2
Optional
If this box is checked, the user will not need to select an element of this selection. If it is checked, the user can only view the dataset when he selected an element.
Remember selection for dataset
Lets you save the selected element with your dataset.
Hidden
If this box is checked, the selection will not be shown to the users. This can be useful when you have a selection with only one element. Since the user can not choose anything, there is no need to show the selection at all.
Prefill with first element
If this box is checked, Nooxl will use the first element of the selection as the default value.
ALL visible when copying/calculating data
If this box is checked, the users will have the option to check an "All" checkbox for this selection when recalculating or copying datasets .
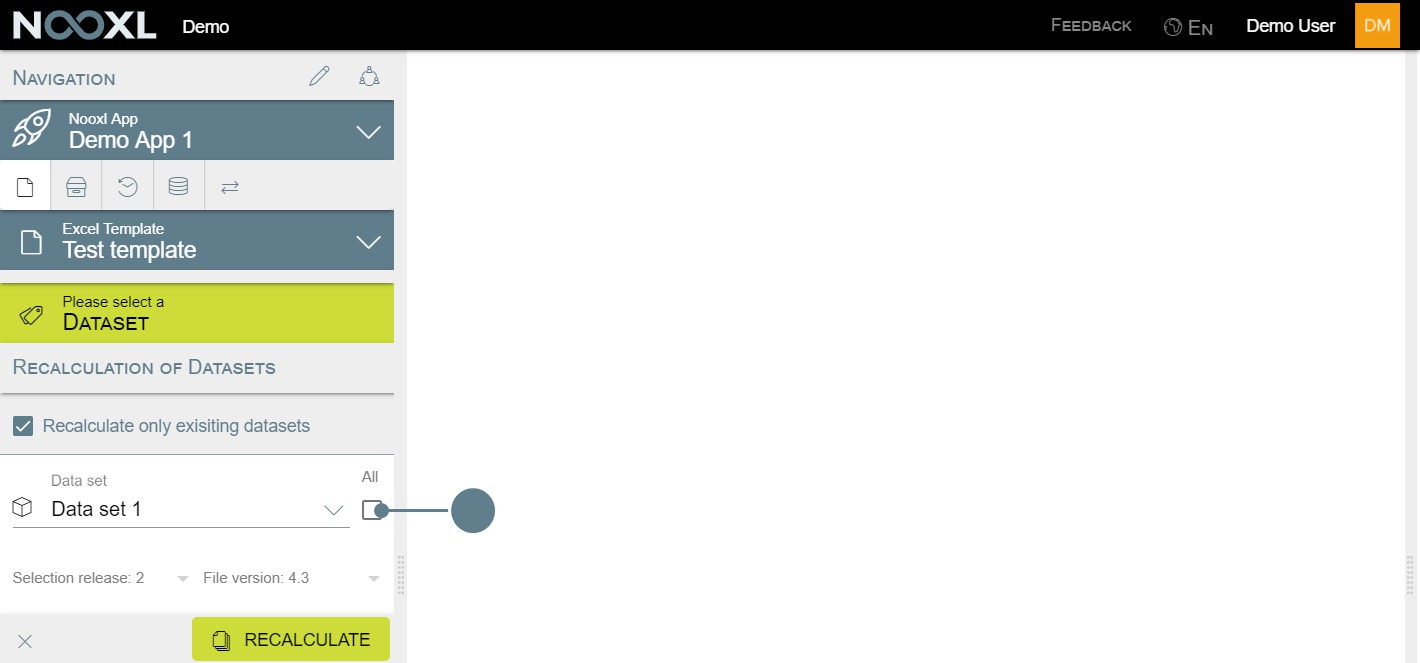
Independent elements can be created
Enables the user to create independent elements using the selections context menu.

Dependent elements can be created (with owner)
Enables the user to create dependent elements using the selections context menu. Nooxl will automatically use all other selections of the dataset to determine the owner of the new element.
Order
Lets you change the order of the selections.
Filter
You find a separate article regarding the filter functionality .
Dynamic selections using Spreadsheet-Filters
As you learned in the section about Selections those are pretty static. You can create a Selection with exactly one element, with a bunch of elements or with all available elements of a catalog. Only the last is kind of dynamic, because if a new element is created it is automatically part of this selection and therefore available to the users.
If your use case demands truly dynamic selections you can use Spreadsheet-Filters. With Spreadsheet- Filters you create a template which contains all the necessary logic to determine what elements are currently in the selection.
A simple example for such a use case is that you have departments and employees in your app and you want create a selection of employees which takes into account which department was selected in the previous selection. You could create something like this by using dependent elements but this approach is very limited compared to Spreadsheet-Filters and has some downsides:
- no easy change of dependencies
- no multi dependencies
- a 1 appended to the element name
- no easy way to just get all elements
Spreadsheet-Filters are also a great way to hide old elements without deleting them to preserve the data for auditing purposes.
Create a Spreadsheet-Filter Selection
Go to Catalogs and Elements (1), turn on the design mode (2) and click on the Selections icon ![]() (3)
(3)
next to the catalog you want to create a Spreadsheet-Filter selection for.
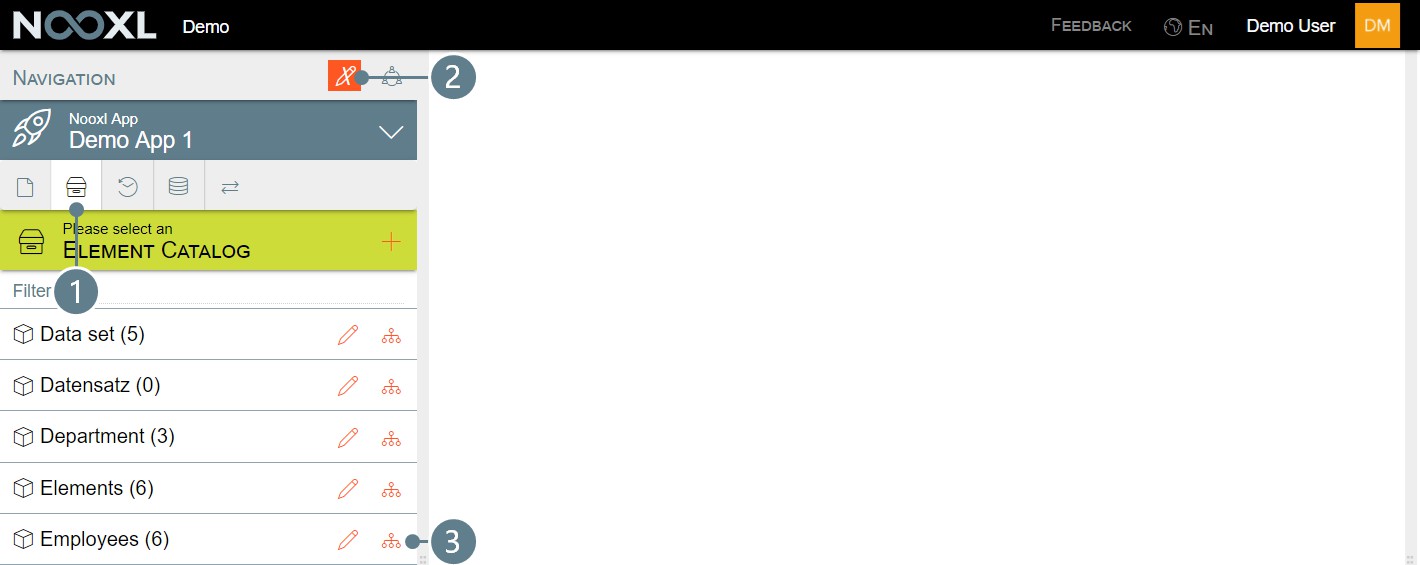
Then click on the + to create a new Selection.
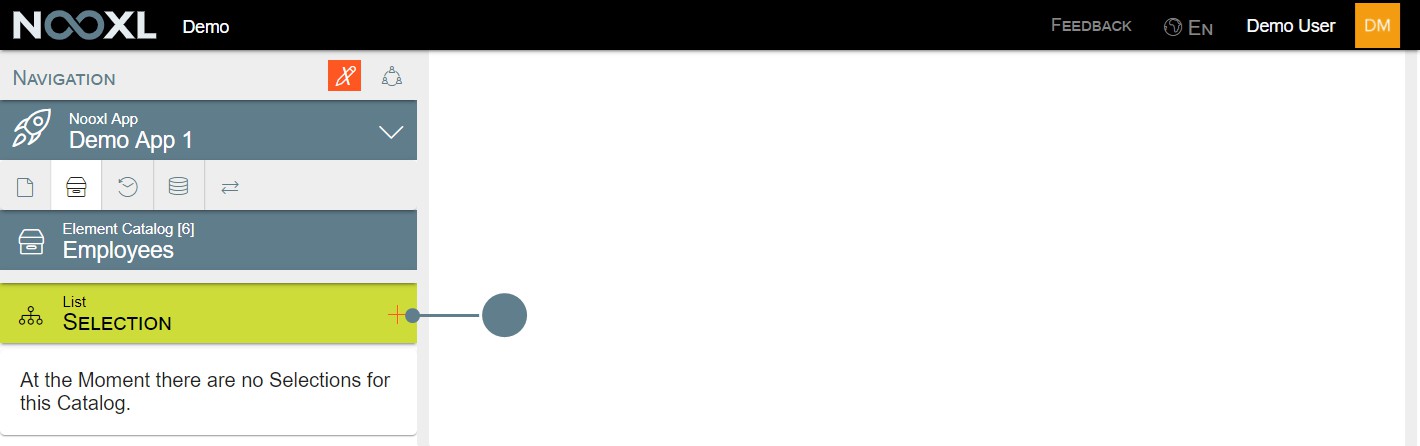
Next you need to select the catalog (1) and name the selection appropriately (2). Also please make sure that the Selection Type is All Elements.
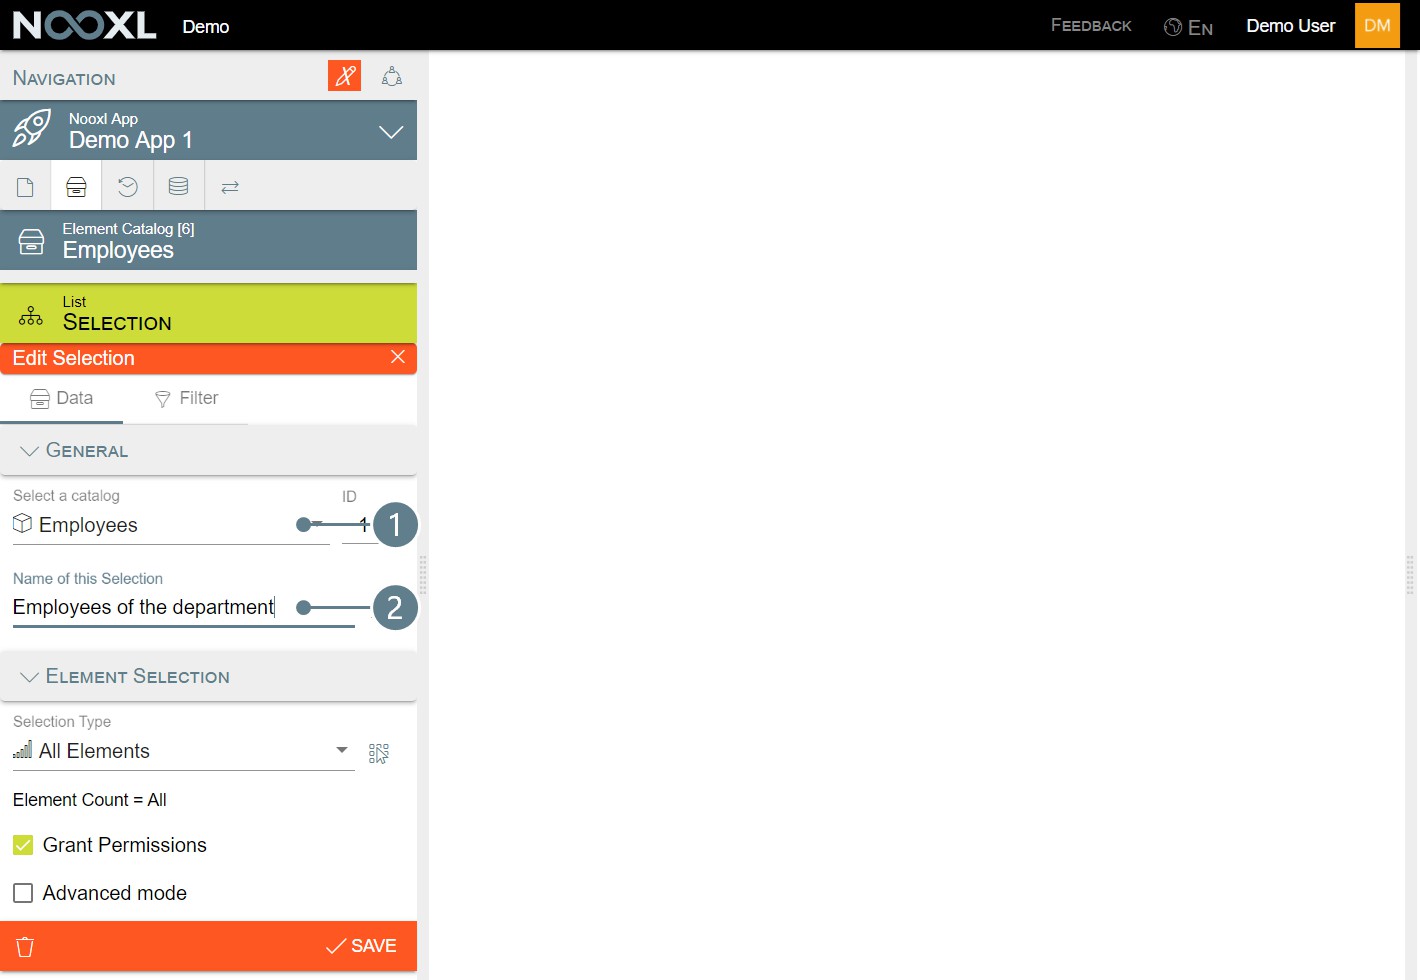
Switch to the tab Filter (1). Here you can see what you need to provide to Nooxl. First of all we have to create a template which will then be set up as the filter spreadsheet (2). Inside this template there needs to be a markup containing the filtered elements (3). And at last we need to specify the kind of data contained (4) (element names, IDs, descriptions or tags) and what the compare method is (5). You find further information about everything in the properties section of this article.
For now click on Save (6) to create the selection in its current state. We will come back after we created our template with the filter logic.
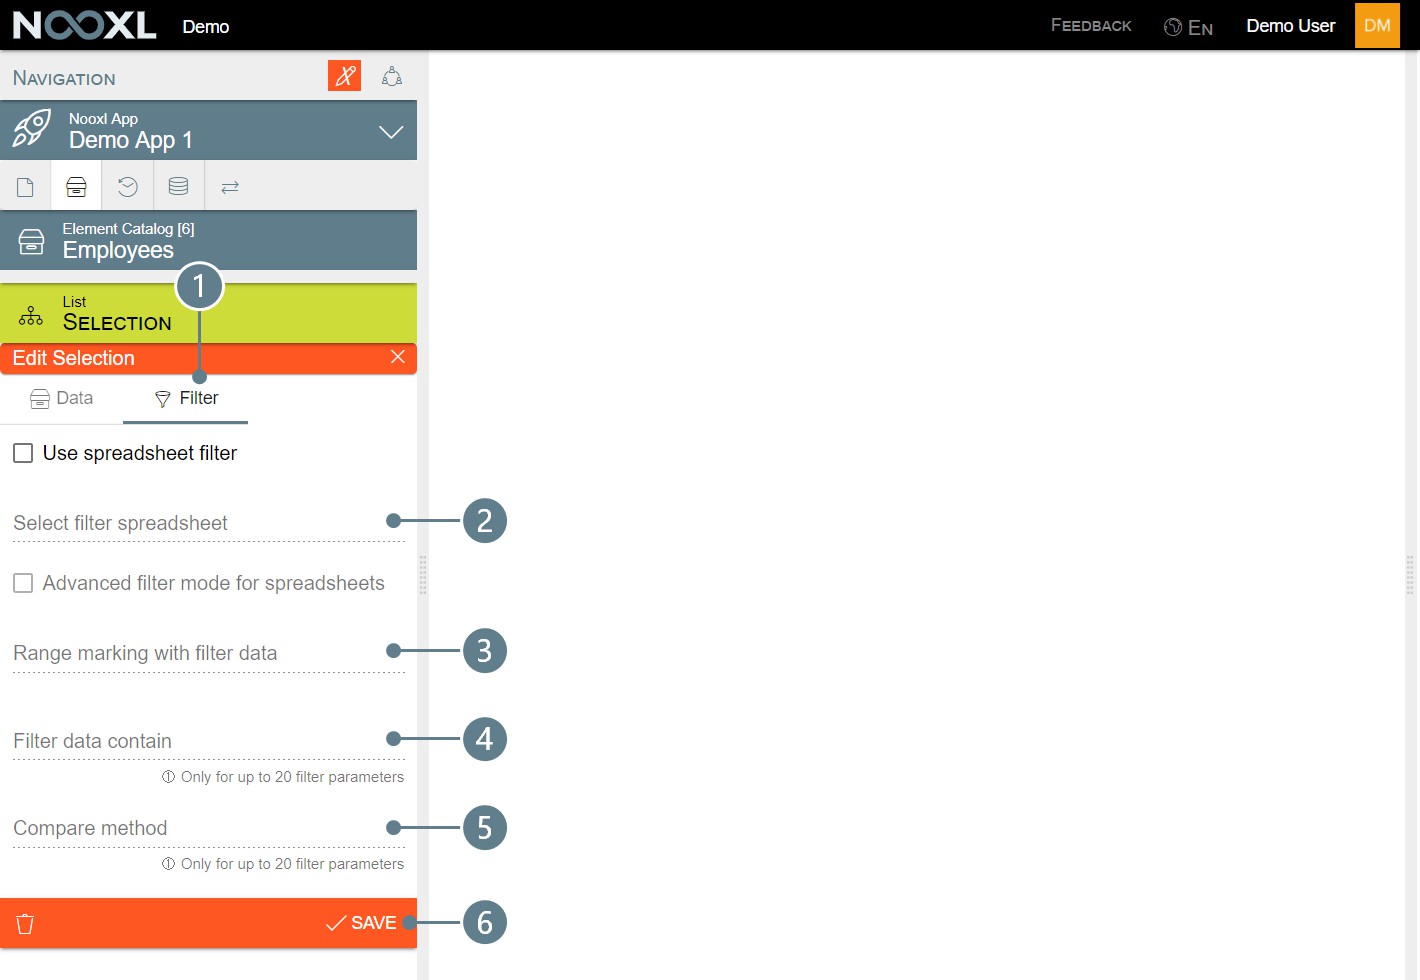
Create a Spreadsheet with filter logic
To populate our Spreadsheet-Filter we need a template containing the logic. To do this, we need to understand what Nooxl needs in order to work. In the end all you need is a markup with the element names, IDs, tags or descriptions of the elements you want to have in your selection.
In our example we want to filter the employees depending on their department. For this we create a new template and add the departments as a selection, so we can store which employees work for which department.
To set this up that way, enables us to have more than one department for an employee.

In the design mode of the template we set up three columns. Create a Cell storage for column (2) and set it up with the advanced mode to use the employees catalog as the dimension down (with expanse = Lines) and additionally output the names of the elements in column (1).
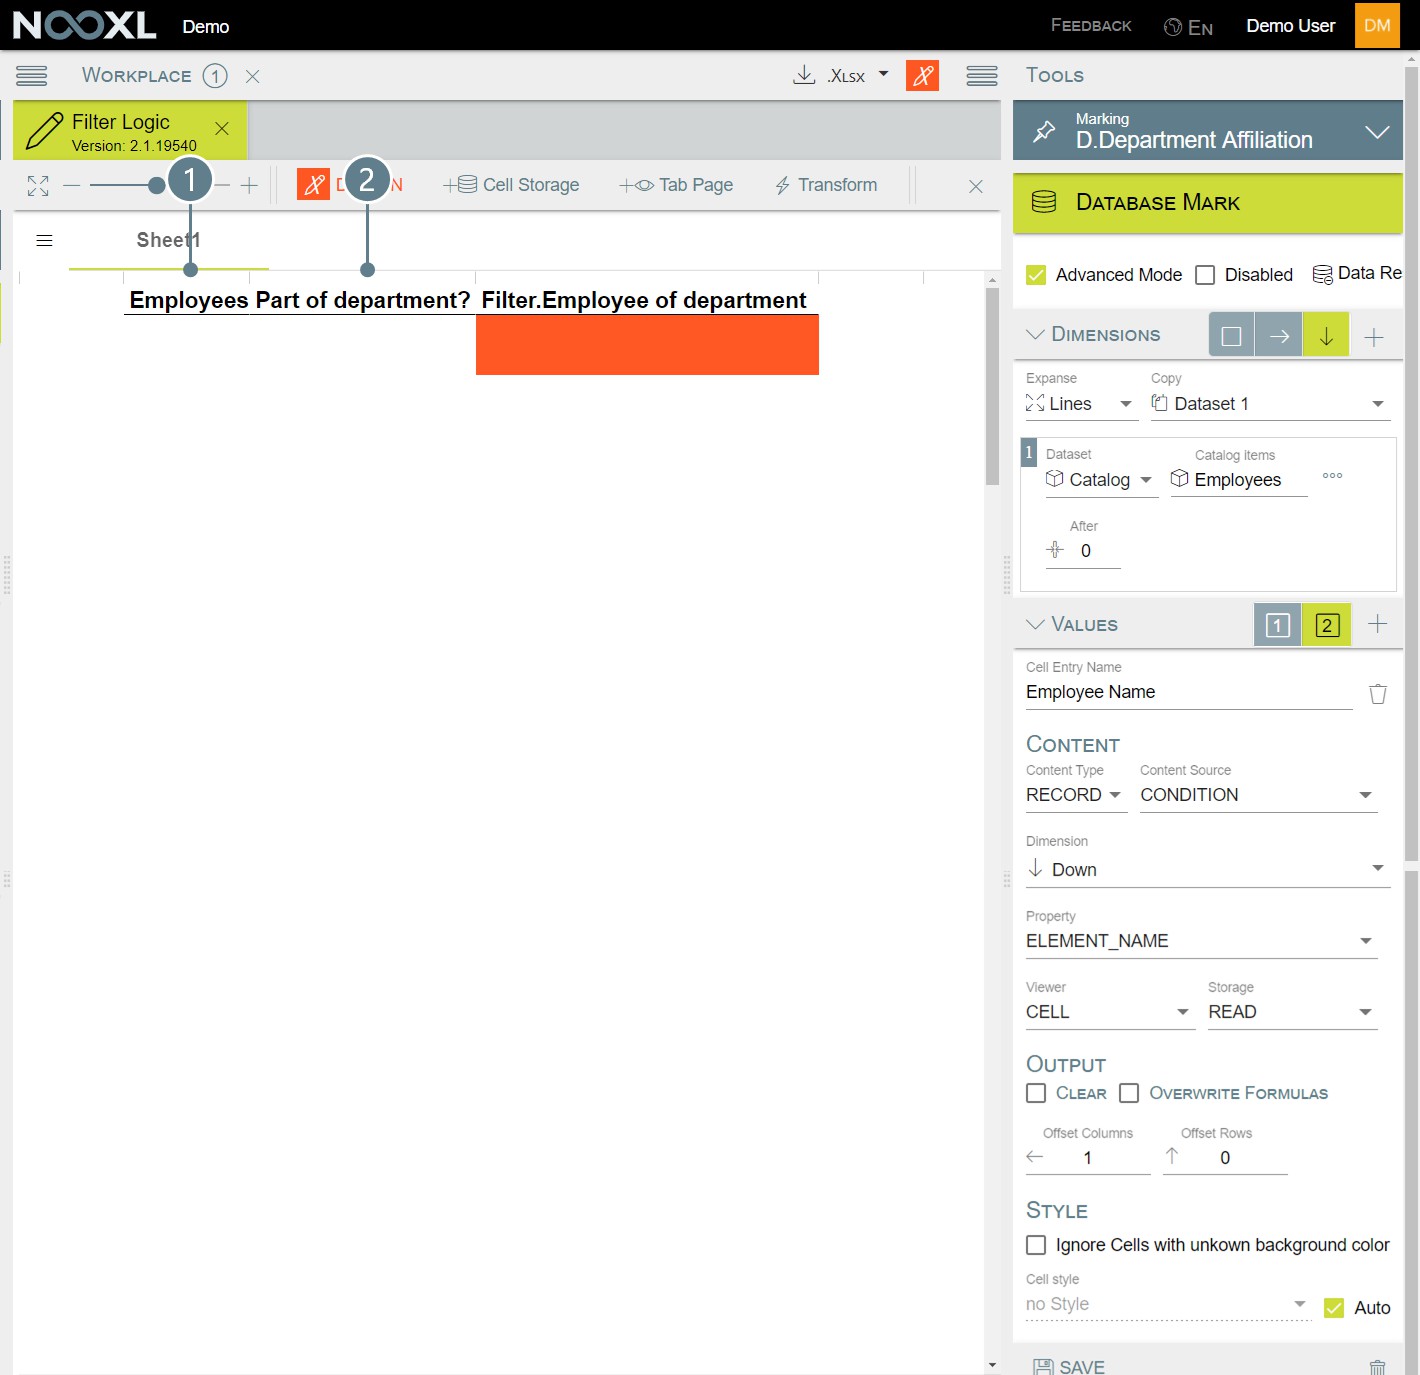
For column (3) create a markup, which spans over two rows. This markup will grow dynamically depending on the amount of employees, since we said that the Lines should be expanded.
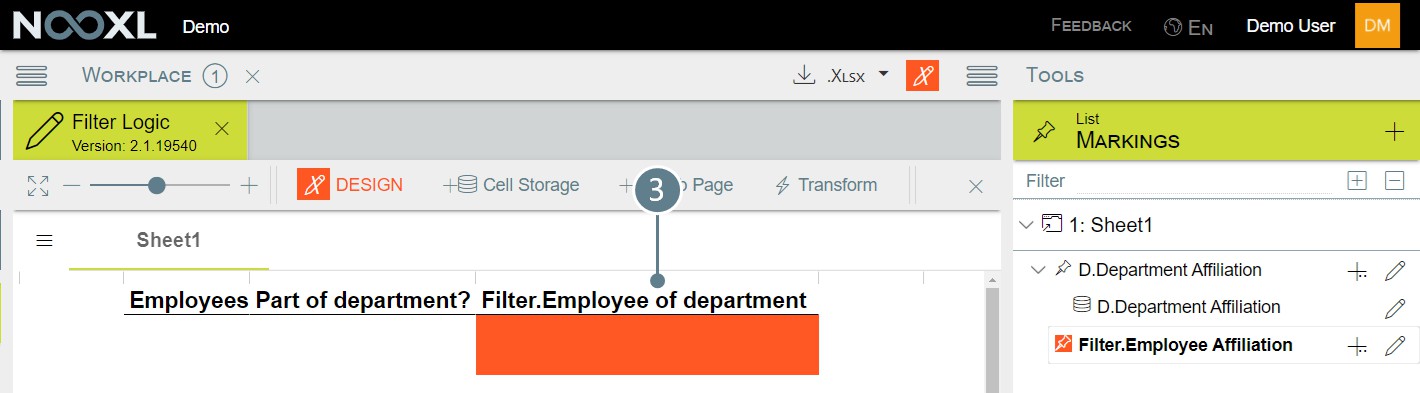
In Excel please set up a formula in the first row of the third column, which checks for any content in column 2 and then takes the content of column 1.
=IF(C2<>"";B2;"")

With this setup we can go through all departments and save which employees are part of that department.
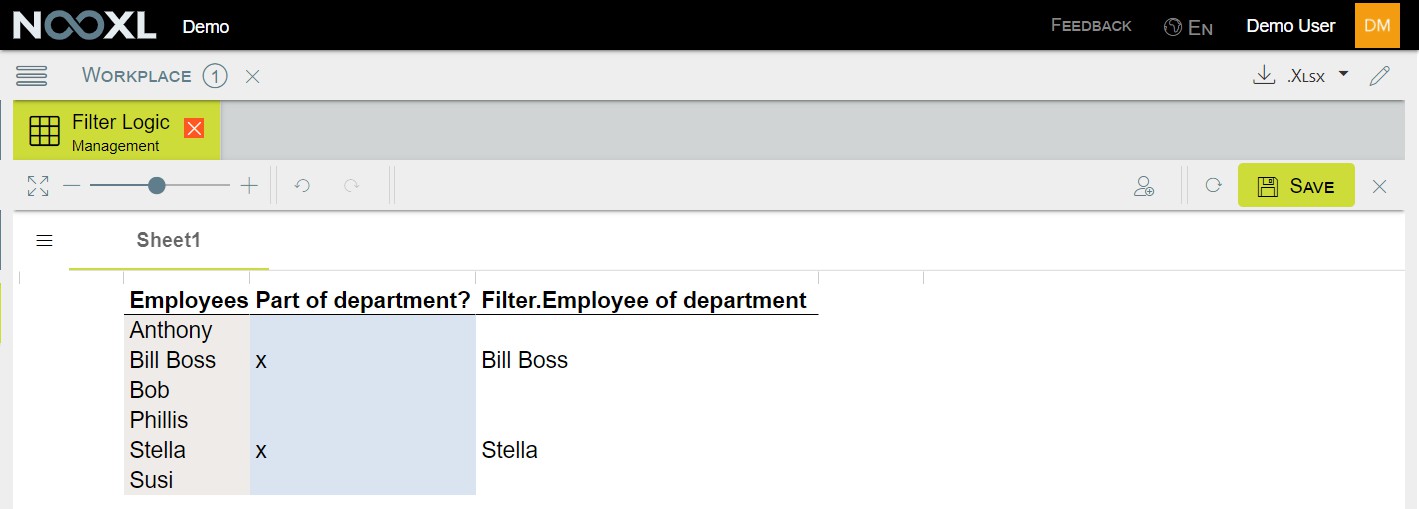
Using the element IDs in the markup instead of using the element names, would increase the performance to process larger catalogs.
Set up the Spreadsheet-Filter properties
Now we can go back to the selection and turn on the option Use spreadsheet filter (1) on the filter tab. Select the template (2) we created in the last step and choose the markup containing the element names
(3). Since the markup contains the names of the elements, specify Element name in the next drop down
(4) and that the content of the markup should equal (5) the content of the catalog. Then go ahead and save the changes (6).
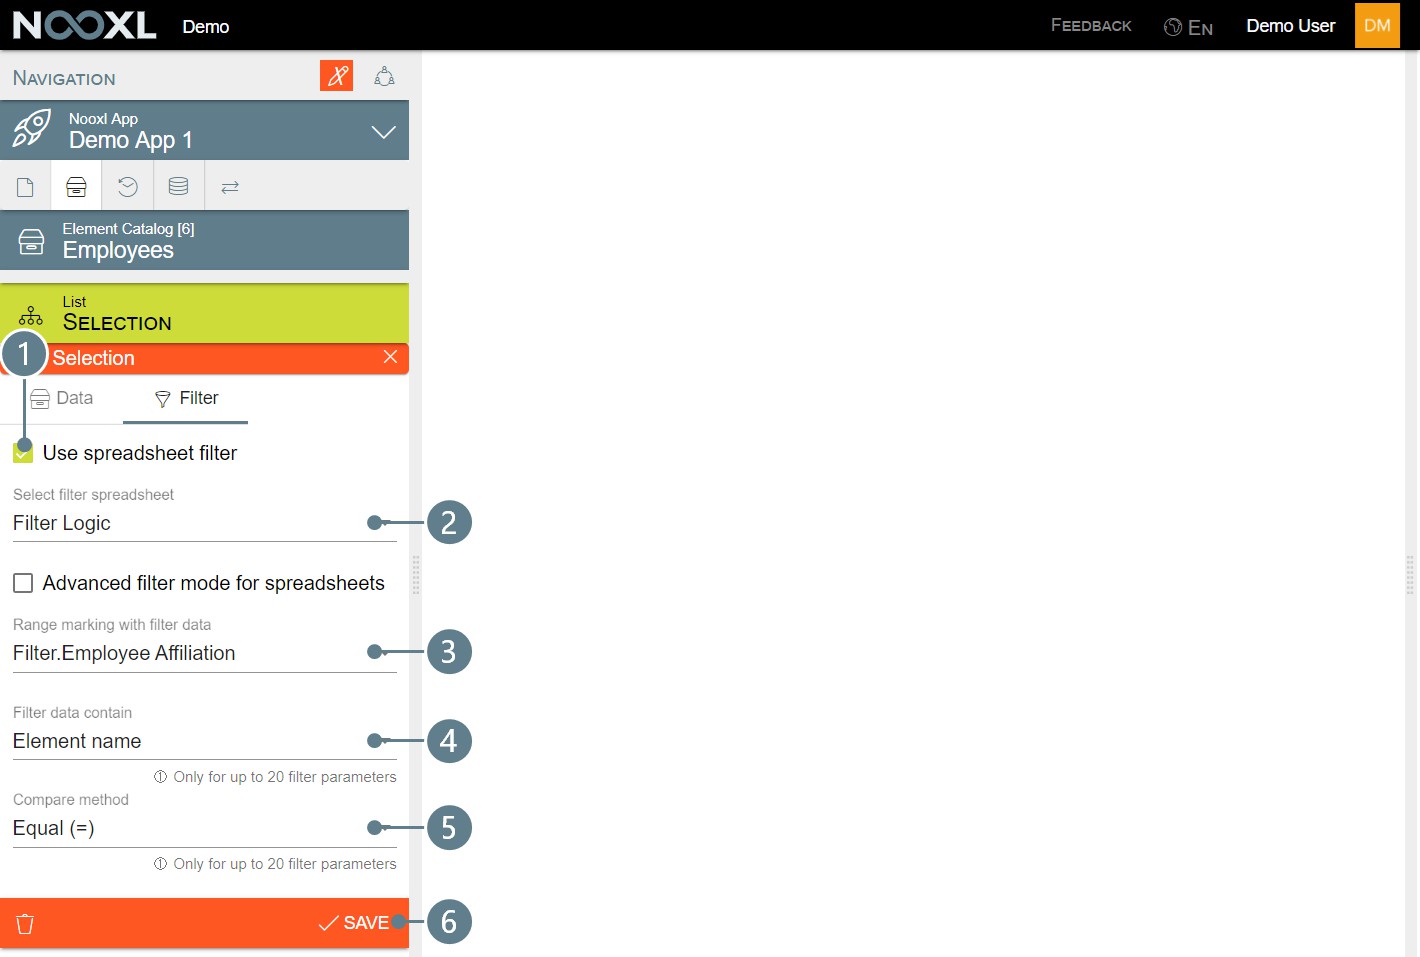
Use the Spreadsheet-Filter in a template
Now when you use your Spreadsheet-filter selection as an option in a dataset selection. You will see that the content will be determined by the department selection.
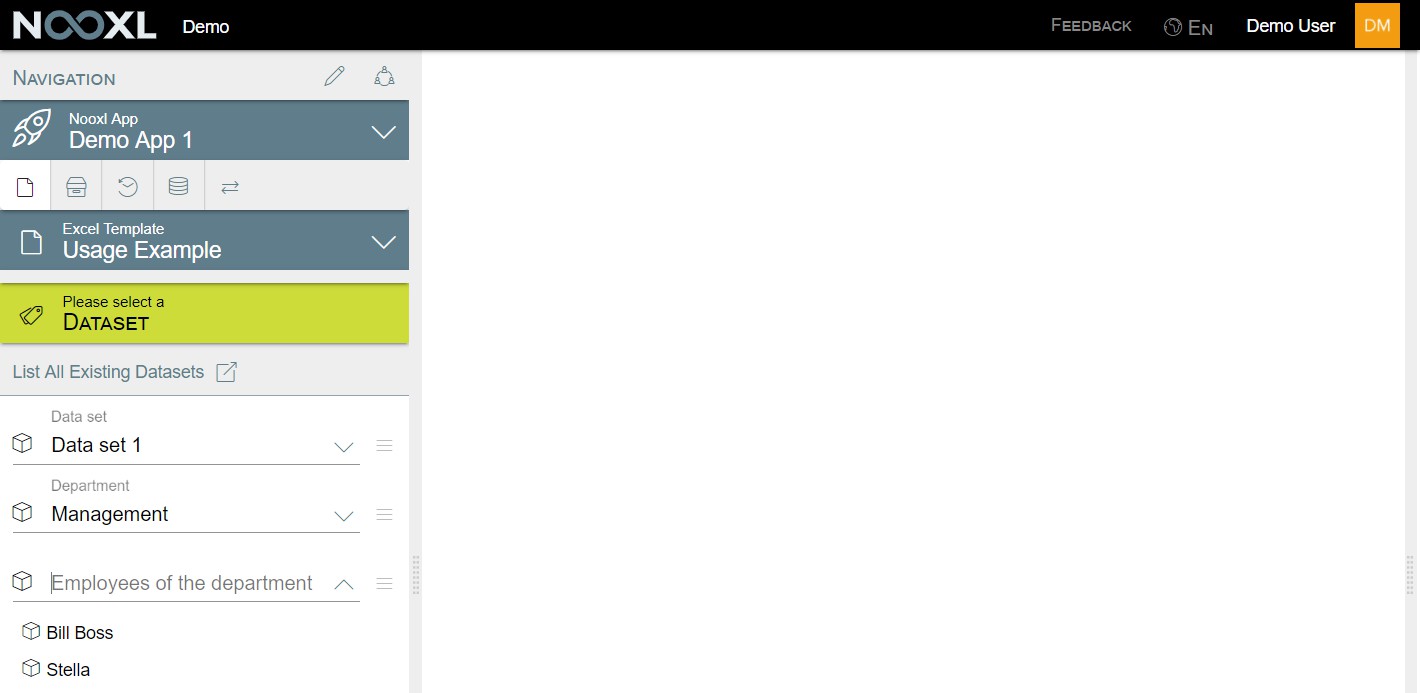
Please note
You must at least use all selections of the filter spreadsheet, but you can have more.
Nooxl will execute the spreadsheet filter template every time it is used by a user. This means, if your logic depends on data from another template you do not need to worry of updating the spreadsheet filter data manually.
Properties of the Spreadsheet-Filter
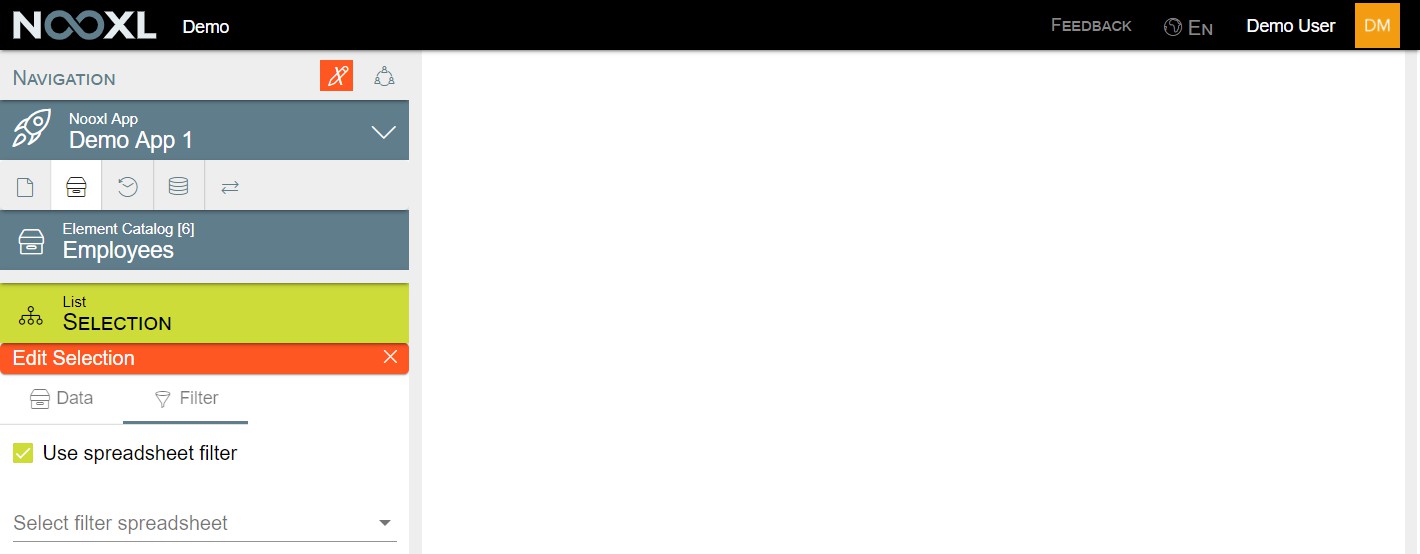
Use spreadsheet filter
Check this box if you want to use a Spreadsheet-Filter logic for the selection.
Select filter spreadsheet
From this dropdown you need to select the template containing your filter logic.
No advanced filter mode for spreadsheets
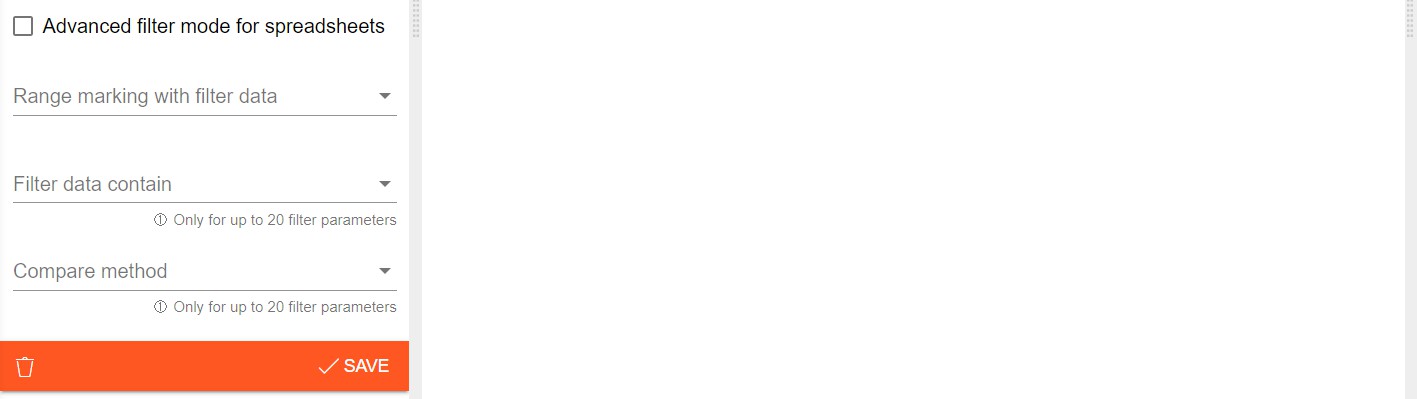
If you do not want to use any advanced filter logic, leave the checkbox Advanced filter mode for spreadsheets unticked.
Range marking with filter data
Select the markup containing your filtered data. This does not need to be a cell storage, a simple markup is sufficient.
Filter data contain
Specify what "part" of the element is located inside the markup.
| Element id | The element ids. This is the most performant approach. |
|---|---|
| Element name | The names of the elements. |
| Element description | The description of the elements. This would enable you to get multiple elements with one description, because descriptions do not need to be unique. |
| Element tags | The tags of the elements. This would enable you to get multiple elements with one tag, because tags do not need to be unique. |
Compare method
What type of comparison should be done.
| Equal (=) | What is stored in the cells of the markup is exactly the specified part of the element. |
|---|---|
| Contains | What is stored in the cell of the markup is part of the specified part of the element. This can lead to unwanted results. If you go for element names and you have for example Stella and Another Stella, the later would also be part of the selection, as soon as Stella is part of it and you choose Contains as the compare method. |
| Like (*,,[abcd],[a-d],[^abcd]) | You can also define patterns in your markup and have all elements be part of your dynamic selection which match against this pattern. |
| Character | Description |
|---|---|
| Any string of zero or more characters. | |
| Any single character. | |
| Any single character within the specified range ( [a-f] ) or set ( [abcdef] ). | |
| [^] | Any single character not within the specified range ( [^a-f] ) or set ( [^abcdef] ). |
Advanced filter mode for spreadsheets
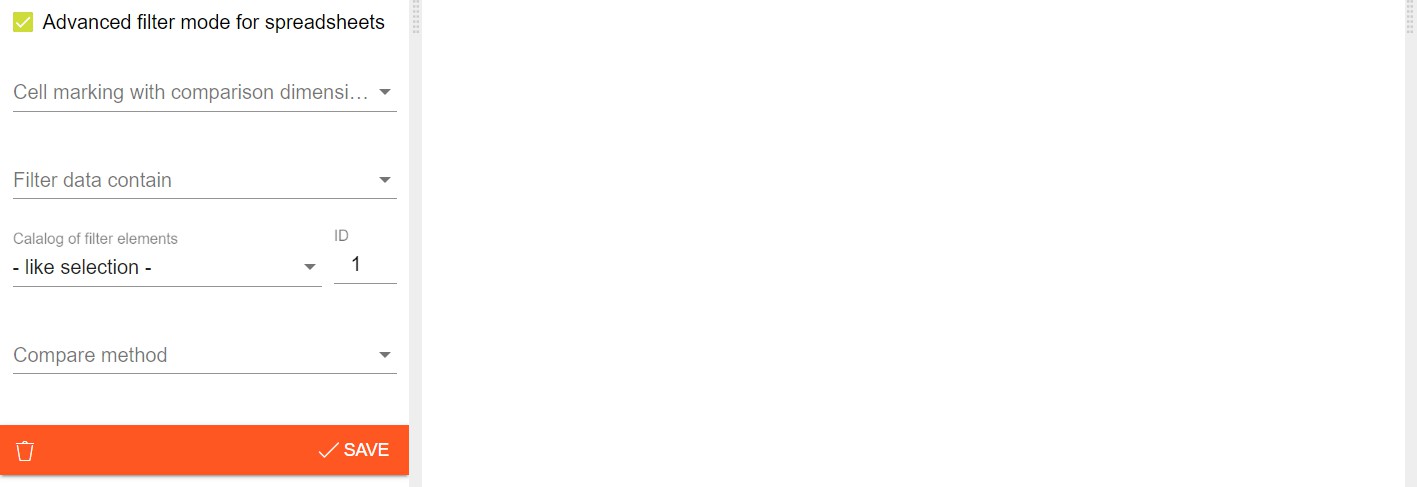
If you need to use advanced filter logic, please check the Advanced filter mode for spreadsheets
checkbox.
The advanced filter mode enables you for example to link two elements together, in a way that they can be used like dependent elements , meaning that you can output the two selections and Nooxl will automatically group your elements together.
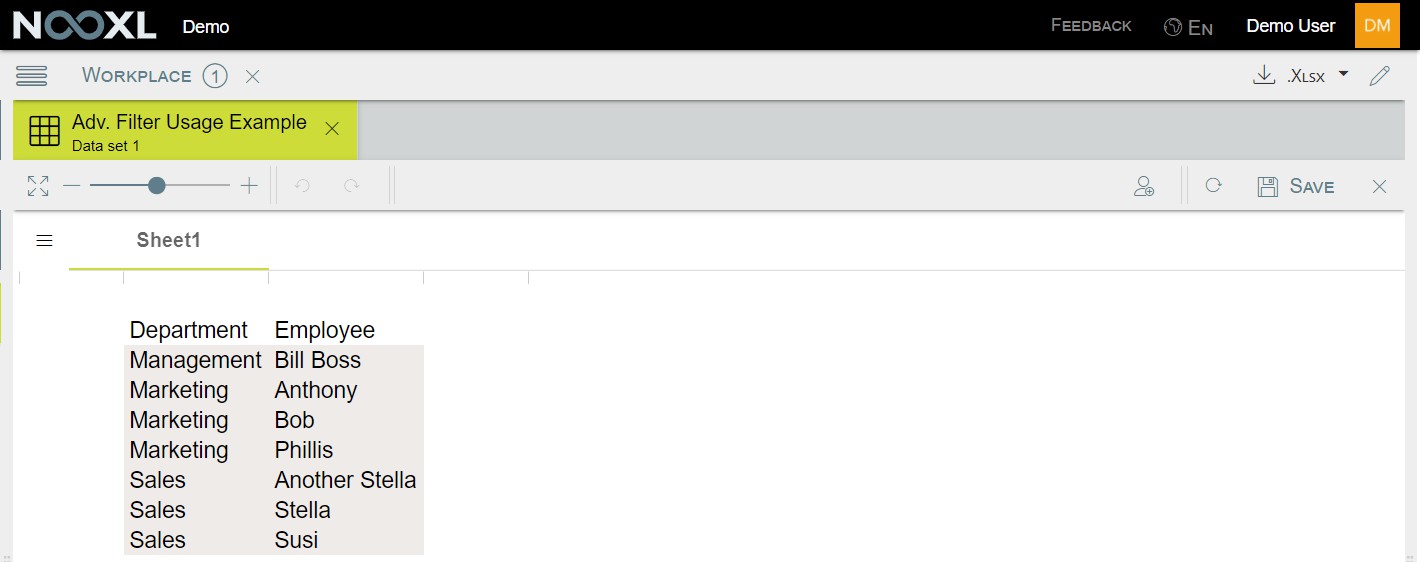
By doing this you are again limited to 1:n pairs.
Cell marking with comparison dimensions
The cell storage containing the information about "the other" catalogs elements.
Filter data contain
Information what Nooxl finds in the cell storage.
| comparison value | If you set the Filter data to a comparison value, you are essentially only filtering the catalogs elements based on a specific value. For example only elements with an "x" saved in this cell storage should be displayed. You could achieve the same result with the standard spreadsheet filter, but you would create some overhead. |
|---|---|
| Element Id | If your cell storage contains the element IDs of a "parent" element, then choose Element Id. |
| Element name | If your cell storage contains the elements names of a "parent" element, then choose Element name. Using the Element Id instead of the Element name will improve the performance on large catalogs. |
Catalog of filter elements
In case you choose Element Id or Element name as the Filter data, then you need to specify the catalog of the elements you are referencing.
ID
If you use a catalog multiple times in your dataset selection, you need to specify unique ID's so that Nooxl knows what selection is which.
Compare method
Currently there is only .
Include element if cell value =
If you want to filter your elements based on a specific value ( Filter data contain = comparison
) then you specify this value here.