Import data files via template
If you regularly receive data from third-party systems as Excel, CSV, or TXT files, you can import it into a model through an import template. This page walks the full workflow, from designing the import template to running the import.
Run an existing import
When a model has an import template attached, the dataset Actions menu shows Import a data file:
- Open the Actions menu and choose Import a data file.
- Pick the import template and select the file with the data; an upload button appears.
- After the upload, the model opens with an extra sheet showing the raw data.
- Click Save to finish the import.
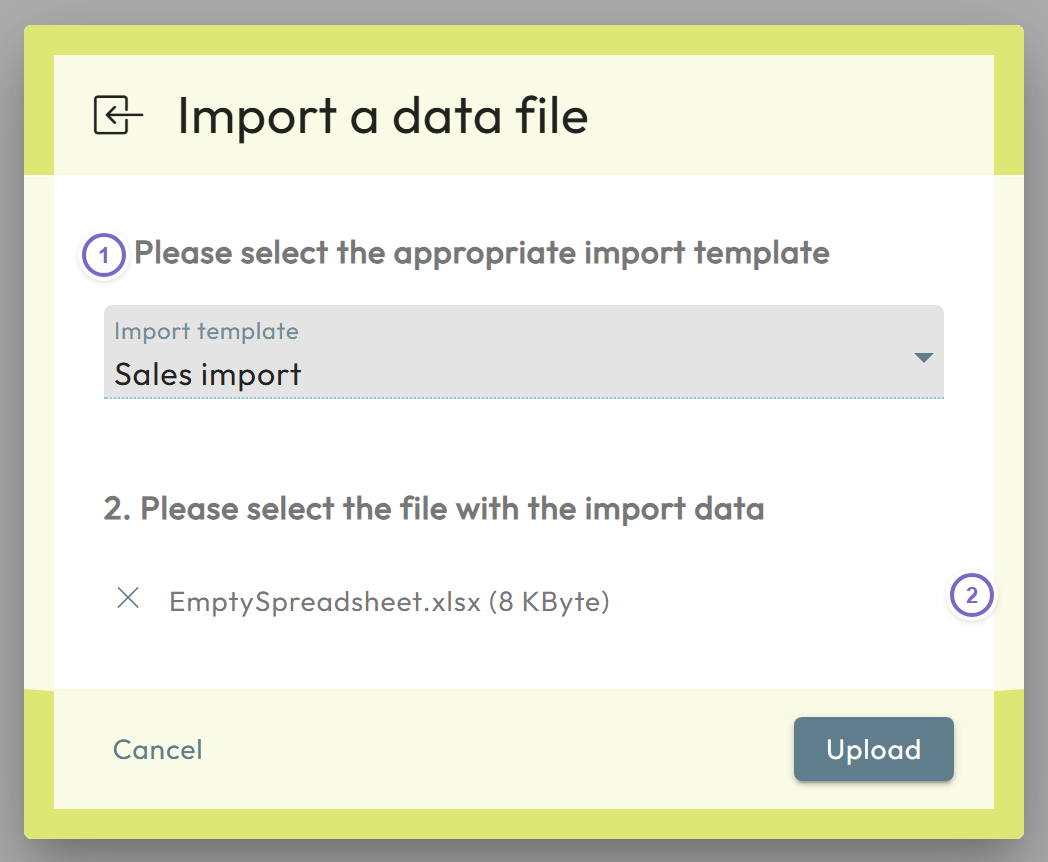
- 1 Choose the import template.
- 2 Select the data file, then upload and save.
Build an import template
The idea: take an example source file, build a model that stores the data you need, then turn a copy of that model into the import template by adding Excel logic that reads from the source file.
- Inspect the source file (
.txt,.csv, or.xlsx) to see what data it holds. - Decide which data you need — usually you discard columns you do not use.
- Create the Nooxl model that stores the data, using data label categories for the dimensions and a cell storage section (advanced mode) to lay out rows and columns. Read label names into the layout so rows/columns are labeled.
- Add the extraction logic: download the model, open it next to the source file, and
write Excel formulas in the cell-storage cells that pull values from the source (for
example a
SUMIFSacross the source sheet). Note the source file name (the string in brackets inside the formula). - Upload the import template via the model's version management → Migration / Import → Add a new import template (see Import templates), pointing the linked data file name at the source file name from step 4.
- Test the import from the Actions menu and verify the data is stored after Save and recalculation.
Dates: convert text dates into real dates in the import template (for example with
DATEVALUE), otherwise separators may be dropped and you end up with strings.
Special characters: enable UTF7 format when the source uses characters like &
or ä.
Automate imports via the automation section
An import can be one step of an automation section (JobRanges):
- Set up a job in the model as described for the automation section.
- Create a cell storage section that lets users upload the data file; in advanced mode add a value named DocId to print the uploaded file's document id next to the storage.
- Reload the model and note the document id.
- Configure the job step:
| Column | Value |
|---|---|
| Job-Name | Any suitable name for the import. |
| Job-Type | MatrixDataCopy |
| Run | 1 to run it (make the cell editable so users can decide, or drive it with a formula). |
| Parameter 1 | The name of the import template as shown in the navigation. |
| Parameter 2 | The import options as JSON, including the import template name (migrationName) and the migrationDocId from step 3. |